Access Management
In this article, you will learn how to create roles with specific permissions, and create users and assign roles or directly enable permissions for restricted dashboard access.
User Management
To minimise risks and keep your system secure, you can assign the created role(s) to your users, or even enable specific permissions for a more granular approach.
Create a user and assign a role
Follow the instructions below to create a user and assign a default or custom role(s):
- Log in to the dashboard using your credentials.
- From the product selection screen, click Settings from the top navigation pane.
- Click Access Management from the General card, and click User Managemenet.
- Click New User.
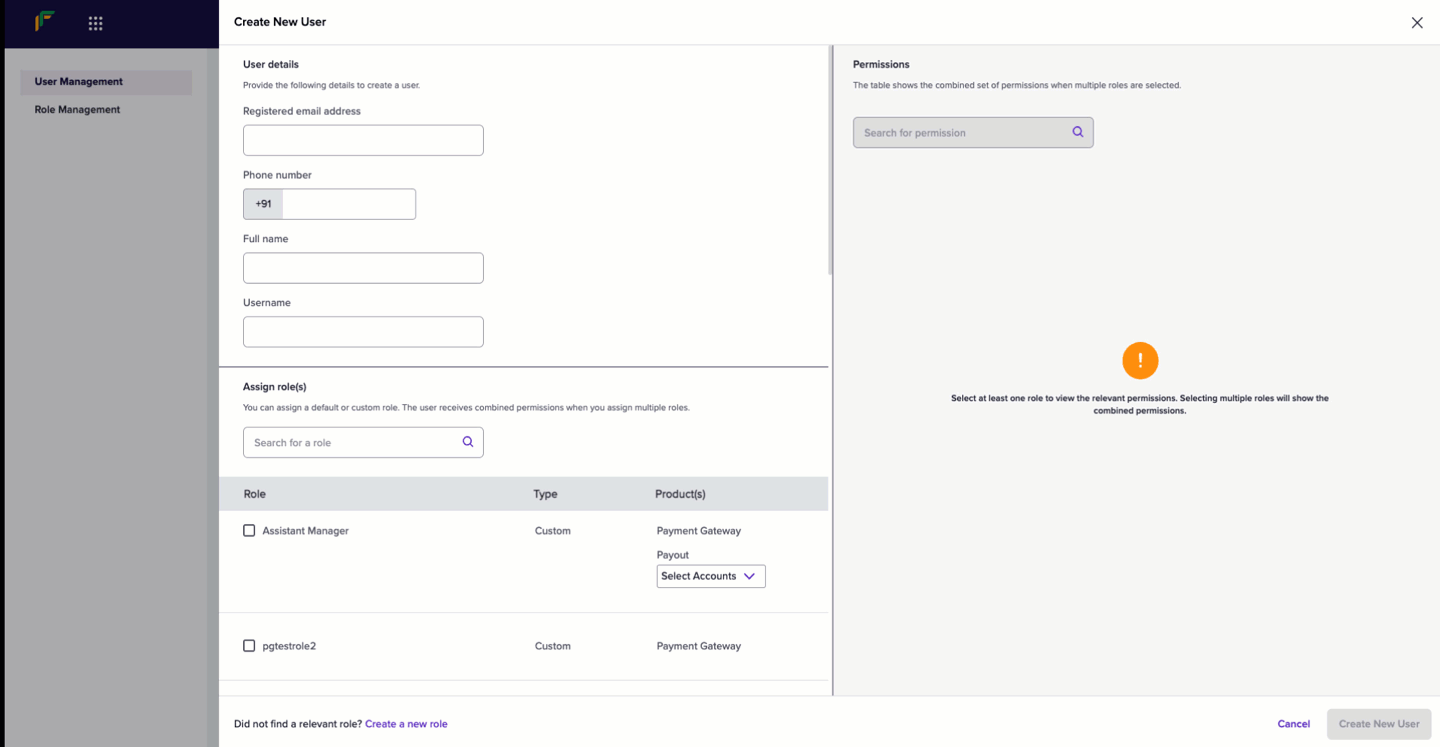
- Enter the following information in the User details section of the Create New User popup:
- Registered email address - Enter the email address of the user.
- Phone number - Enter the phone number of the user.
- Full name - Enter the full name of the user.
- Username - Enter a username for the user.
- Check the box of the role that you want to assign for the user in the Assign role(s) section. You can view the permissions enabled for the particular role in the Permissions section.
- Custom - You can create a custom role in the Role Management screen, and assign it to your users.
- Default - You can select a default role created by Cashfree Payments and assign it to your users. Find the list of default roles that are readily available for you below:
| Developer | Description |
|---|---|
| Developer | Develops and maintains integrations, access API secrets, webhooks and can access all API resources. |
| Operations | Manages daily payment processing, ensure payouts, refund payments, handle disputes and export data. |
| Manager | Manages overall business cashflow including settlements, payment methods, and reports. |
| Admin | Oversees all system functions and has access similar to account owner. |
| Support | Provides technical assistance to customers and has view only access to transactions, refunds, and transfers. |
Assign multiple roles
You can assign multiple roles for the user by checking the respective boxes of the roles. The Permissions section displays the combined permissions of the selected roles.
- Click Create New User.
- A user is created successfully. You can view the created user(s) in the User Management screen.
Create a user and enable permissions without a specific role
You can also create a user and enable specific permission without assigning a specific role. You can use this to provide temporary access to a specific dashboard without having to redefine the entire role within your organisation.
Follow the instructions below to create a user and enable permission:
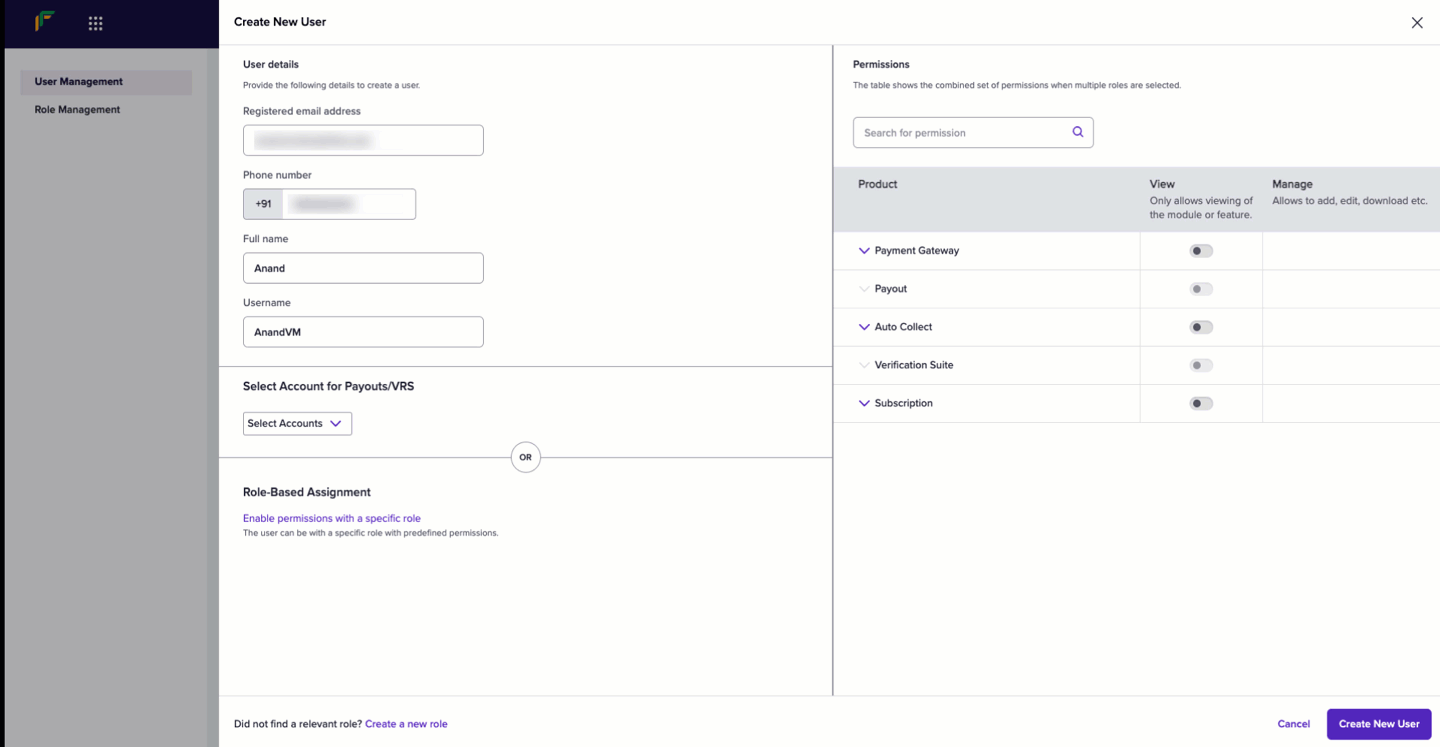
- After you enter the required information of the user in the User detail section of the Create New User popup, scroll down to see Direct Permission Assignment.
- Click Enable permissions without a specific role.
Enable permission without a specific role - Step 1
- The Select Account for Payouts/VRS dropdown appears; use it to select the account(s) that the user can access.
- Follow the instructions in the Permissions section, and click Create New User:
- Search for a permission - Use this search bar to search for a permission.
- Table
- Product - Use the dropdown to navigate through each product's features.
- View - Use the toggle to enable or disable a permission that allows to only view the module or feature.
- Manage - Use the toggle to enable or disable a permission that allows to add, edit, download etc.
- A user is created successfully. You can view the created user(s) in the User Management screen.
Enable permission without a specific role - Step 2
Manage user
Follow the instructions to manage the created user:
- The table in the User Management screen lists the created users.
- Enable/Disable - Use this toggle to enable or disable a user.
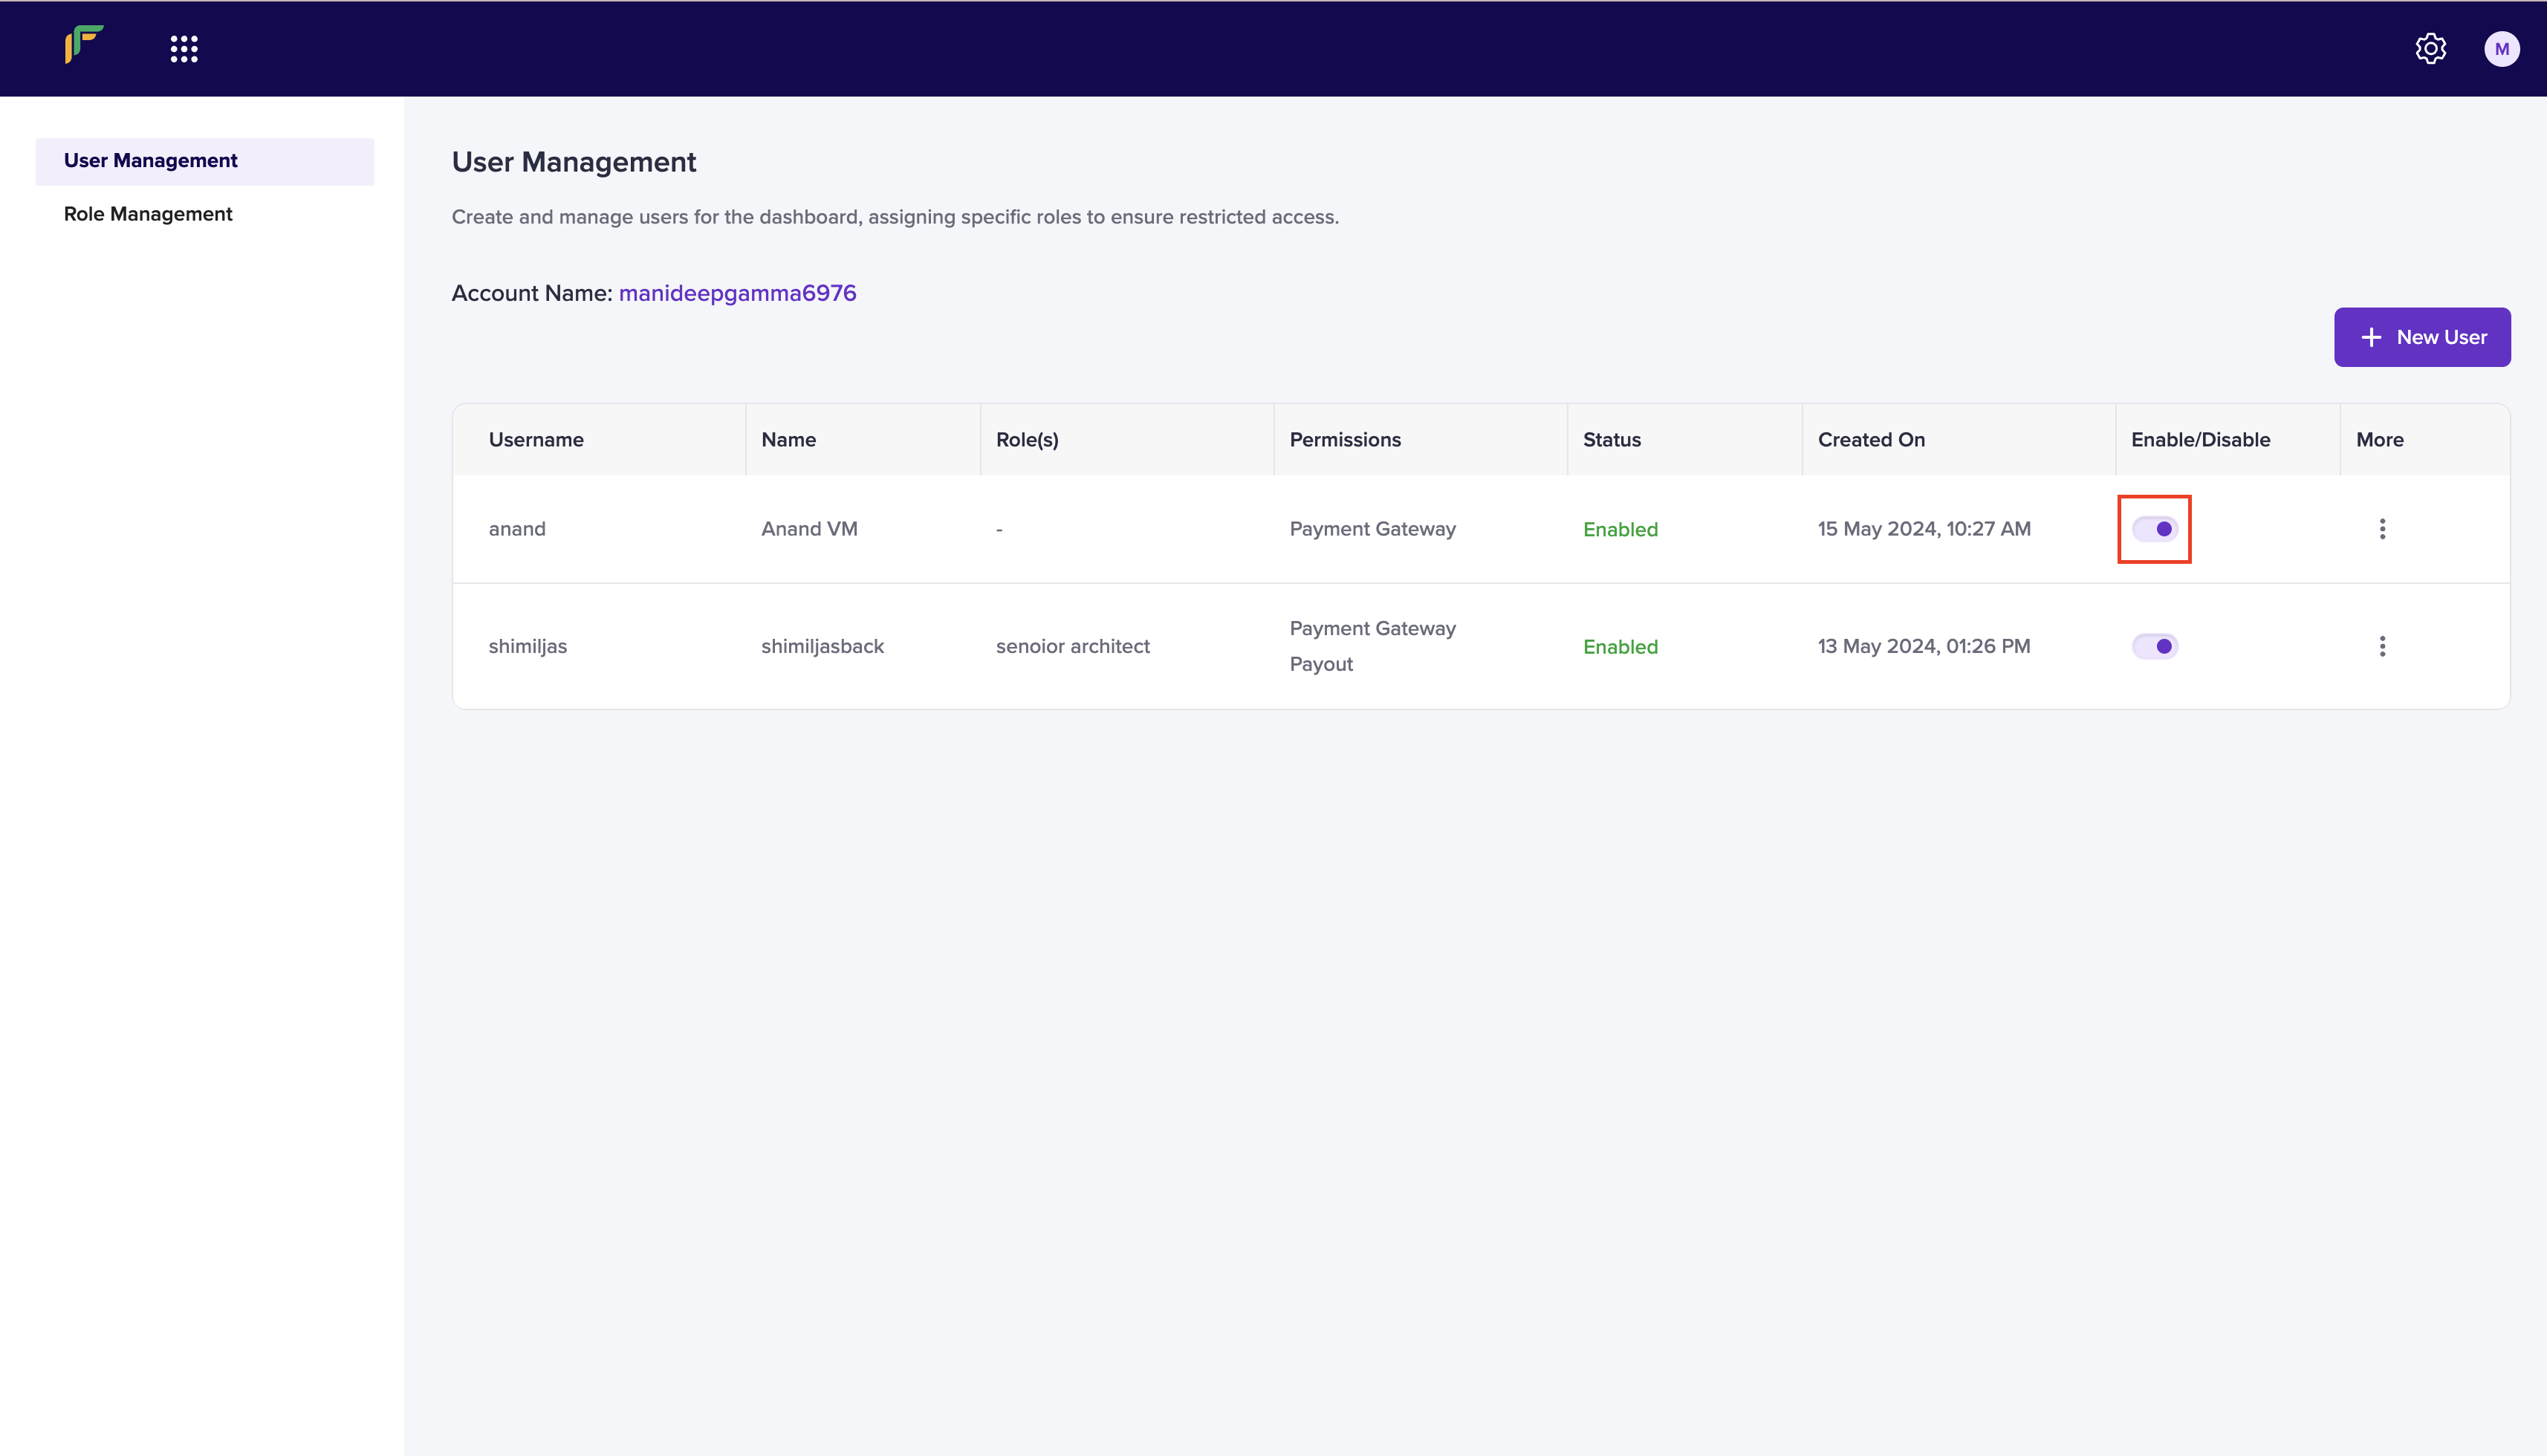
Enable/Disable
-
Click the ellipses icon of the user that you want to manage.
-
Select an option:
- View details - It allows you to view the user details.
- Edit details - It allows you to edit the user details in the Update Details popup. Click Update User when done.
- Reset password - It allows you to reset the password for the user. Enter the following information in the Reset Password popup:
- New Password - Enter the new password in the field.
- Auto generate password - Check this box if you want the system to generate a password for the user.
- Send password - Check this box to send the password to the user's email address.
- Delete - It allows you to delete the user.
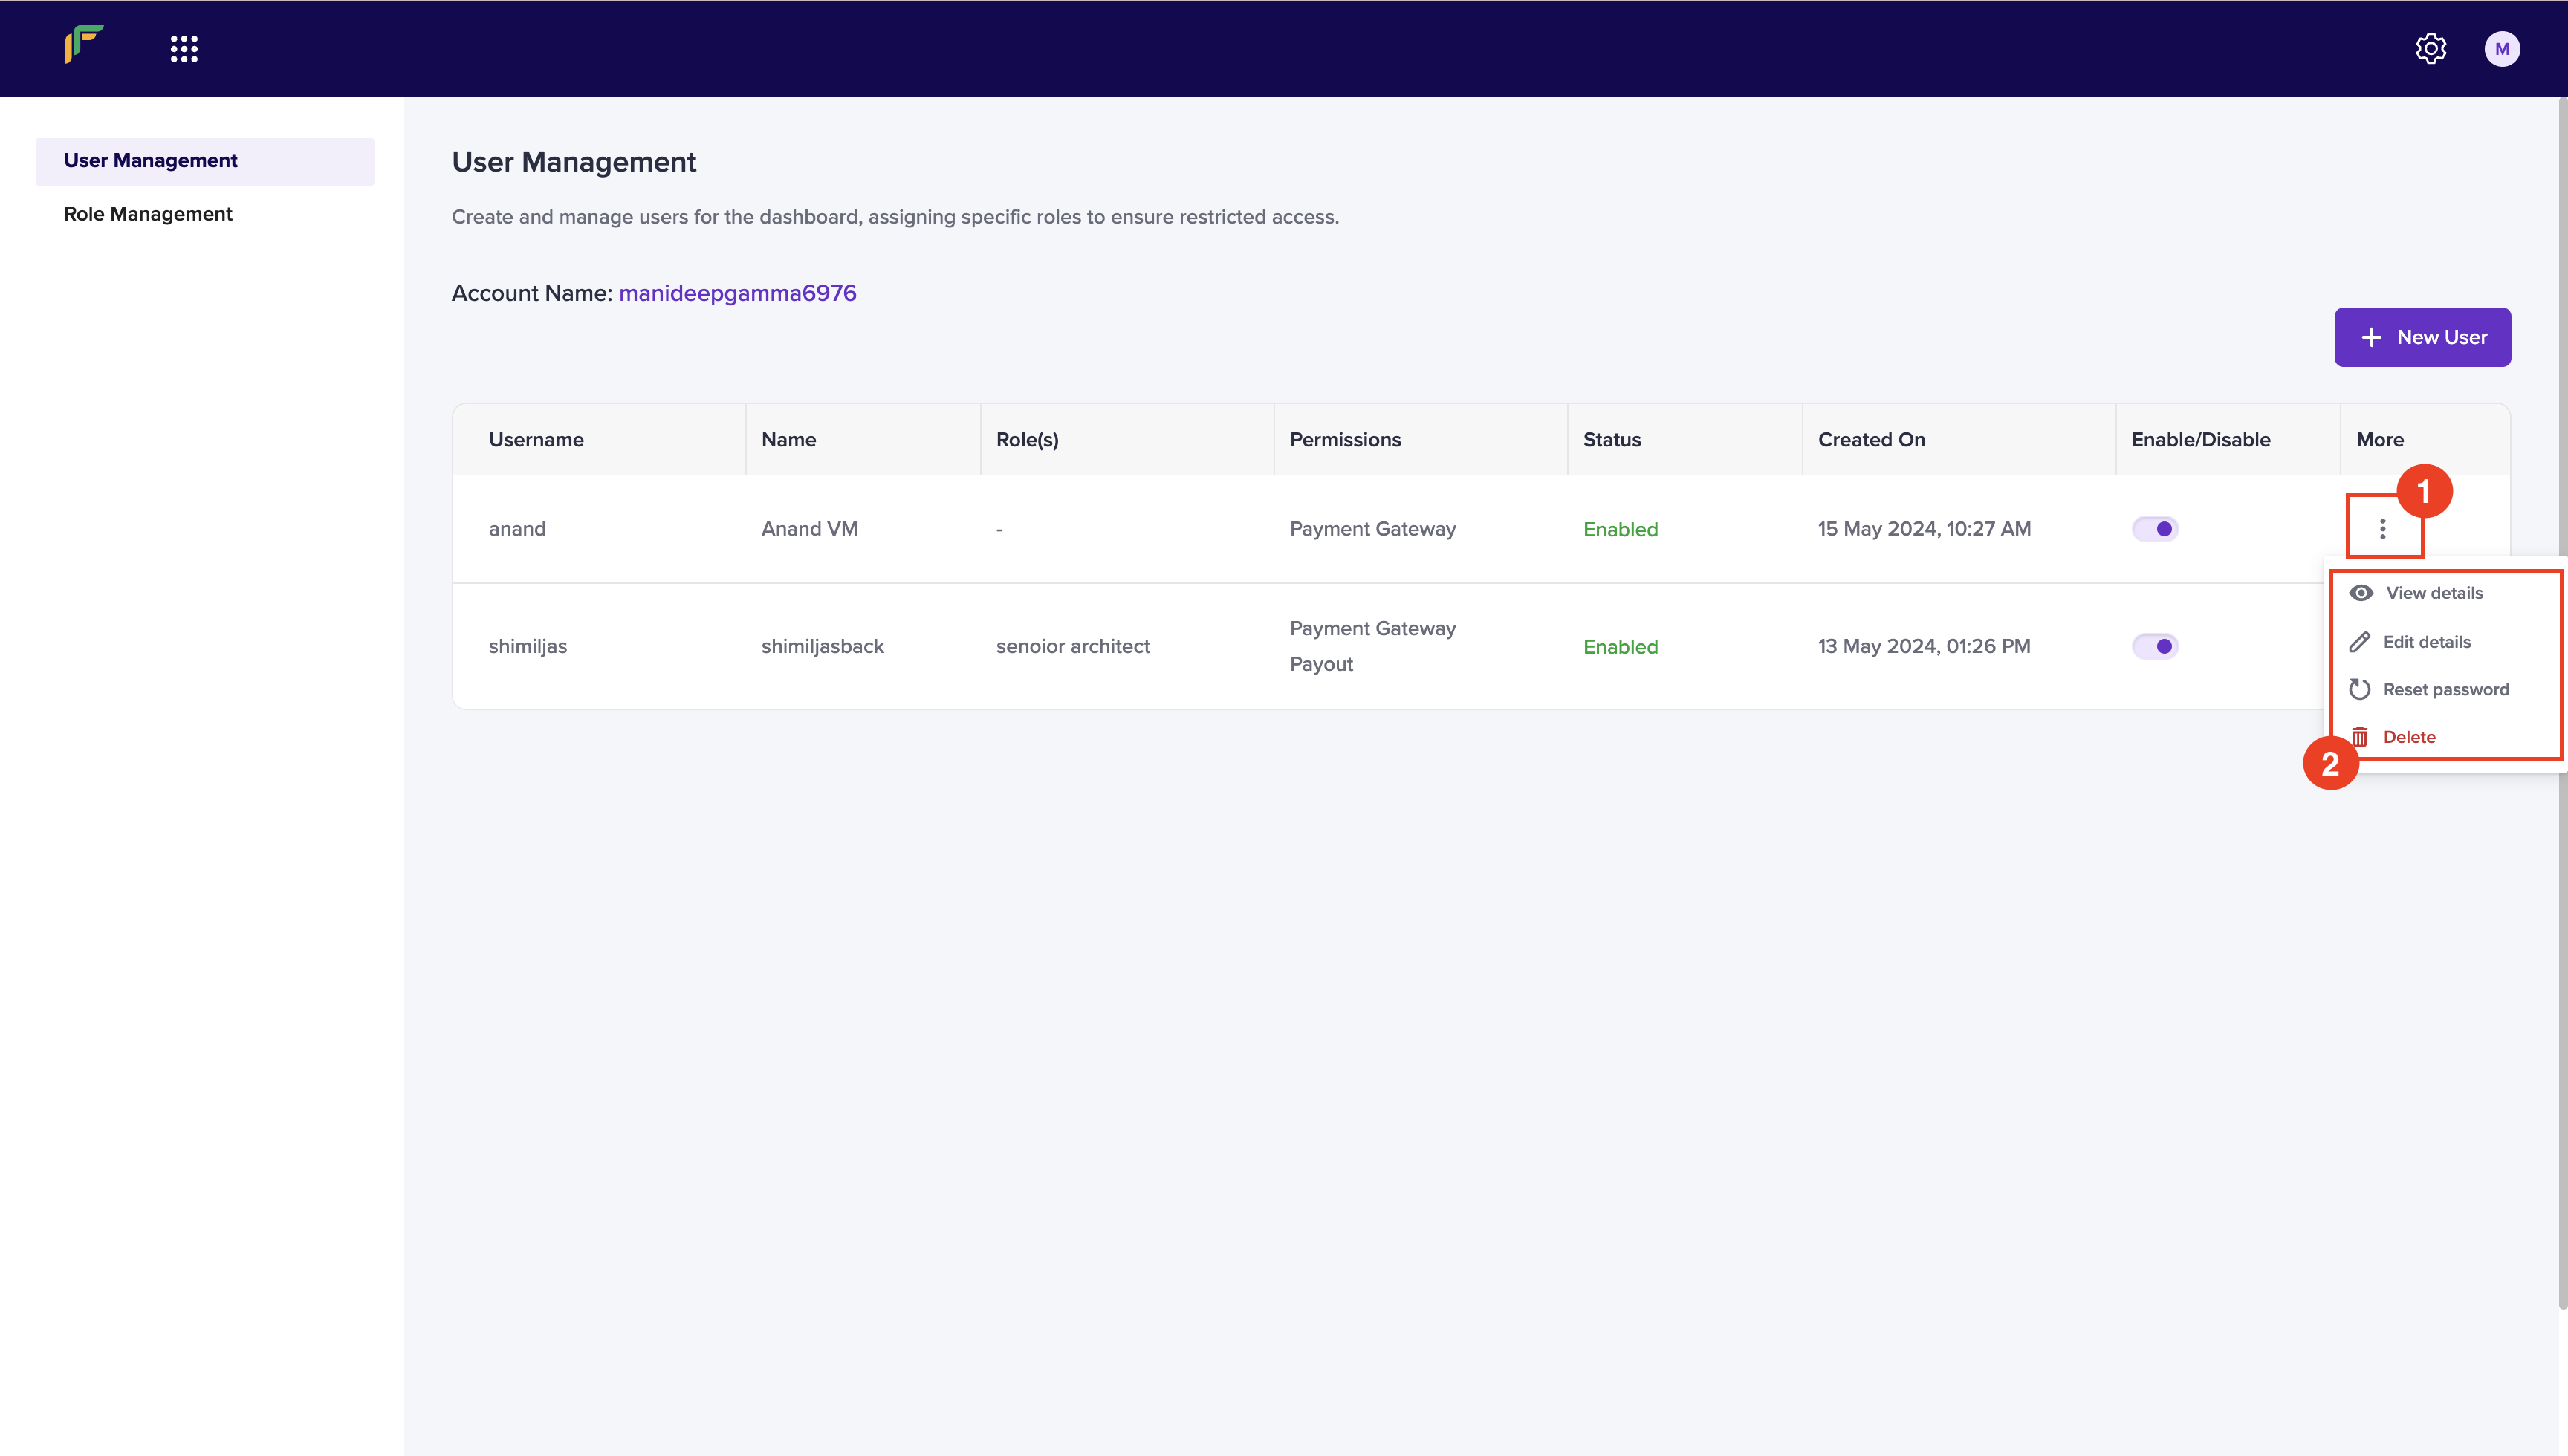
Manage User
Role Management
This dashboard feature allows you to create and define the access levels and permissions for different roles within the system. The cornerstone of this system is its enhanced flexibility and control through the creation of different roles with specific permissions for each role.
Create role
You can now create roles tailored to the exact needs of your team members. For example, you can create a role for a user that allows only to view Payment Gateway's orders and nothing beyond that.
Follow the instructions below to create a role:
- Log in to the dashboard using your credentials.
- From the product selection screen, click Settings from the top navigation pane.
- Click Access Management from the General card, and click Role Management.
- Click New Role.
- Enter the following information in the Create New Role popup, and click Create New Role:
- Role - Enter the name of the role in this field.
- Description - Enter the description for the role.
- Search for a permission - Use this search bar to search for a permission.
- Table
- Product - Use the dropdown to navigate through each product's features.
- View - Use the toggle to enable or disable a permission that allows to only view the module or feature.
- Manage - Use the toggle to enable or disable a permission that allows to add, edit, download etc.
- A role is successfully created. You can view the created role(s) in the Role Management screen.
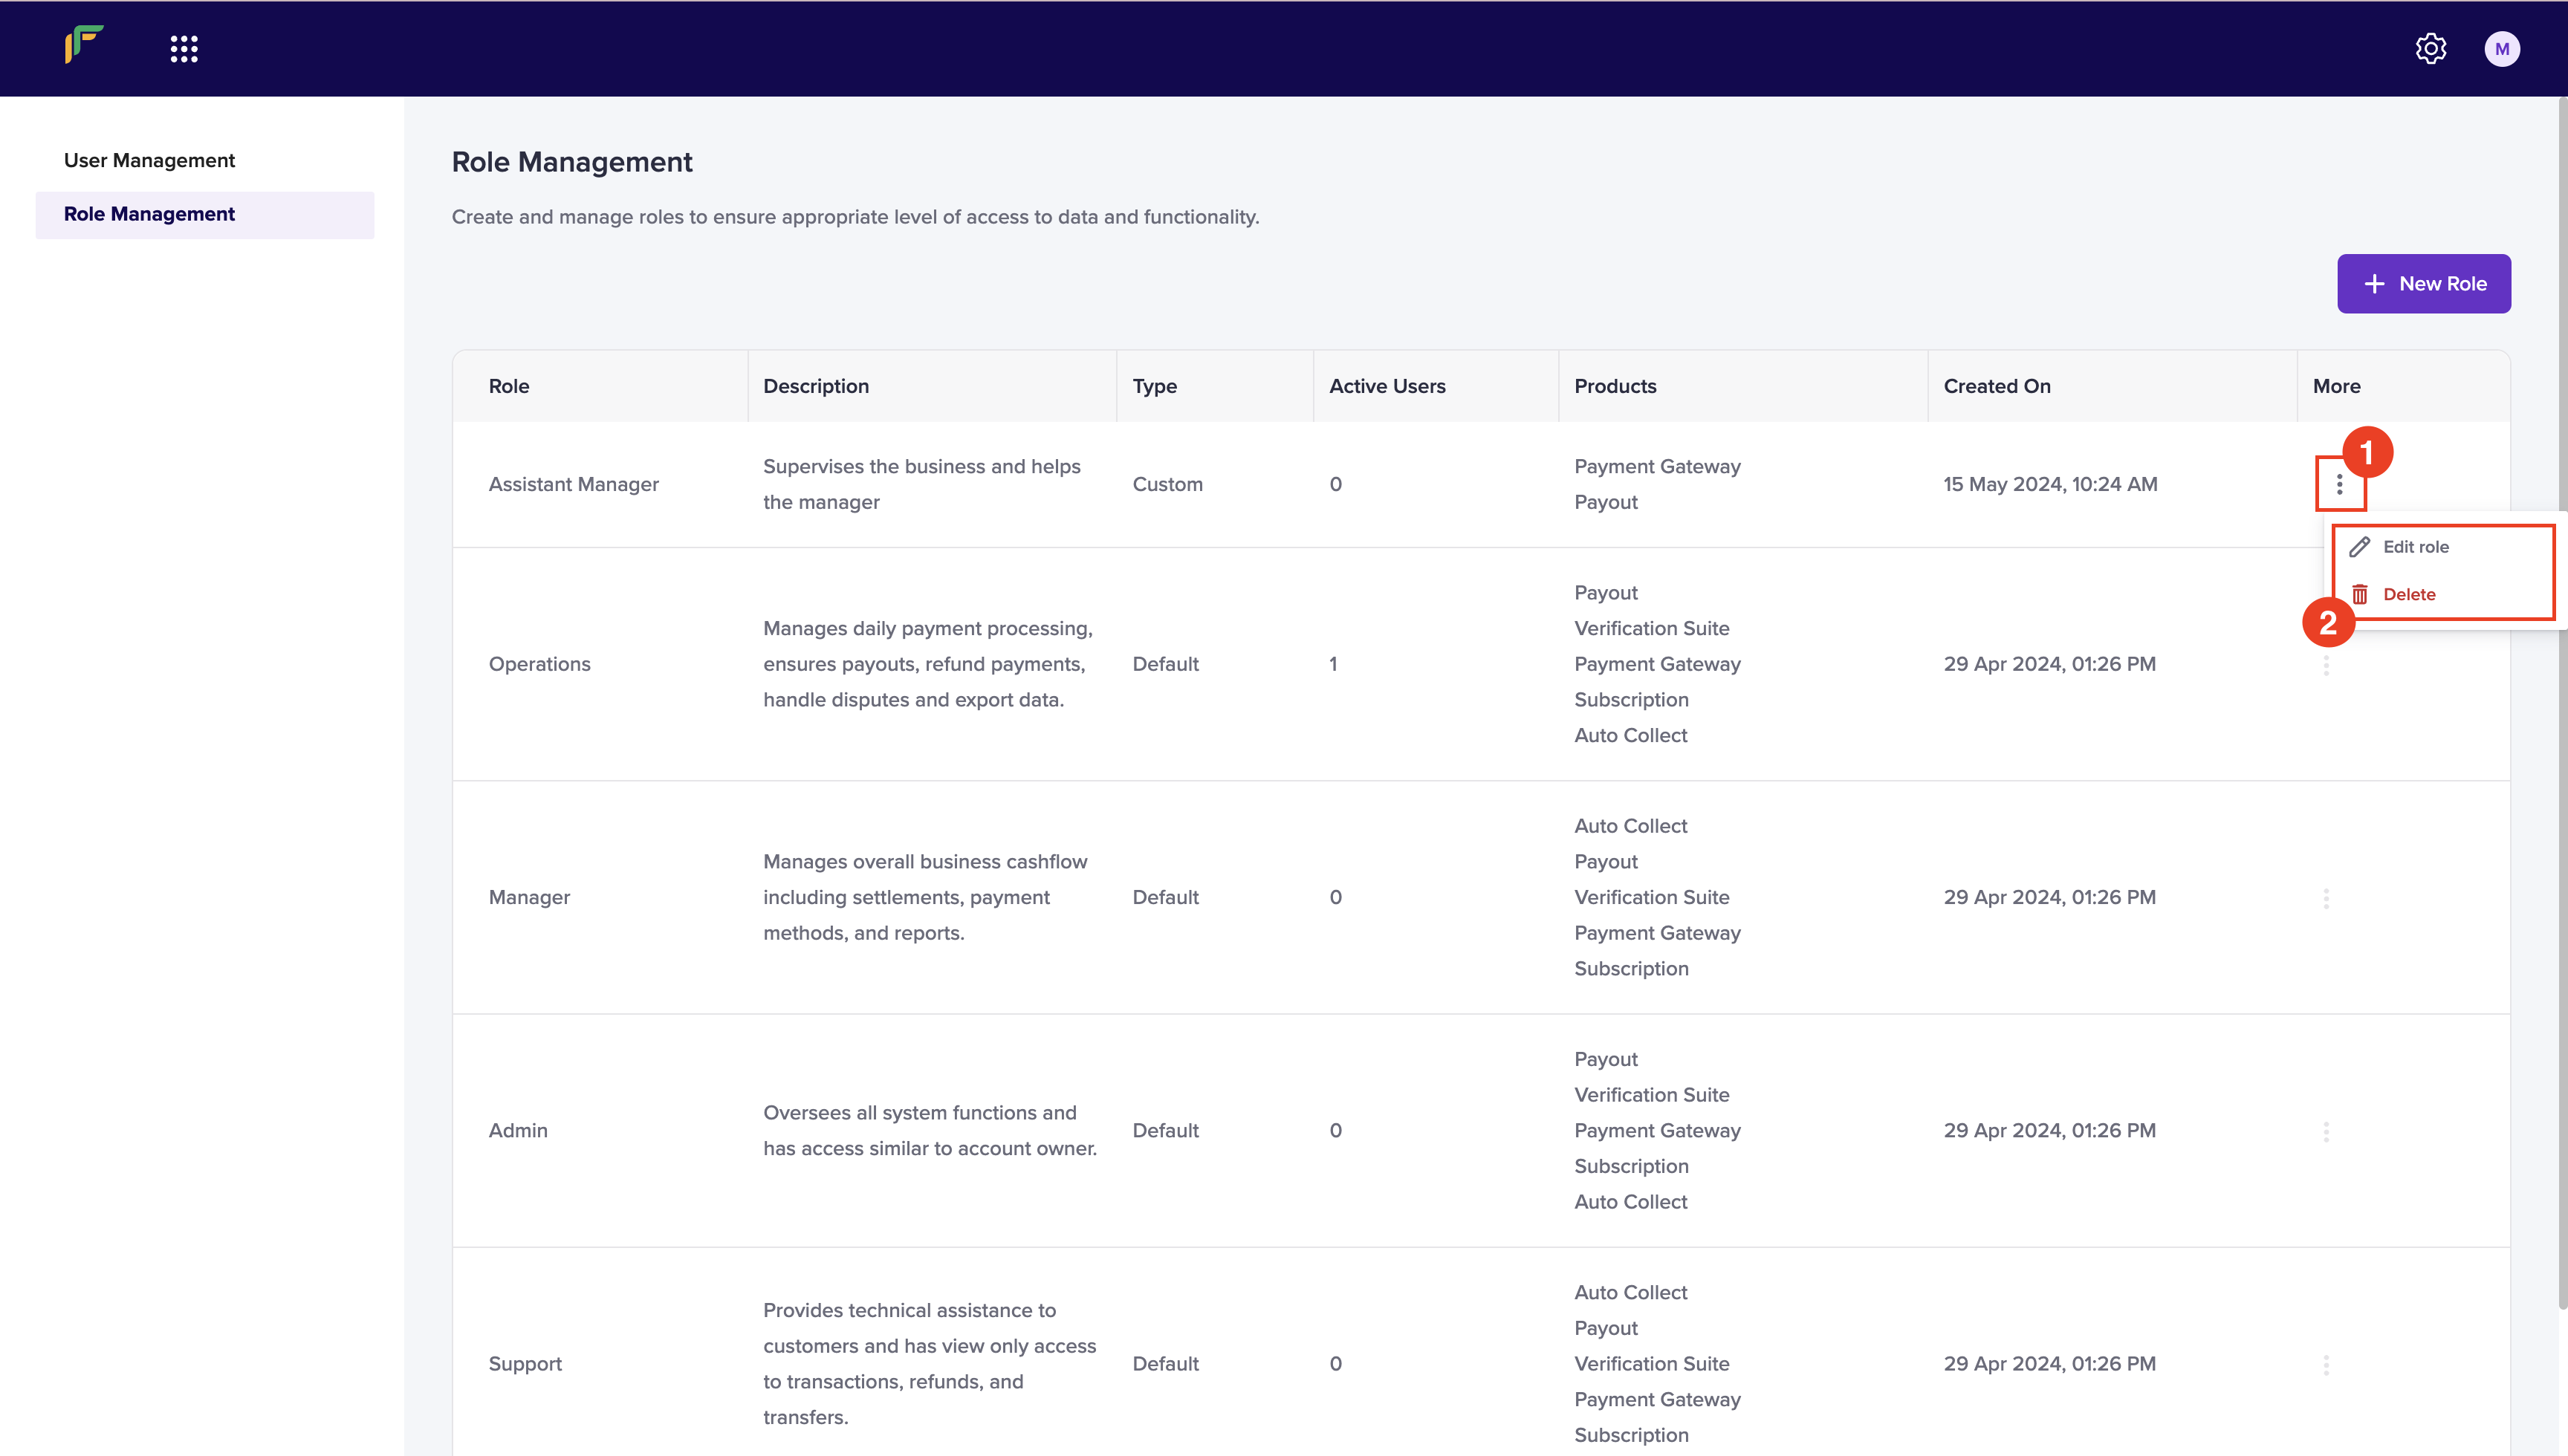
Manage role
To maintain security and proper governance, we allows you to manage the created roles. Follow the instructions below to manage:
- From the Role Management screen, click the ellipses icon of the role.
- A dropdown box appears with the following options:
- Edit role - It allows you to edit the role. Click Edit Role > update the details > and click Update Role.
- Delete - It allows you to delete the role.
WHAT’S NEXT
Tell your users what they should do after they've finished this page
Updated 4 months ago