Creating Payment Links
In this chapter, you will learn how to create a payment link from the Dashboard, Batch Upload or via API.
To create a payment link you need first add your product and customer details. You can then share the payment link via SMS, email, Whatsapp or any other platform. You can also set auto-reminders to receive the payment.
Creating Payment Link from the Dashboard
The GIF below shows how to create a payment link from the dashboard, the steps are mentioned below.
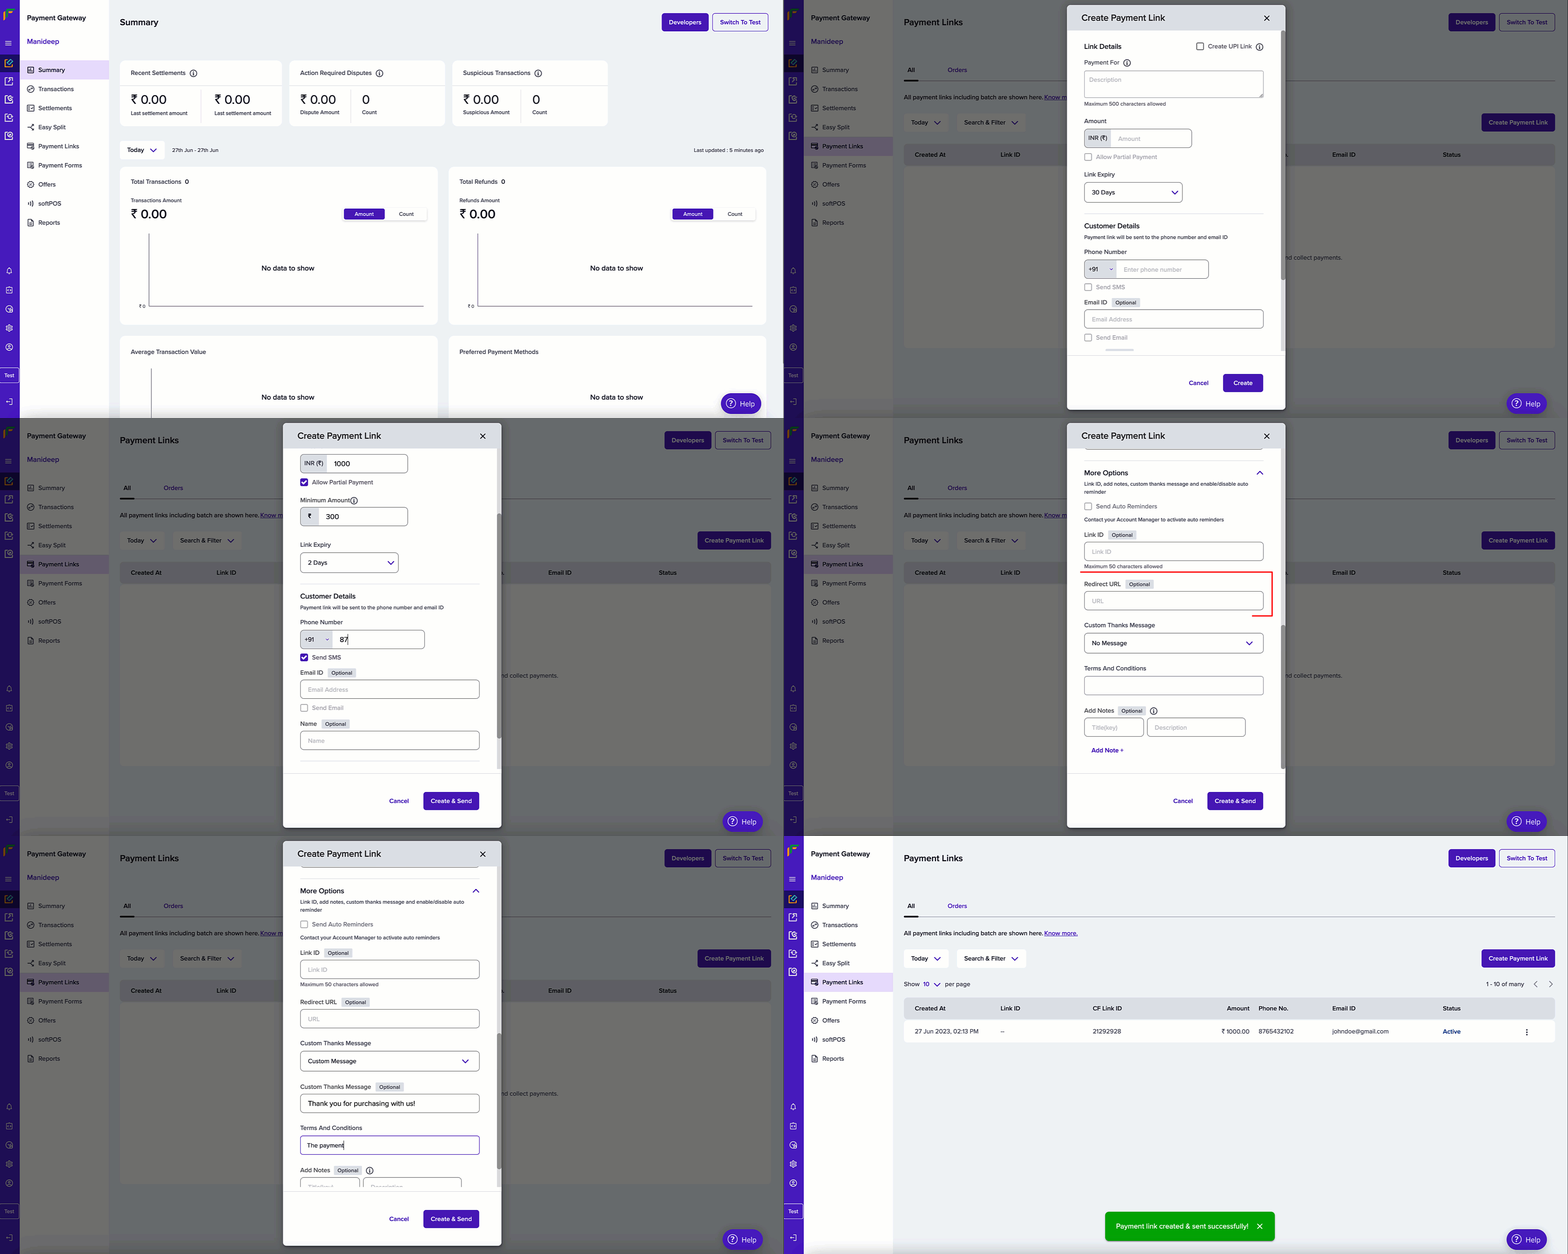
To create a Payment Link from the Dashboard,
- Go to Payment Gateway Dashboard > Payment Links > click Create Payment Link.
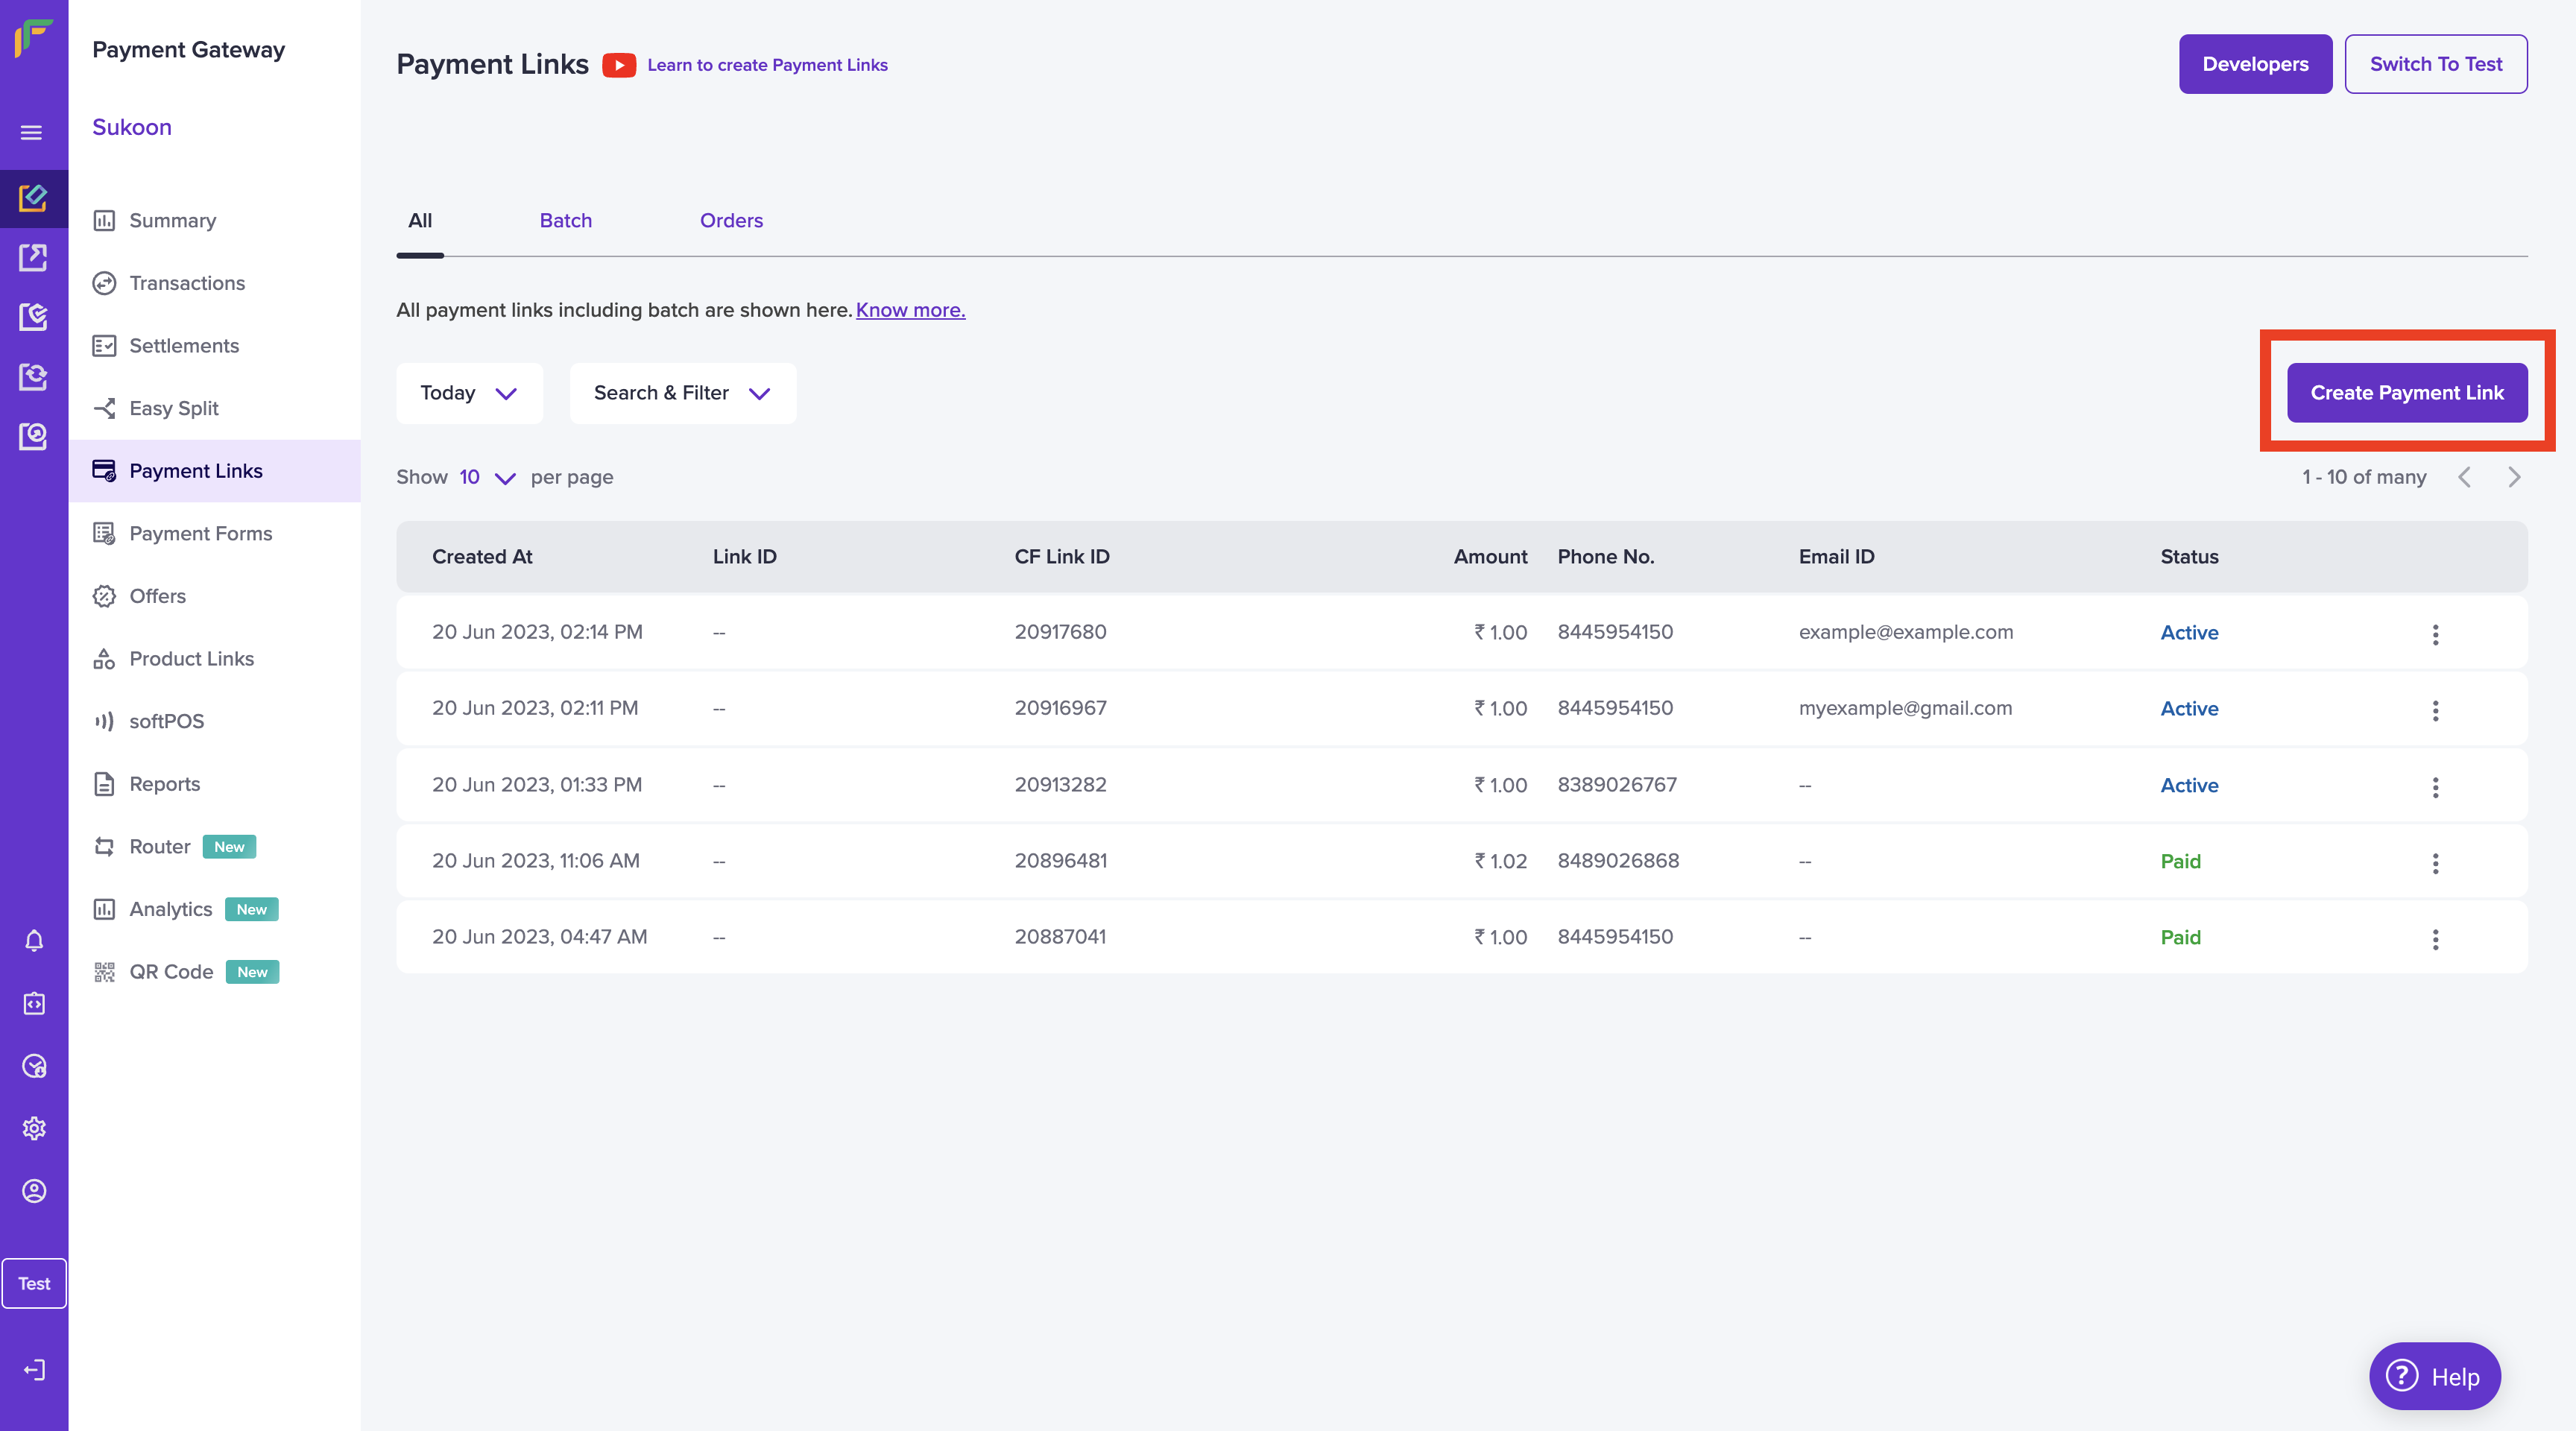
Create Payment Link Step 1
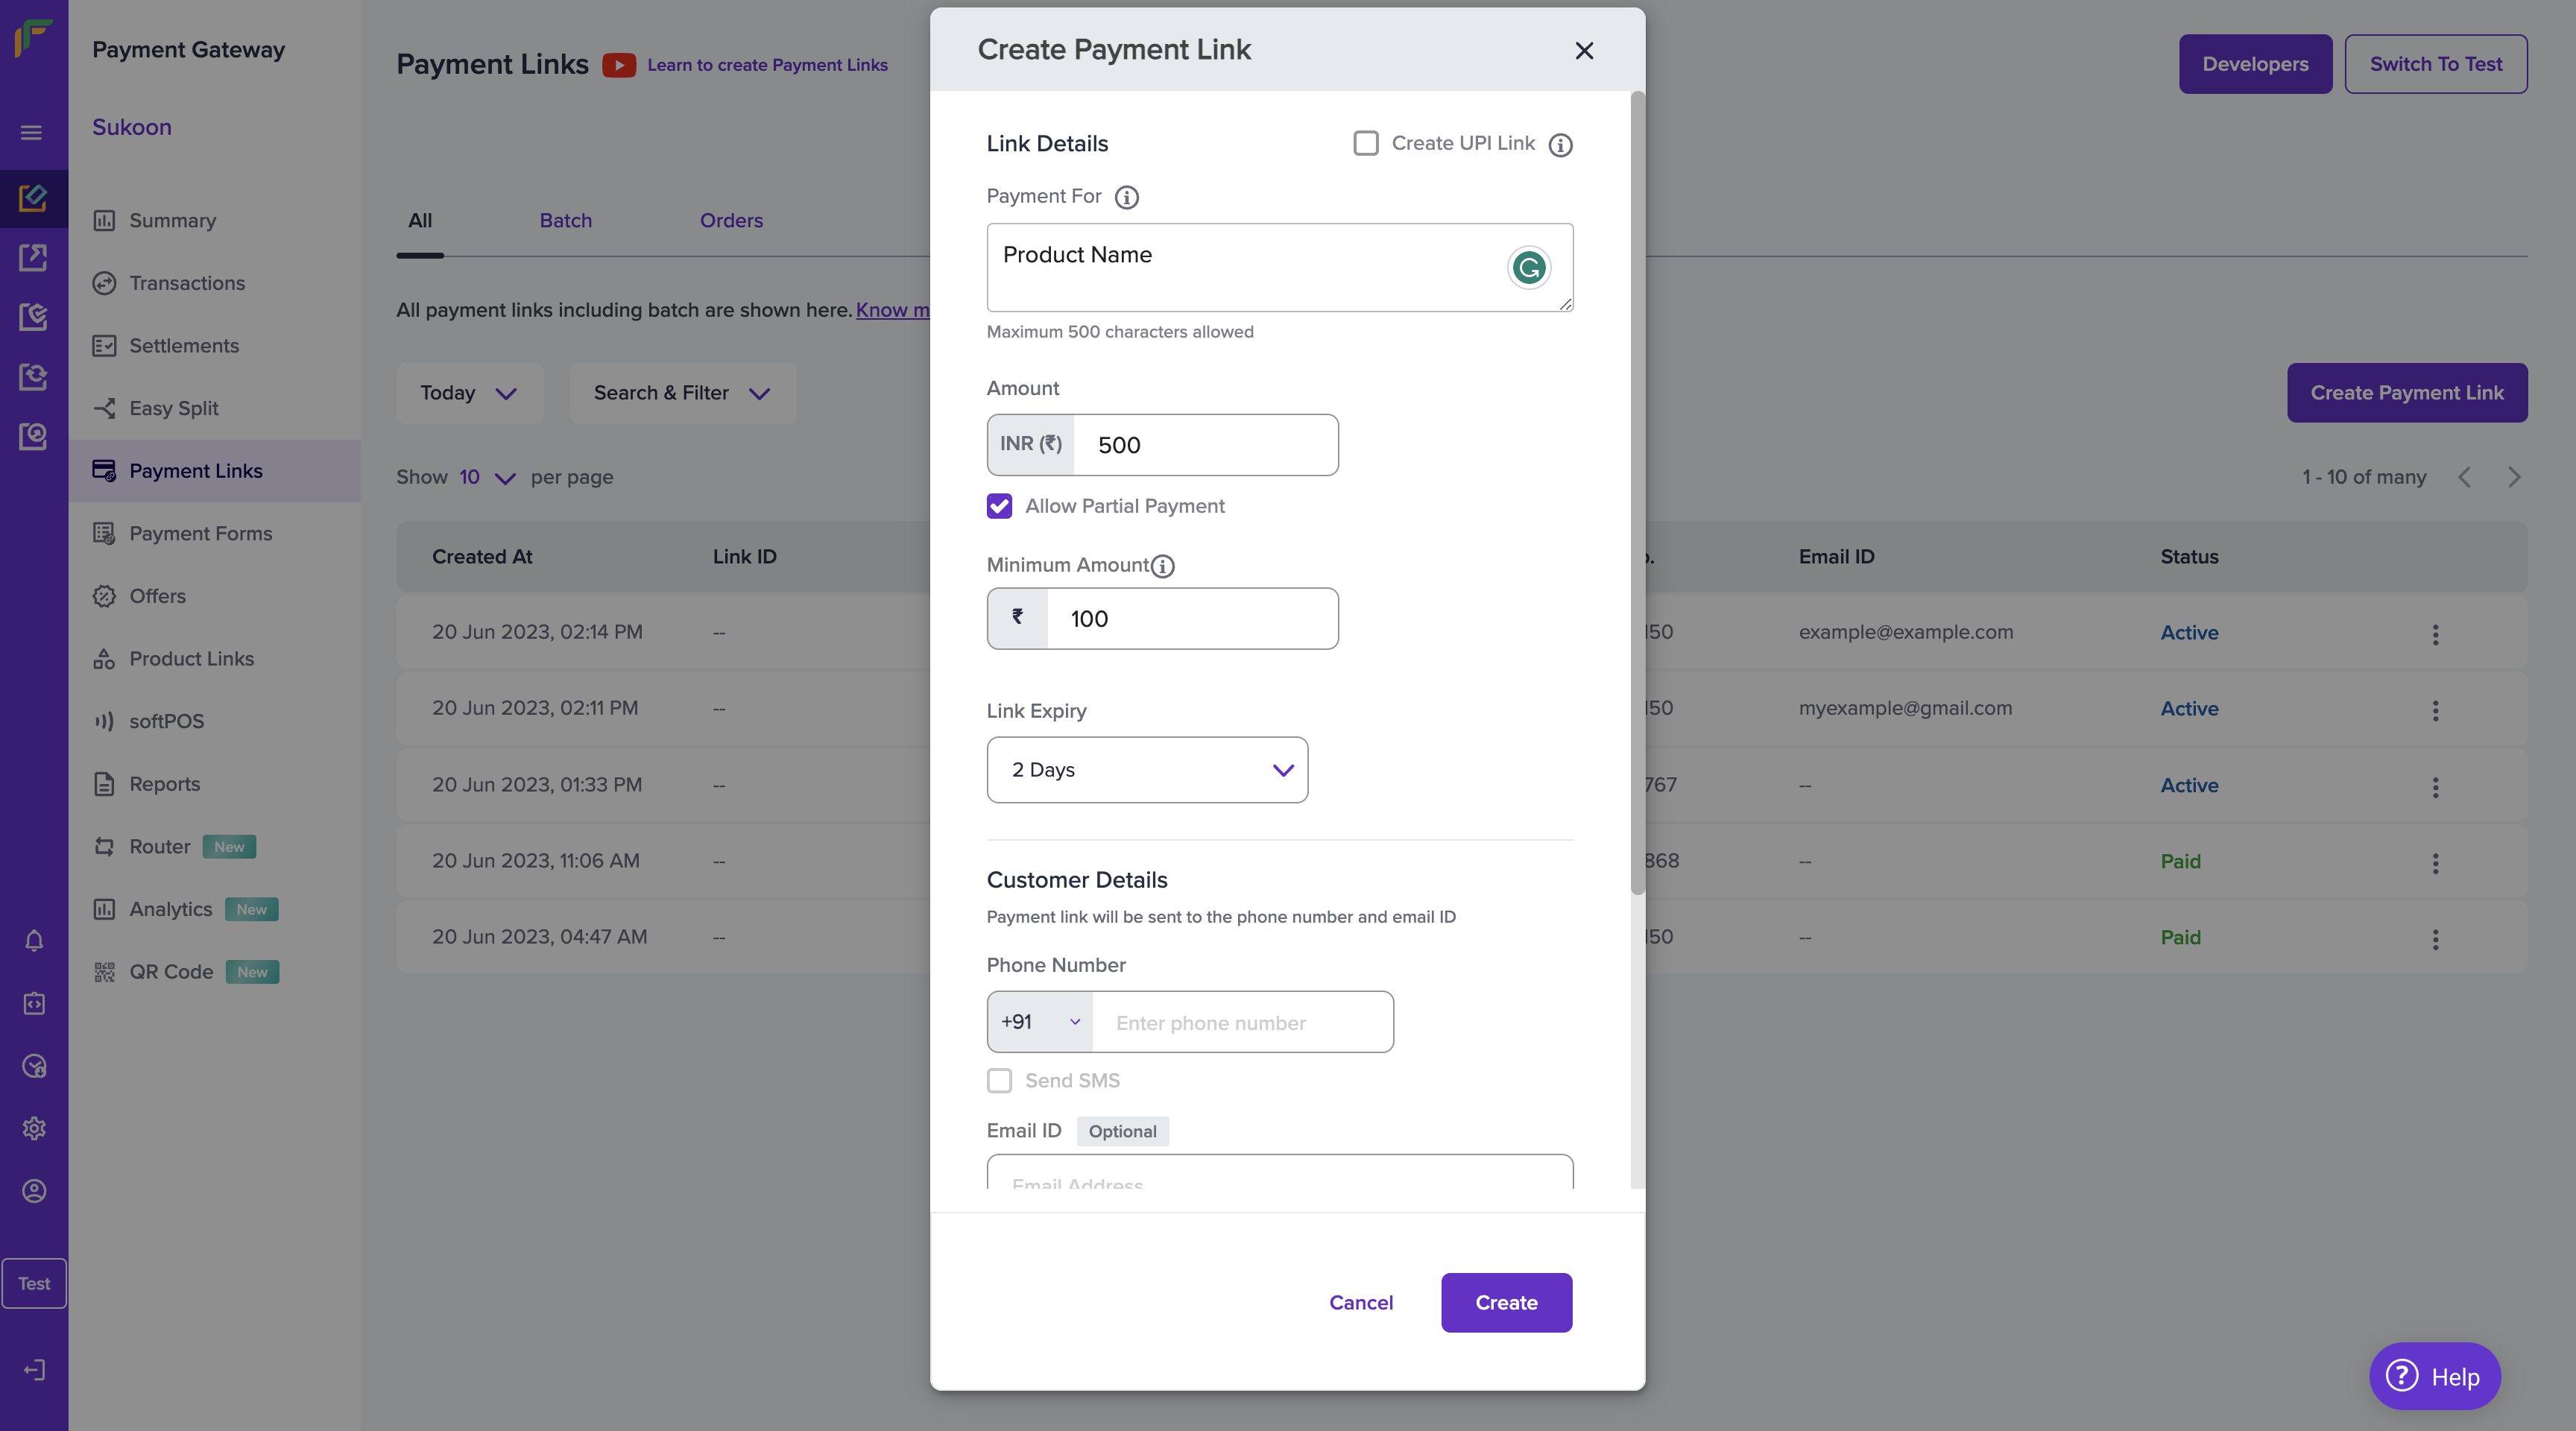
- From the Create Payment Link pop-up window provide the link details and customer details.
Link Details -- Payment For - Mention the reason for the payment. This information is shown to your customer during the payment.
- Amount - Amount to be collected.
- Allow Partial Payment - Select this option if you want to allow your customers to pay a partial amount up front. Enter the minimum amount for the payment and the link expiry value. The link will be kept active based on this value.
- Create UPI Link - Select this option if you wish to send this link to your customers and accept payments via API.
Create Payment Link Step 2
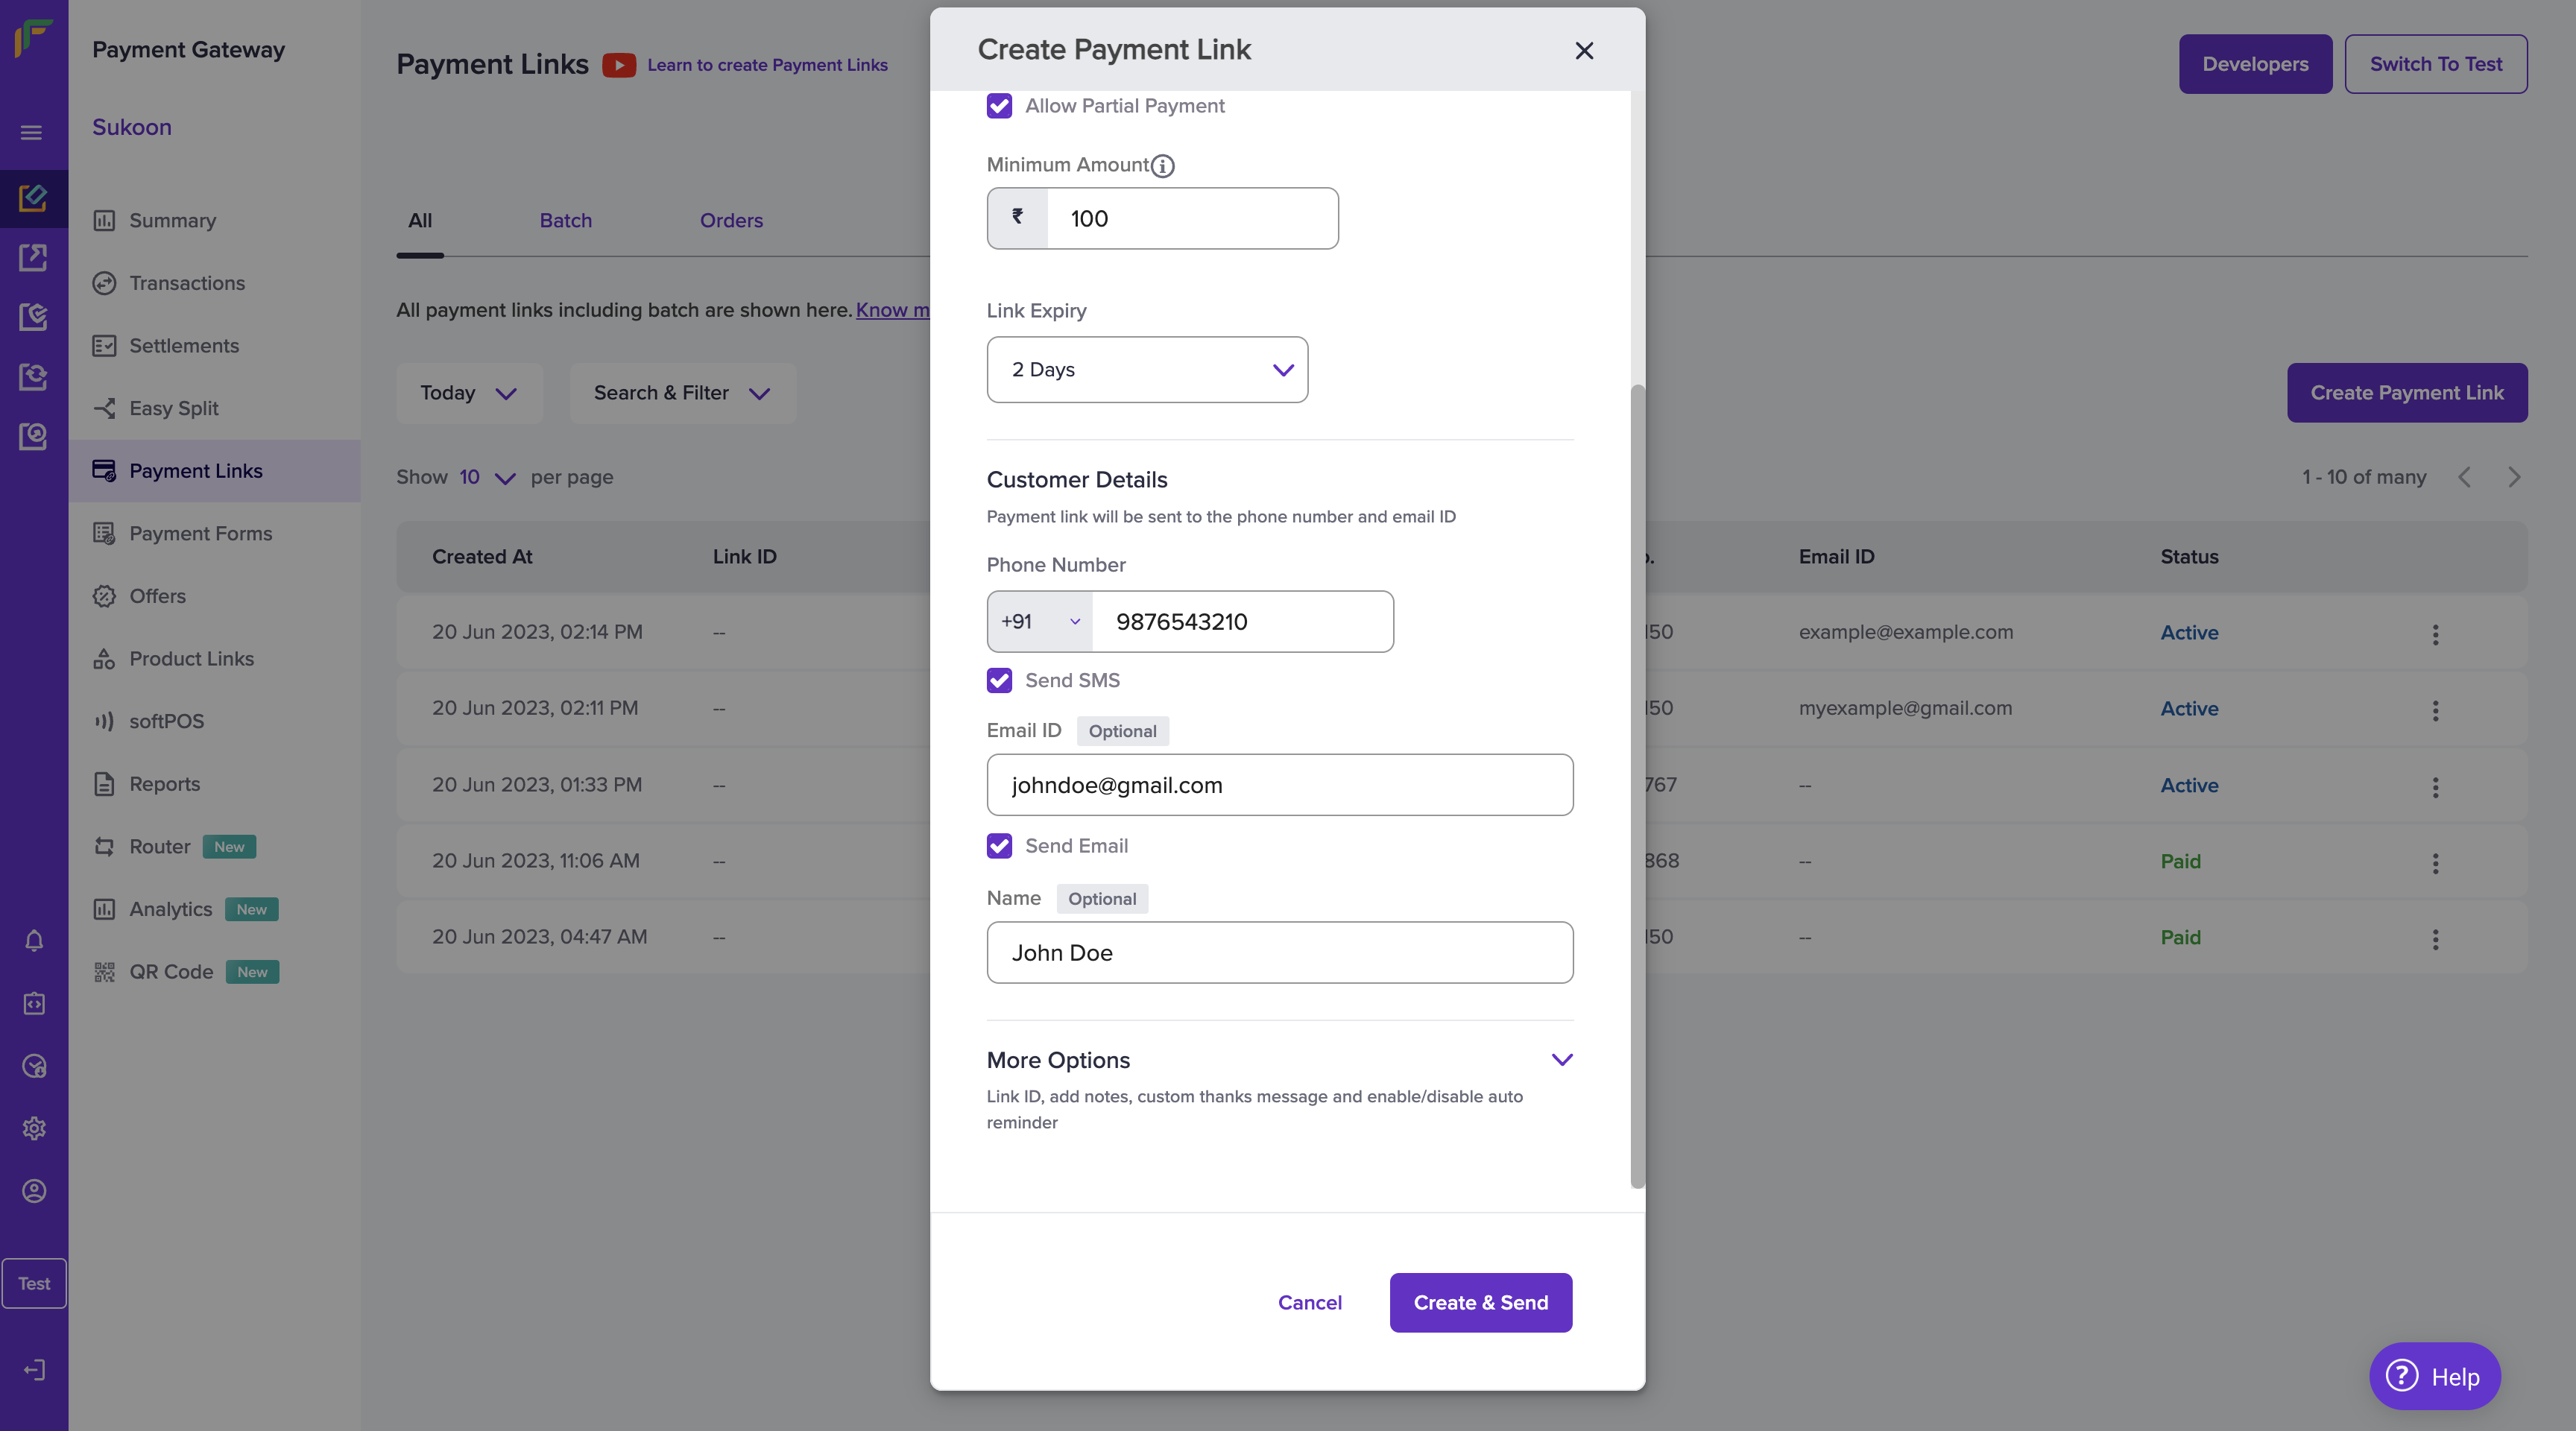
- Customer Details - Provide the customer details. They are mentioned below:
- Phone Numer - Customer's phone number. Choose the Send SMS option if you wish you notify your customer through SMS.
- Email ID - Customer's email ID. Choose the Send Email option if you wish you notify your customer through Email.
- Name - Name of your customer.
Create Payment Link Step 3
- More Options
- Select the option Send Auto Reminders to send payment reminders automatically to your customers. Contact your Account Manager to activate auto reminders. Click here to know more.
- You can add the Link ID and additional description for your reference. This will not be visible to your customers.
- Redirect URL - provide the URL to which your customer's will be redirected after completing the payment.
- Configure the Custom Thanks Message. You can either choose from the available messages or create a custom message.
- Add a note if required. Click Create & Send to send the payment link to your customer.
- Click Create & Send to send the payment link to your customer.
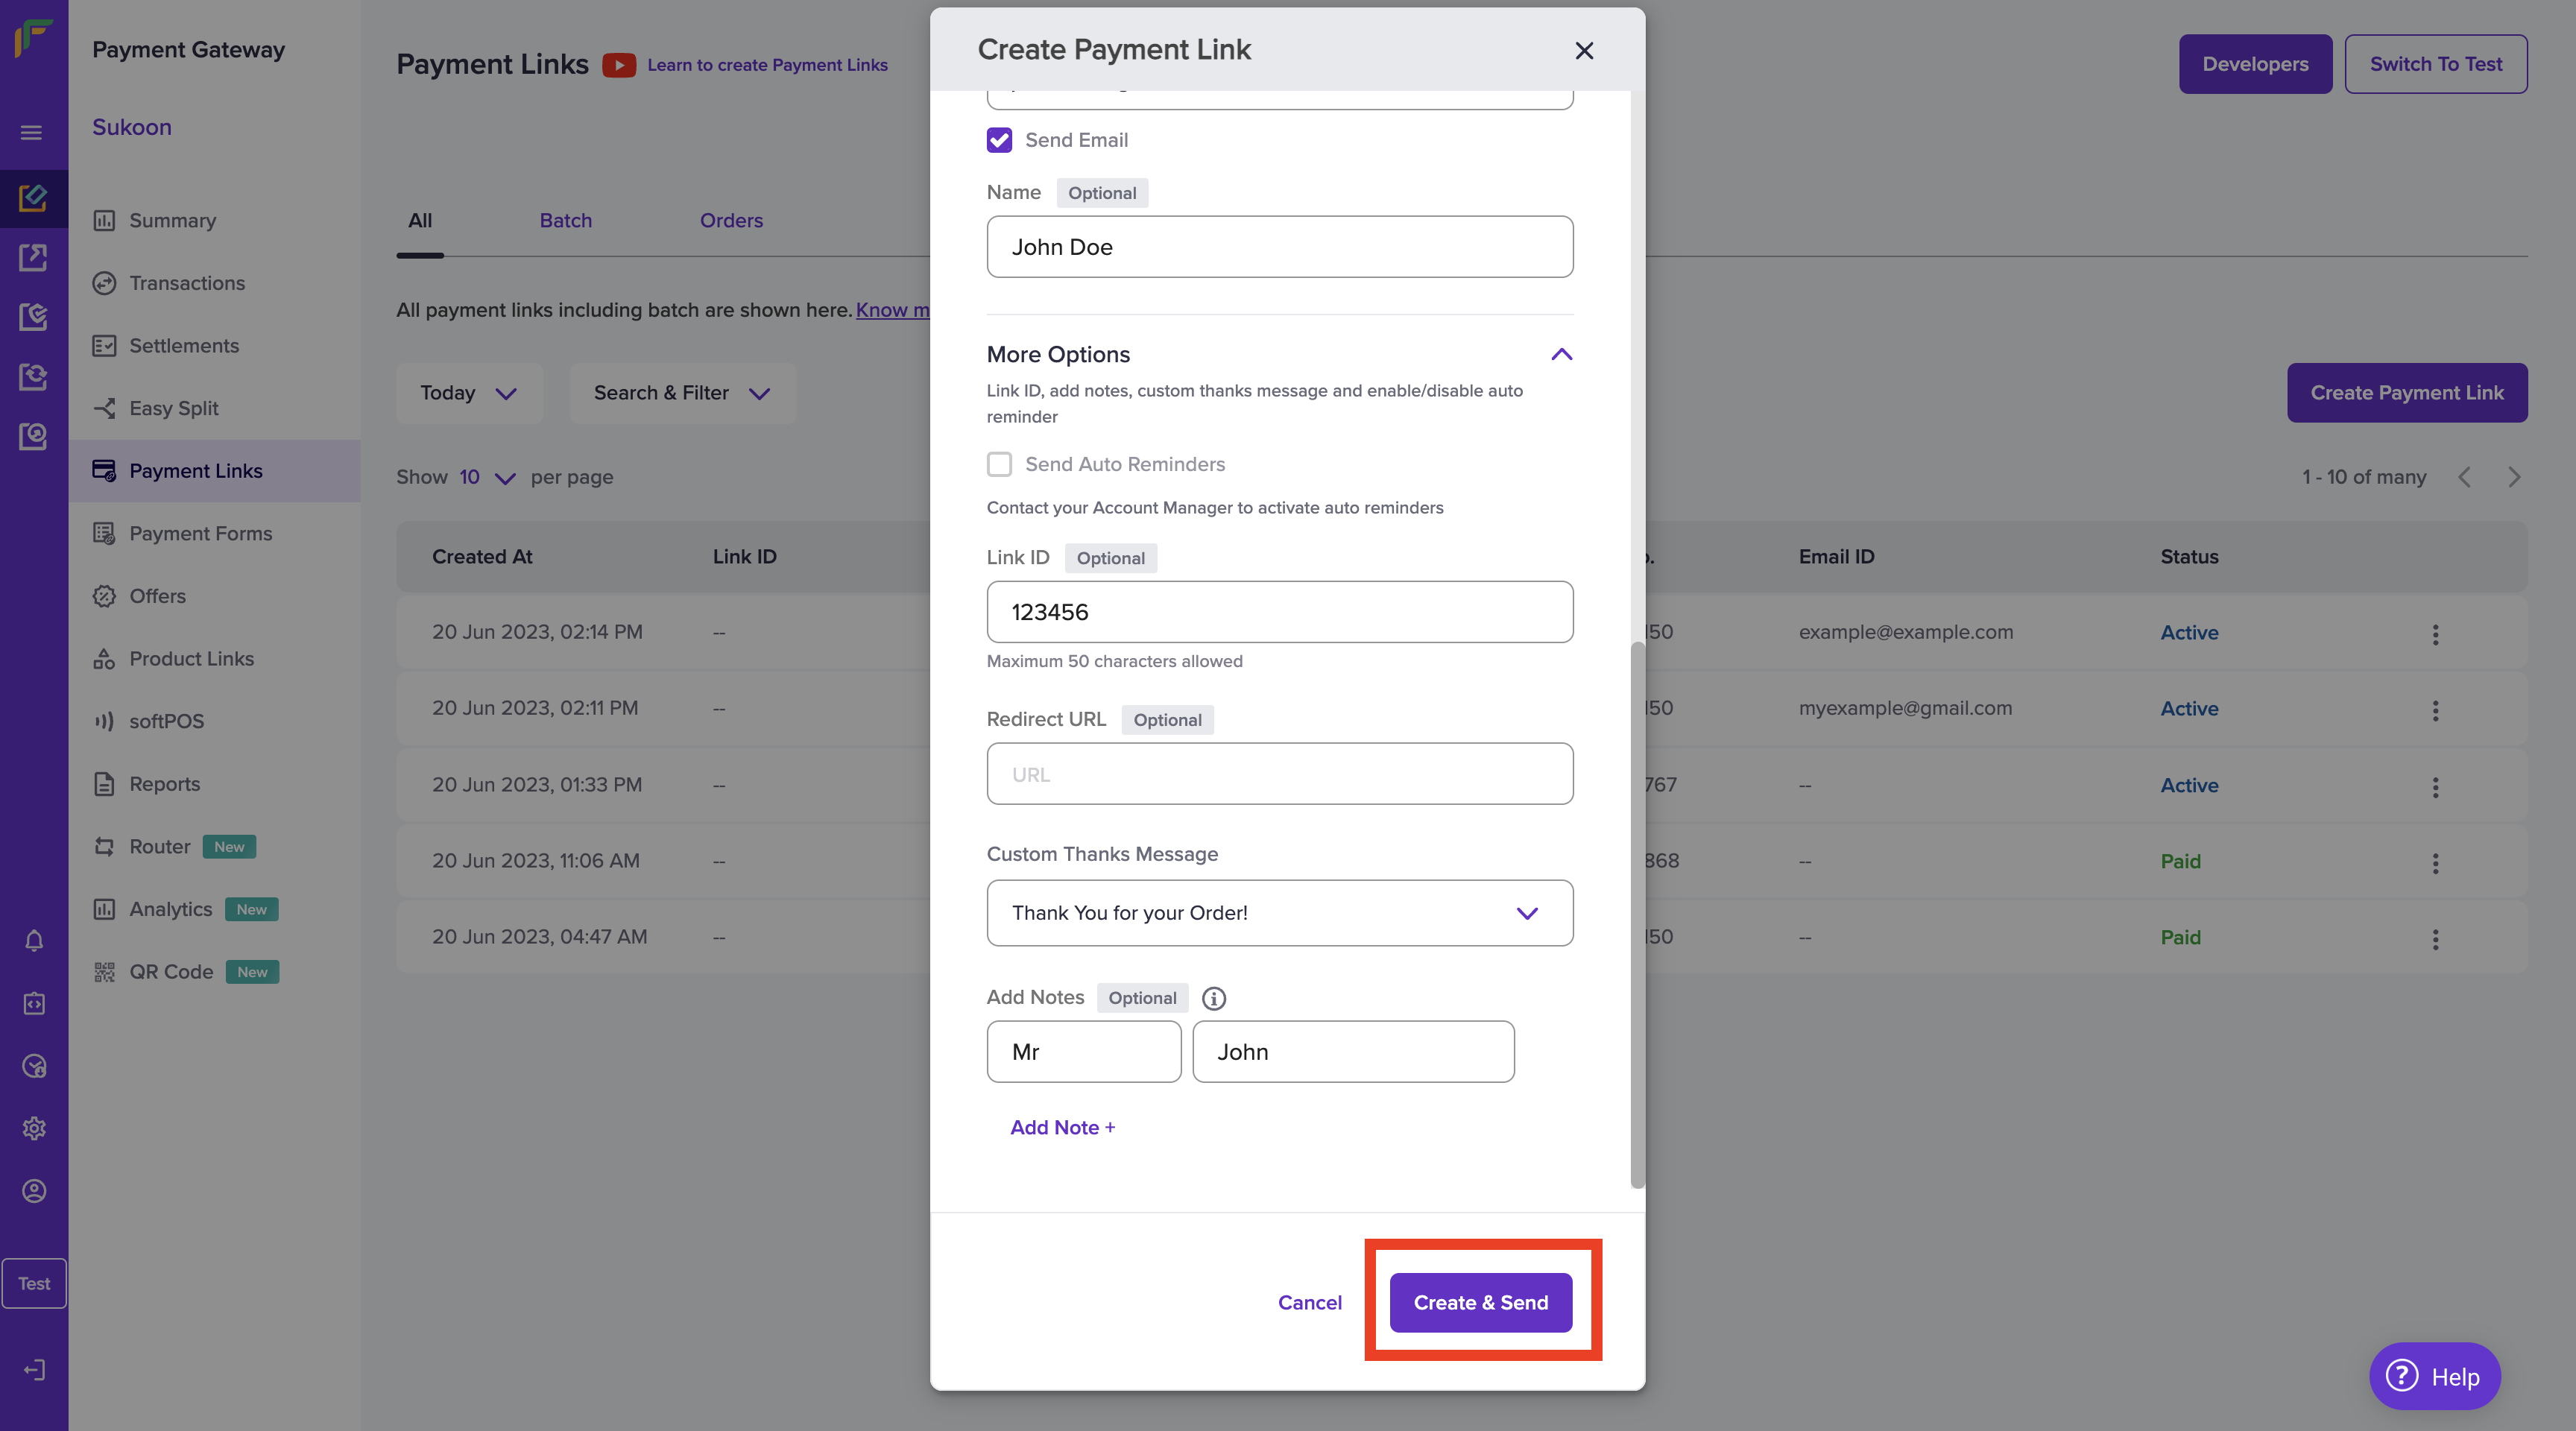
Create Payment Link Step 4
Once you have created the payment link, you will get the message "Payment Link created successfully". Details such as Created At, Link ID, CF Link ID, Amount, Ph No, Email, and payment status is visible on this screen. The image is displayed below for your reference.
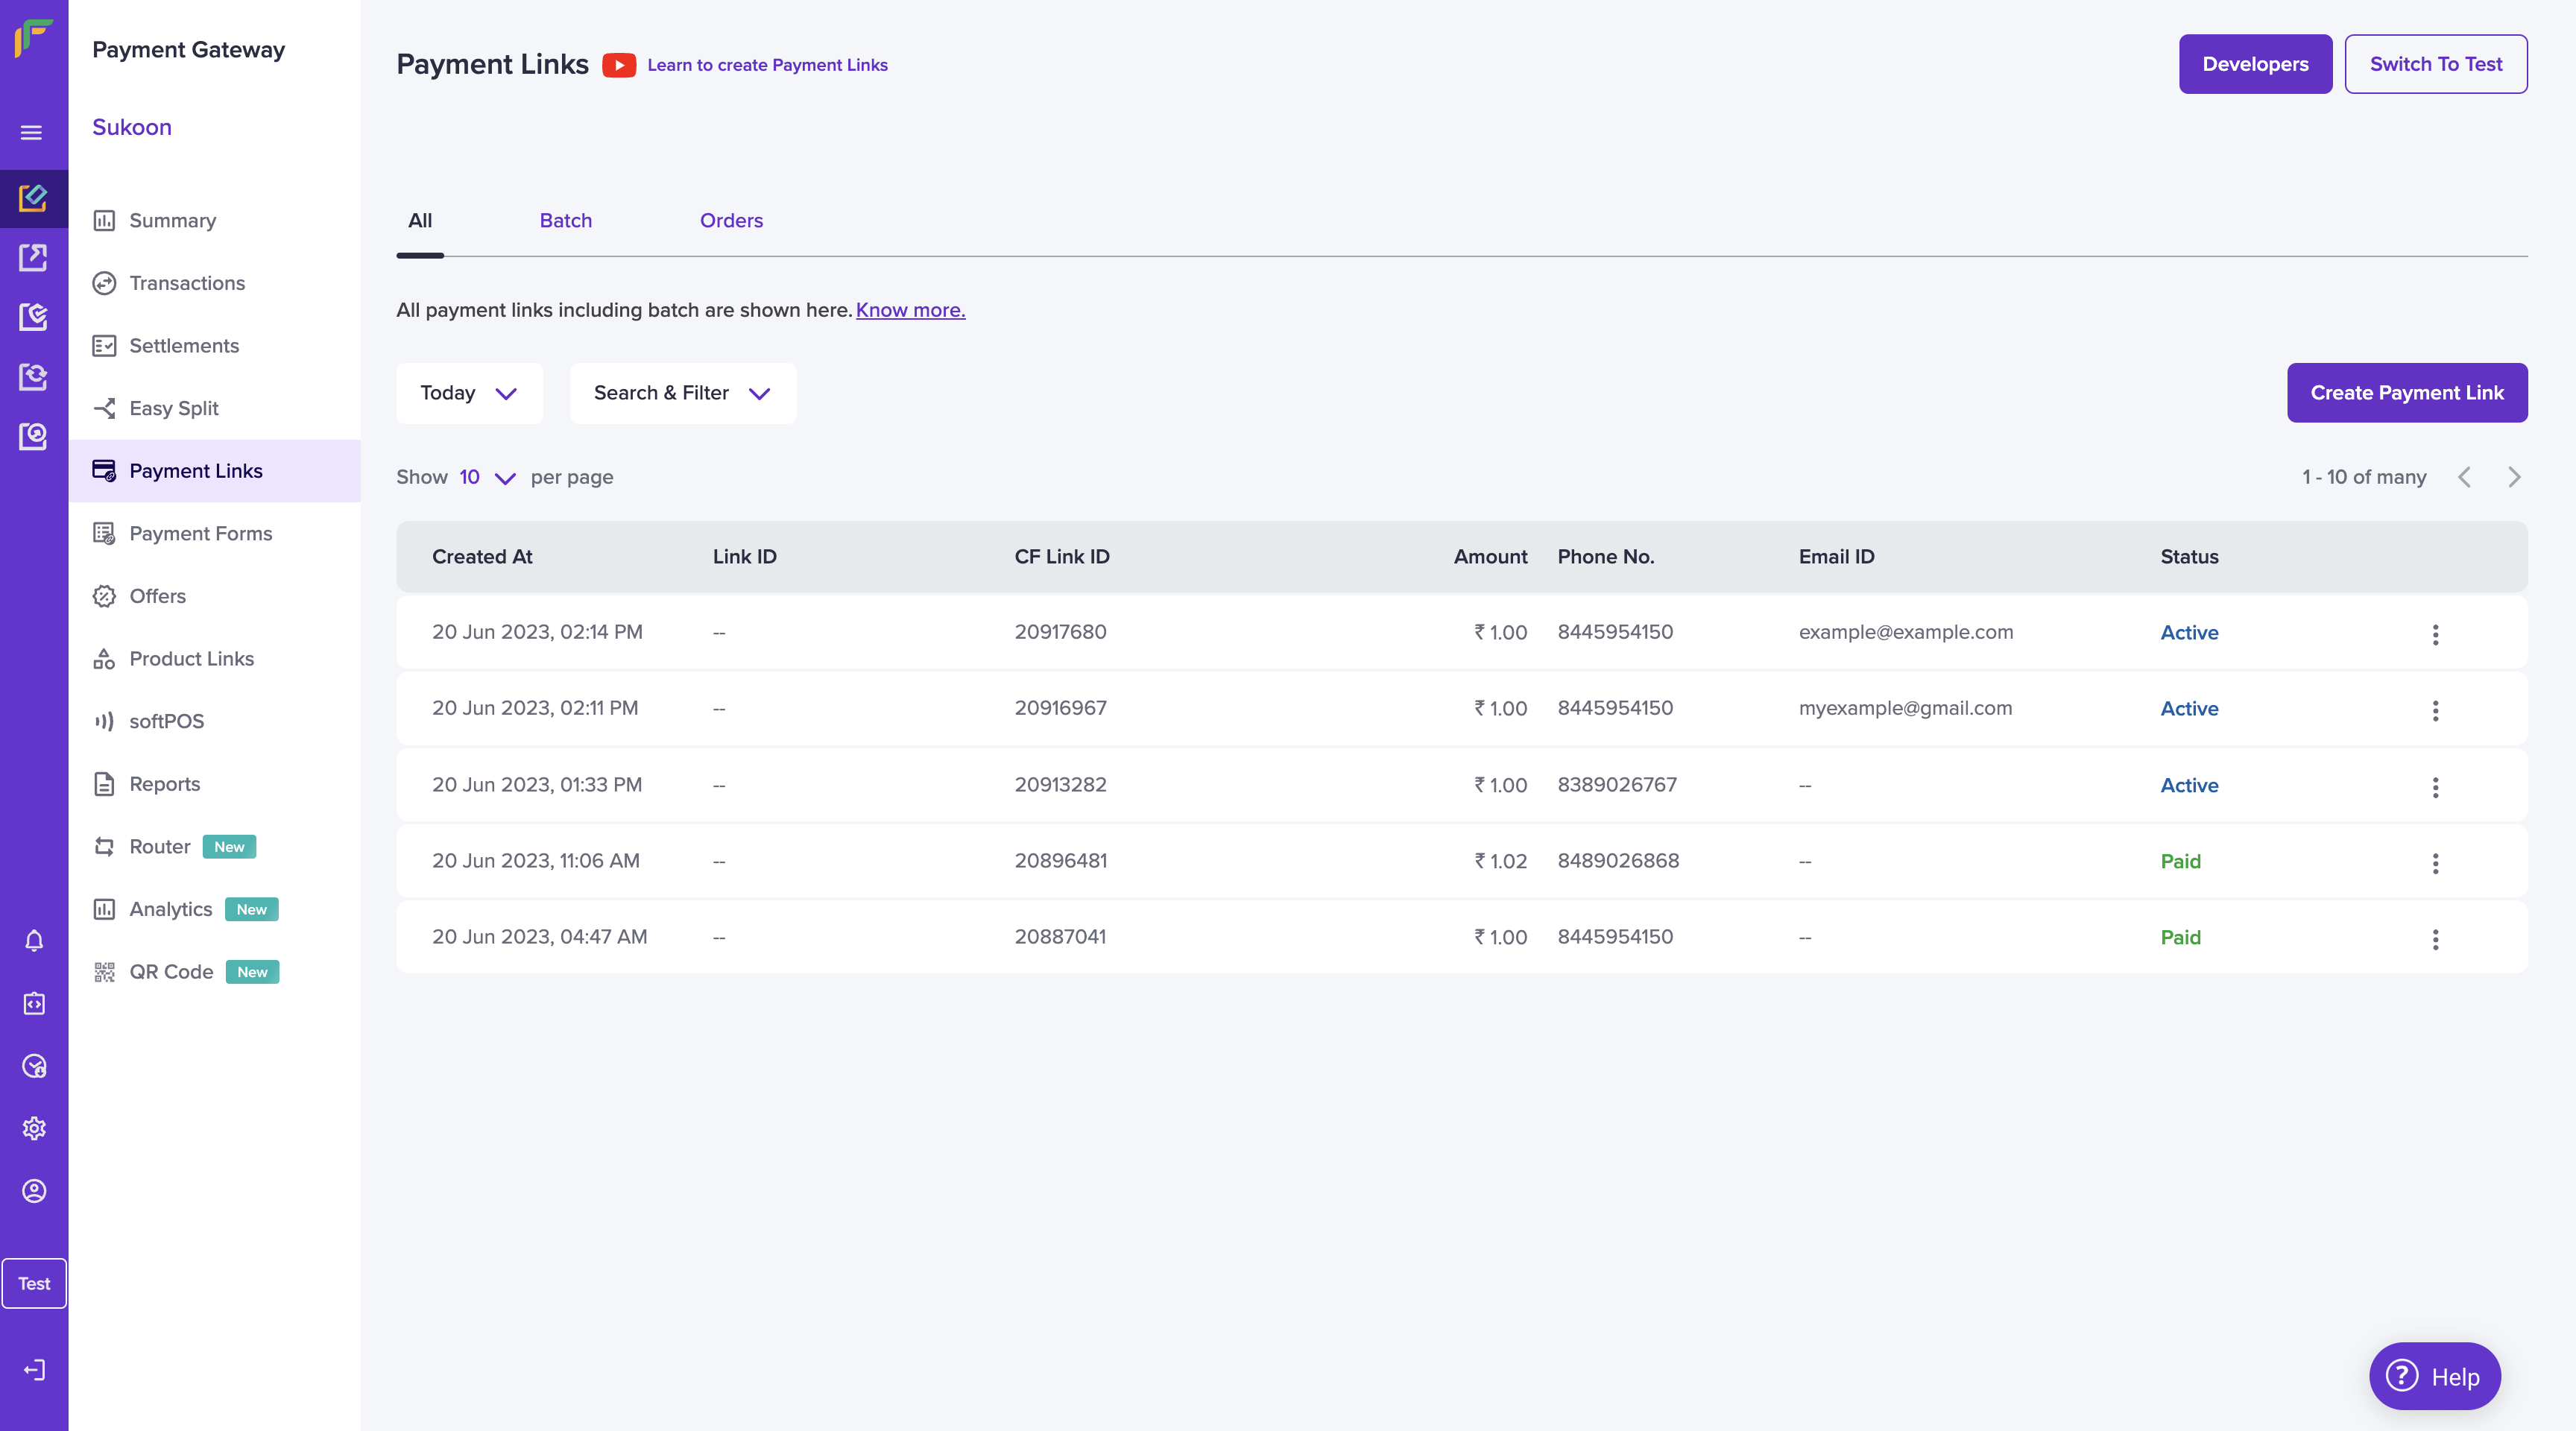
Payment Links Homepage
Click on a particular link to view more details of that payment link. The payment link URL is visible on this page along with other details such as Orders, Customer Details. Copy the payment link and send it to your customer to start receiving payments.
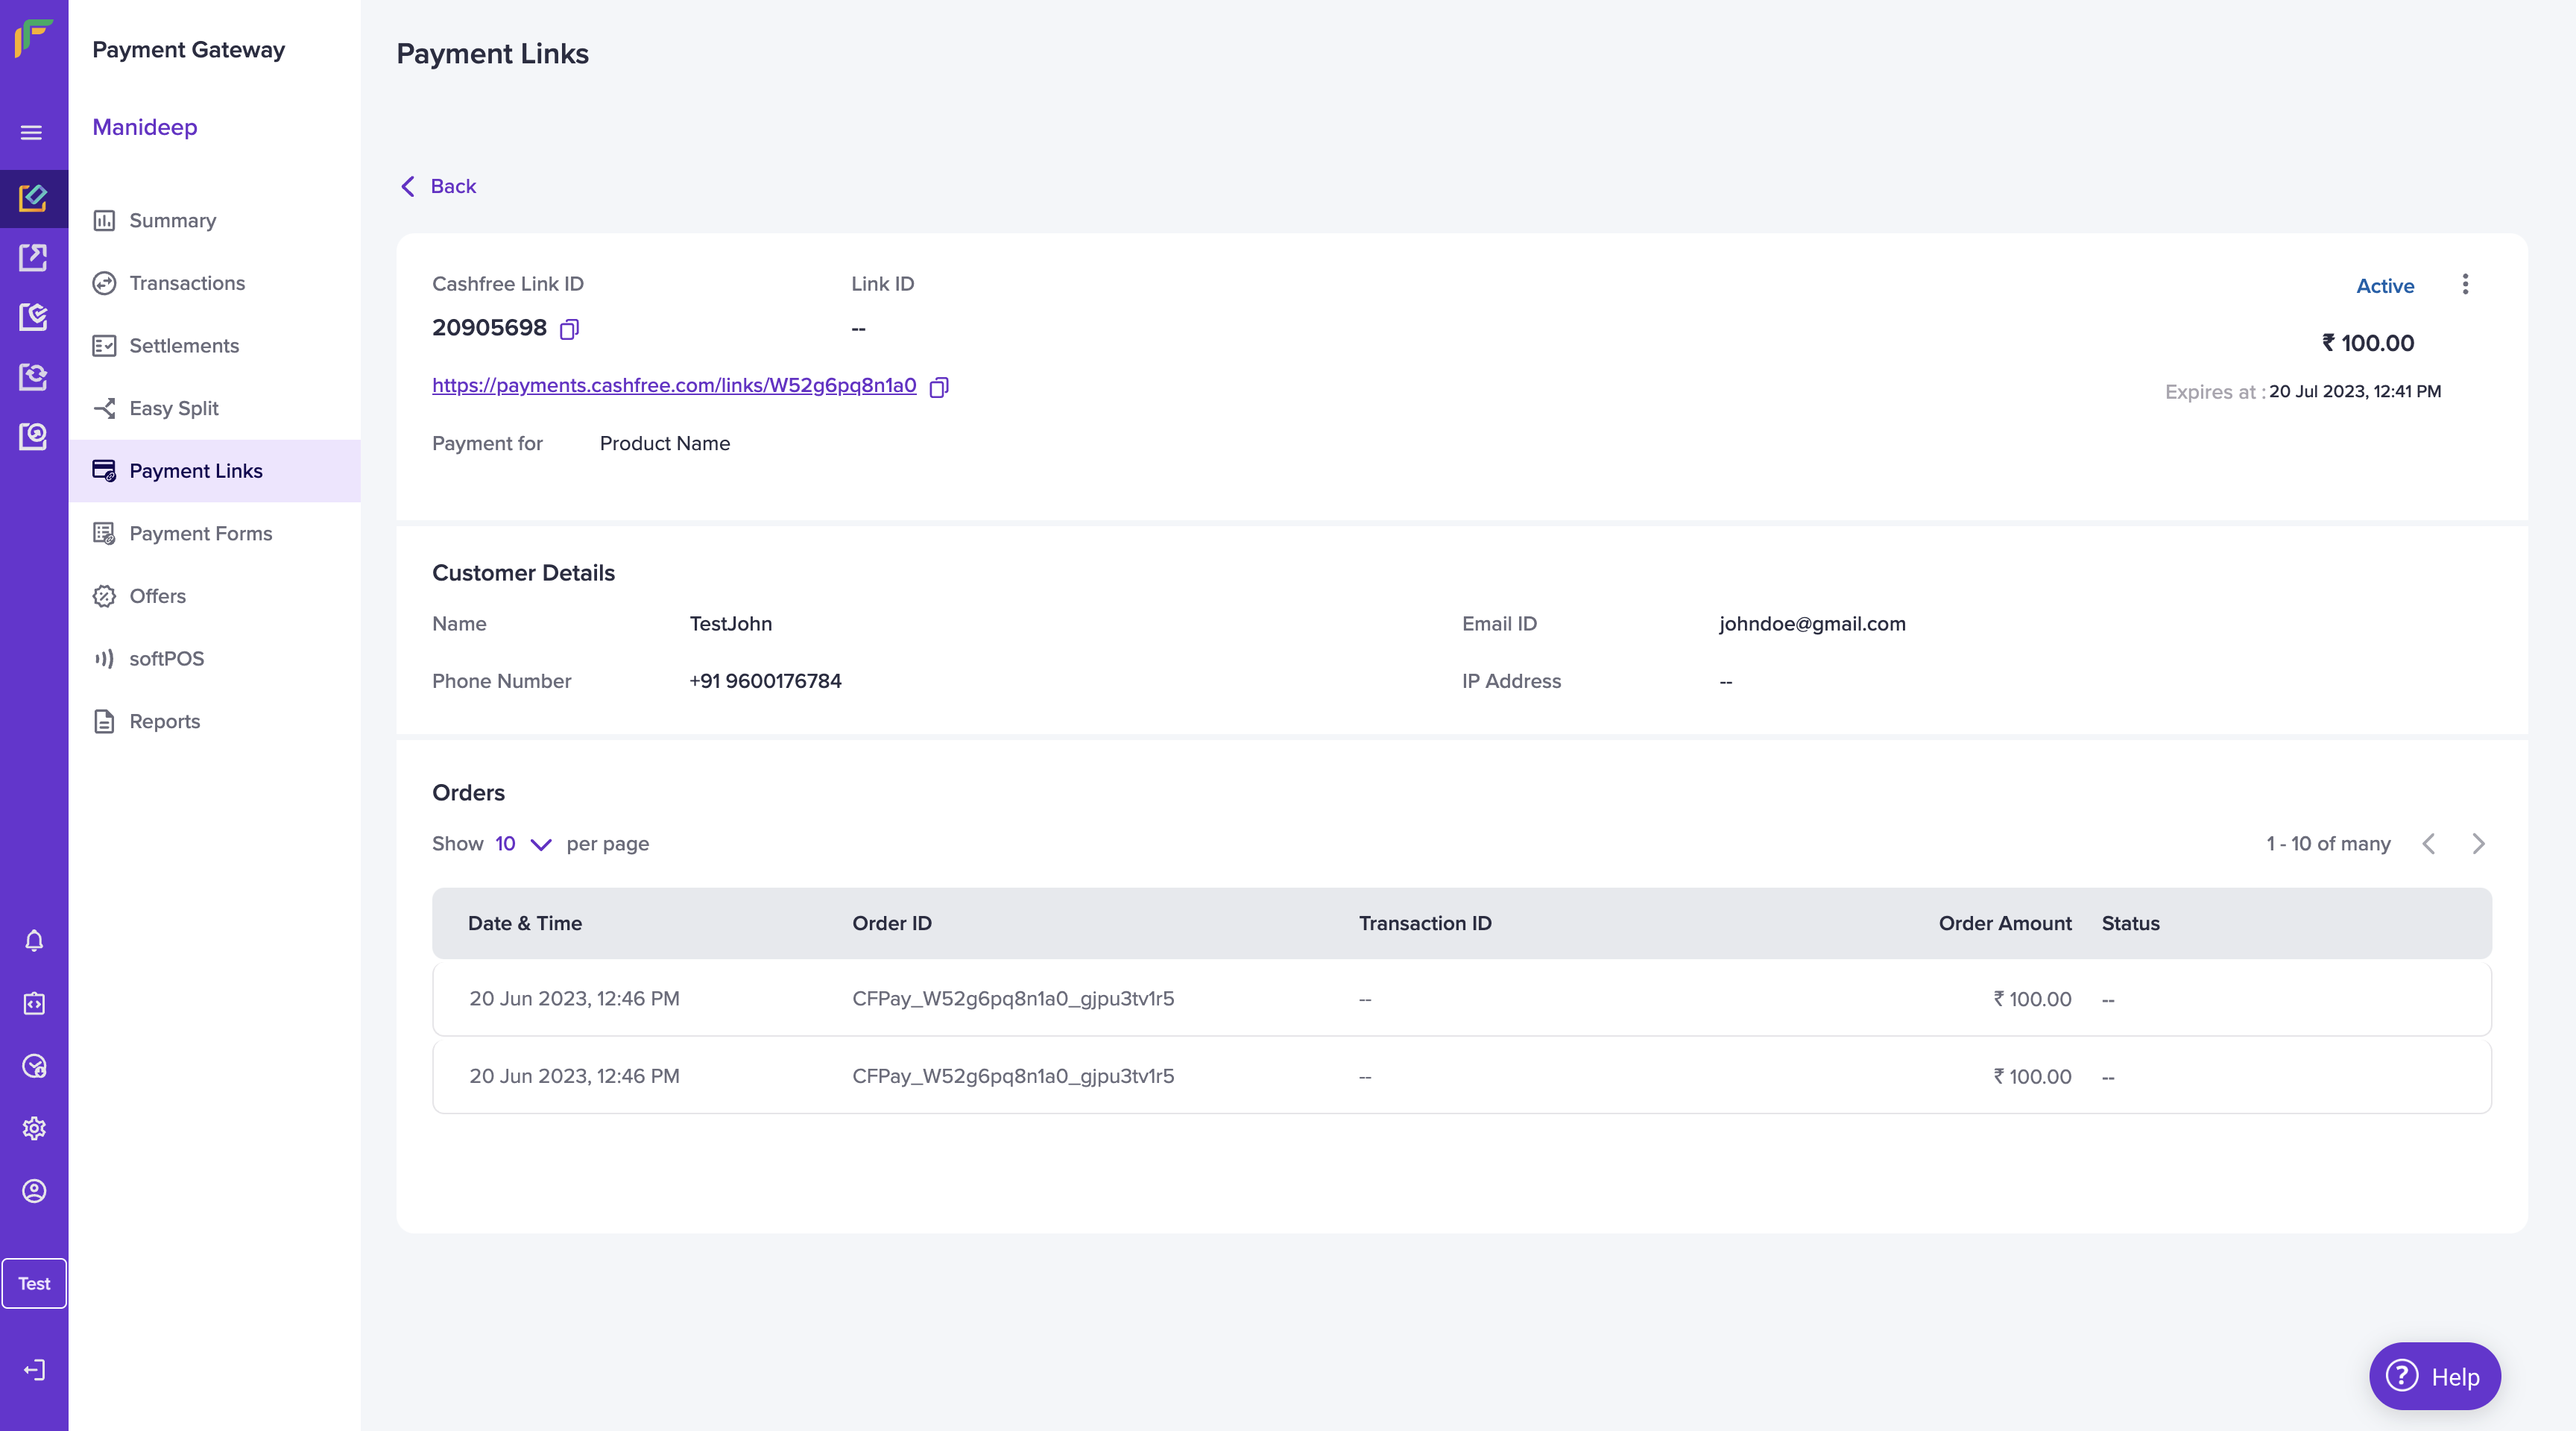
Payment Link Details
Reminders
With Cashfree Payment Links, you can send auto-reminders to your customers about the payment via SMS and email. When you create Payment Links and if the option Send Auto Reminders is enabled, by default, reminders will be sent 1 day after creating the payment link, the subsequent day, and 1 day before the payment link expires. All reminders will be sent between 12 PM to 6 PM.
You can also decide when to remind your customers based on your business requirements. You can send a maximum of three reminders for a particular payment link. Contact your account manager to set the required payment reminder options for your account.
You can send any 3 payment reminders from the following available options:
- Based on payment link creation date - 1, 2, 3, 7, 14 days after creating the link
- Based on payment link expiry date - 1, 2, 3, 7, 14 days before the payment link expires
Example: A payment link is created on the 1st of September, and the expiry date is the 30th of September. You can send a maximum of three reminders to customers. You can select to send the reminders from the dates specified here - 1st, 2nd, 3rd, 7th, 14th day of creating the payment link/before the payment link expires.
Create Payment Link via Batch Upload
Create a large number of payment links at a time using the Batch feature. Add all the required details in a single file as per the required format and upload the file in the Batch section. Download the sample file to know what details are required to be filled in the batch file.
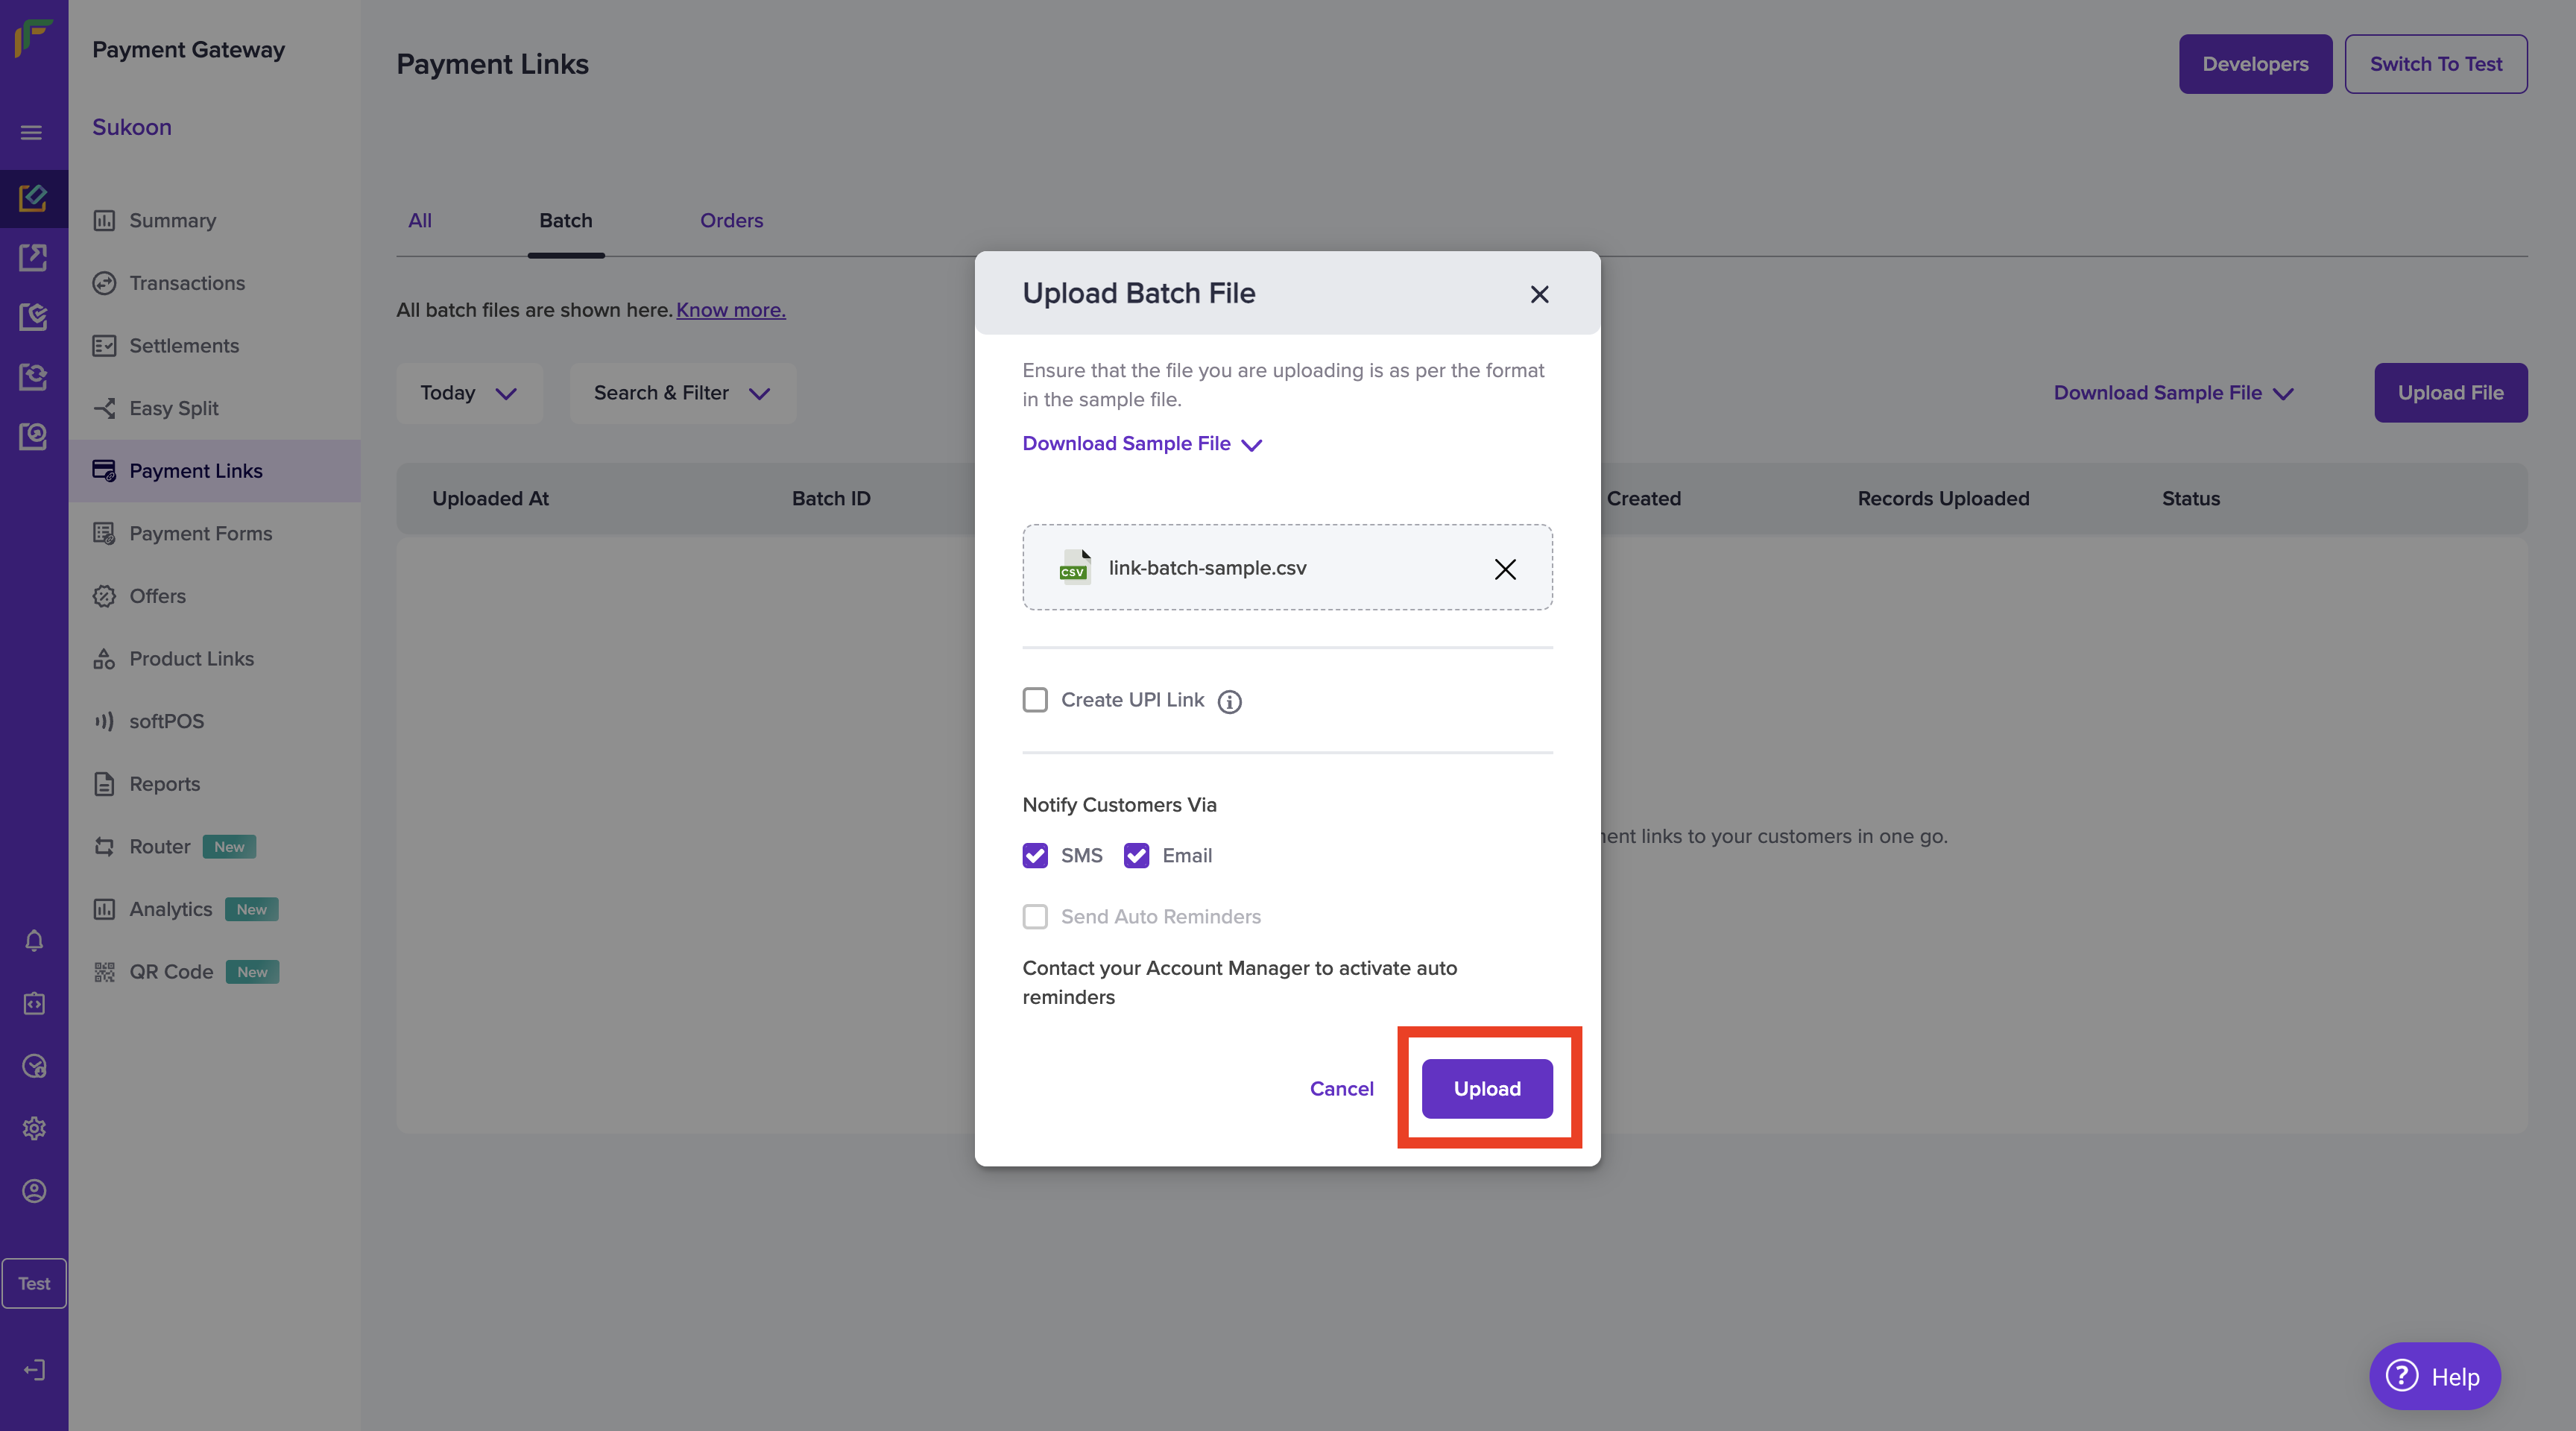
To initiate a batch upload,
- Go to Payment Gateway Dashboard > Payment Links > Batch > click Upload File.
- Click Choose a File to select the file you want to upload and then click Upload. The uploaded file will be visible in the Batch section.
- Download the file after it is processed to view the details. If there are any errors in the file, correct the errors and upload the file again.
Note:
To use the Batch feature, write to [email protected] with your business requirement. We will verify the details and activate it for your account. While we activate the feature, you can experience the flow in the test environment.
Create Payment Link via API
You can create a payment link via our API. Click here to know more.
Track Orders and Payments
Each time your customer opens a Payment Link and attempts a payment, a new Order is created against that link. It gives you information on how many times a particular customer has clicked the link before making the full payment. Details of partial payment details are available here. You can use these details to follow up with customers and improve your conversion rate.
To view the details against each payment link, go to Payment Gateway Dashboard > Payment Links > Orders.
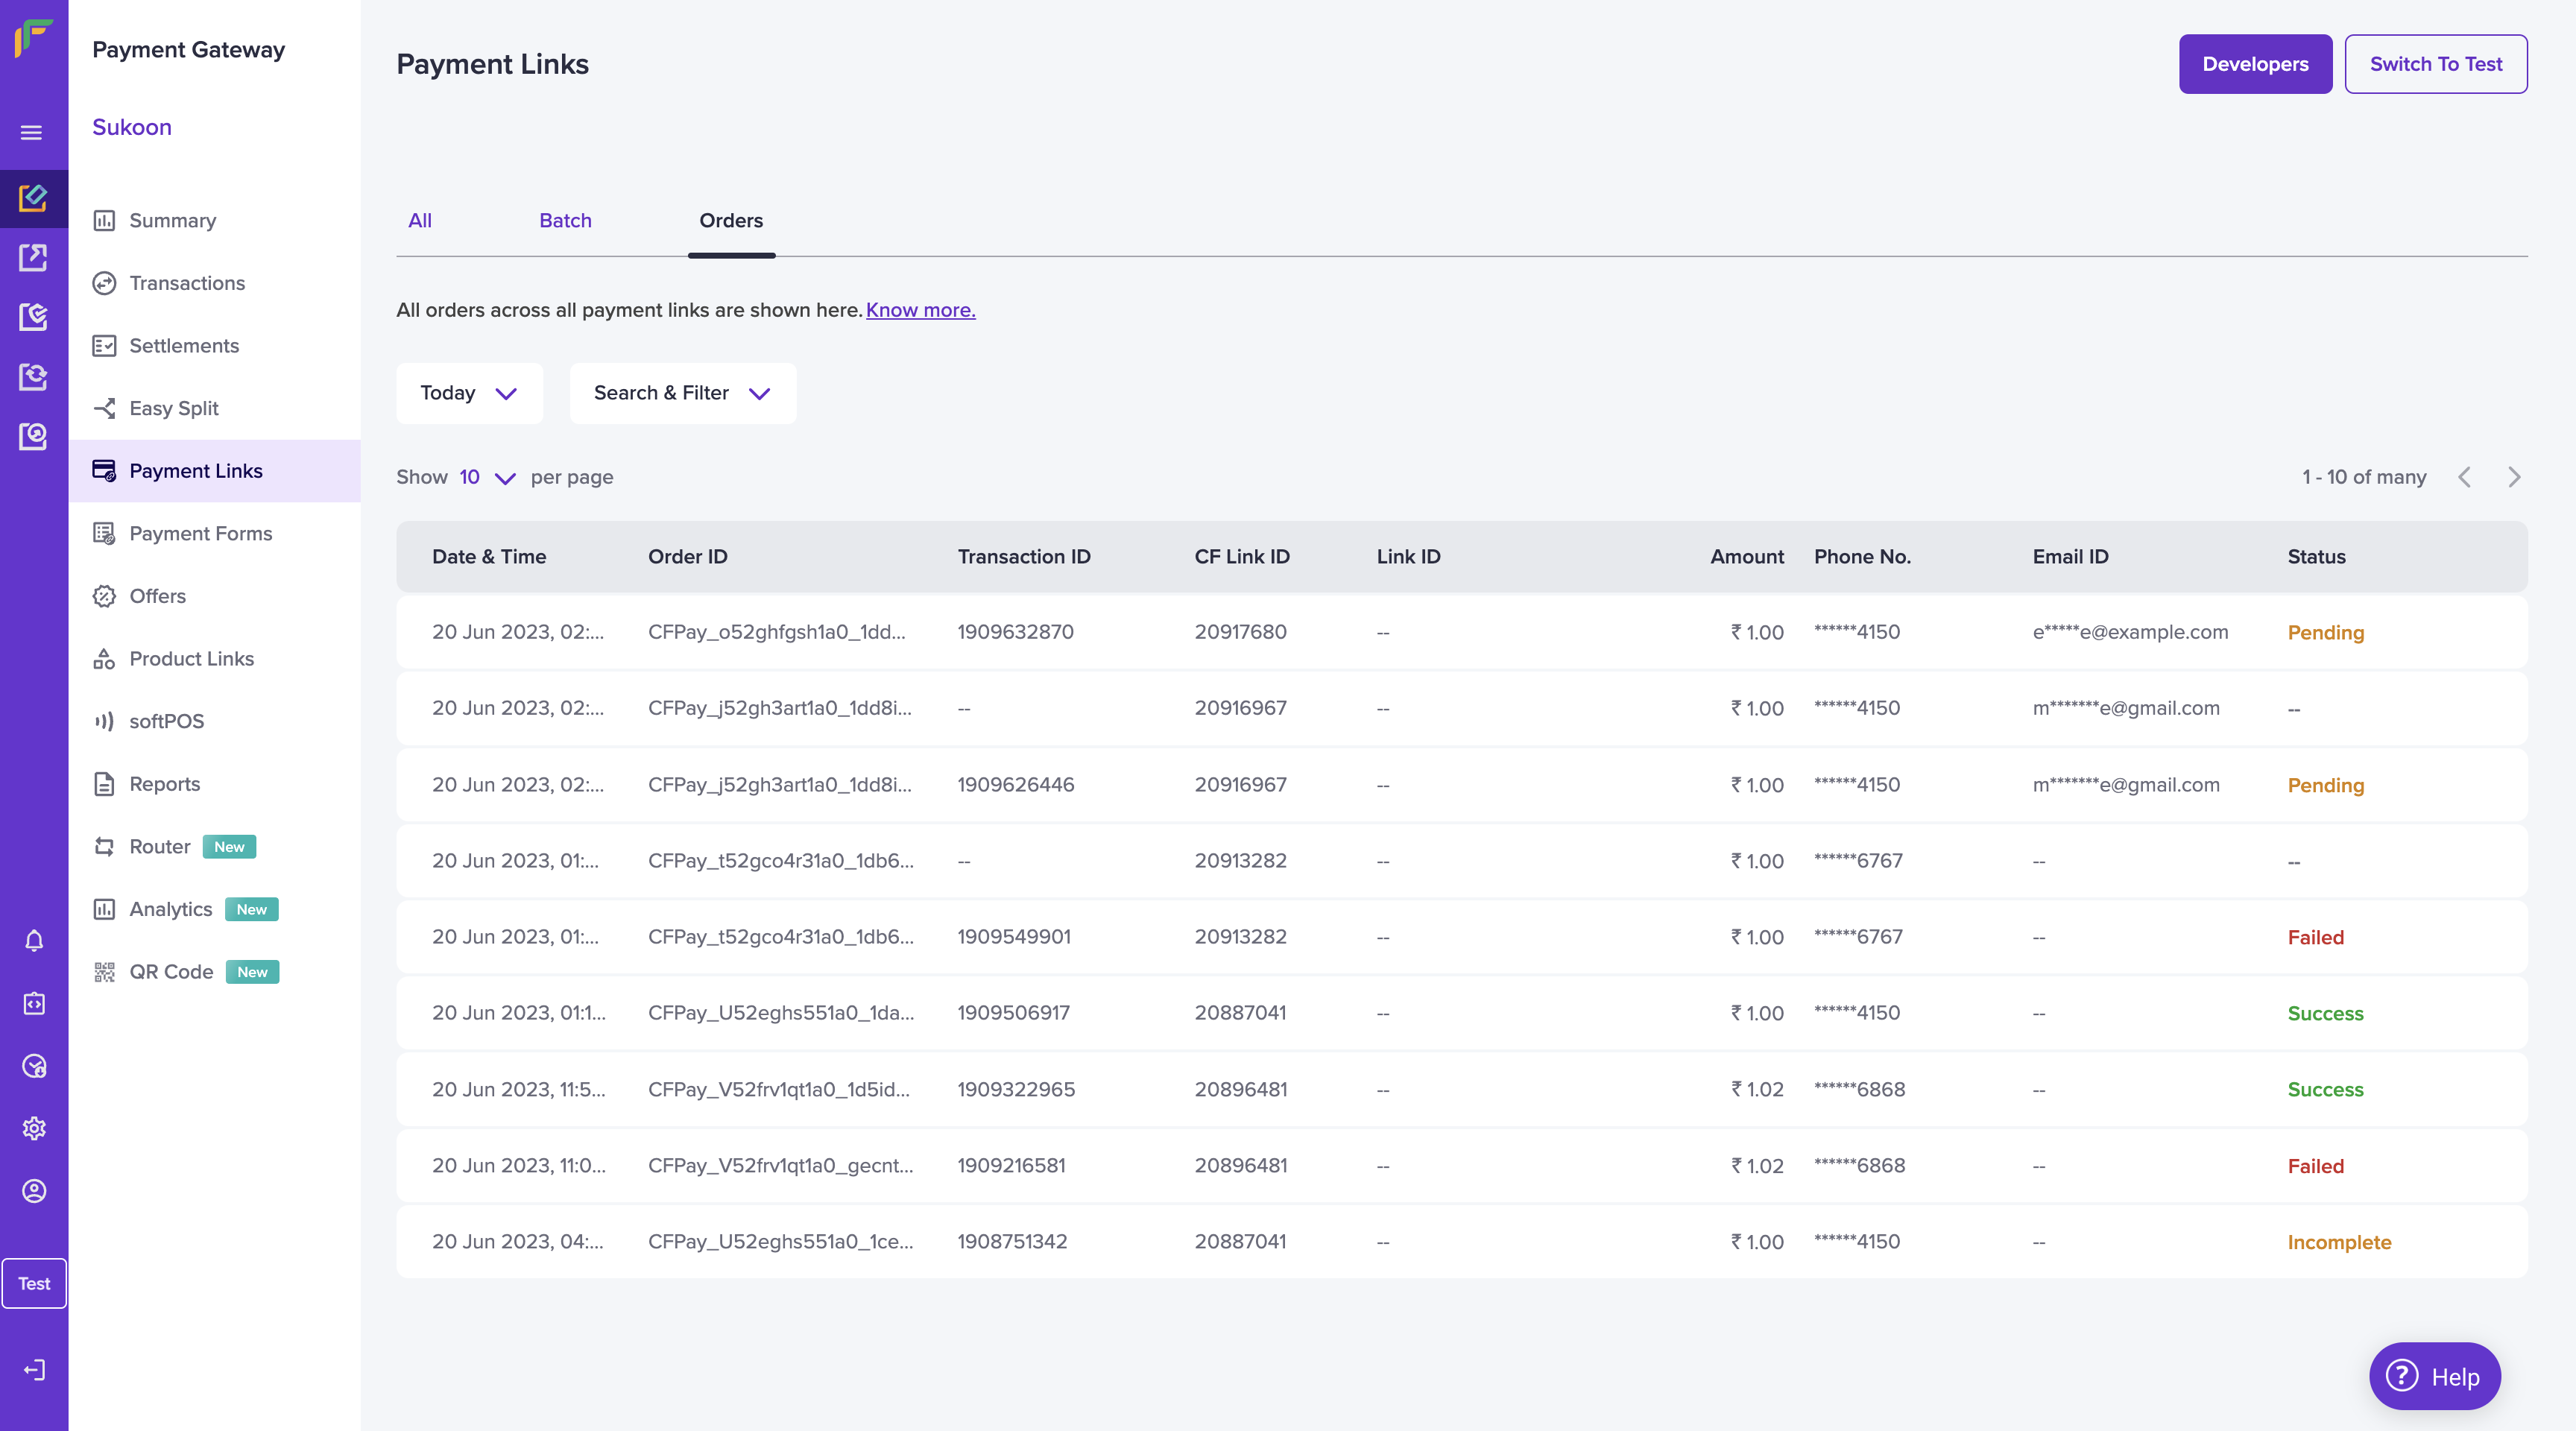
Payment Links - Orders
You can filter for a specific date range to view the order details. You can view the details based on the statuses - Success, Pending, Failed, User Dropped, and Incomplete.
Subscribe to Developer Updates
Updated 5 months ago