Auto Collect Dashboard
Auto Collect enables you to collect payments from customers via bank transfers (NEFT, RTGS, IMPS ) and UPI. As a prerequisite, you must create virtual accounts for each of your customers and share the account details with them. You will receive notifications when they make the payment. You can create any number of virtual accounts and receive payments through NEFT, RTGS, IMPS, and UPI automatically from your customers. Use our simple-to-use APIs to integrate and accept payments or you can also use the feature-rich dashboard.
The Auto Collect Dashboard helps you create virtual accounts for your customers, view the payments received, manage settlements, configure your number/email to be notified when your customers make payments, and much more without any integration.
To access the Auto Collect dashboard, you must first sign up with Cashfree.
Summary
Navigate to Auto Collect Dashboard > Summary. This section provides insight into your daily transactions: the number of payments and the total amount received for the day. It also provides information on the unsettled amount.
Click the Last 7 days dropdown to select the period of the summary data. Determine the date range if you choose Custom Date Range and click Apply.

Summary
Virtual Accounts
Create unique virtual bank account numbers and UPI IDs using the dashboard, and share the details with your customers to accept payments. You must create a new virtual bank account number or UPI ID for each customer. It helps you track payments and to reconcile the received payments from all customers.
Virtual Account ID
Virtual Account ID is a unique identifier you create to identify each payer. It is a part of the generated virtual account number. You can create a virtual account for your customer who wants to pay using bank transfers, UPI or both.
Create a Virtual Account
Follow the instructions below to create a virtual account:
Virtual Accounts
- Go to Auto Collect Dashboard > Virtual Accounts > Accounts Created > and tap Create Virtual Account.
- In the Create Virtual Account popup, enter the following details in the Virtual Account Details section
- Virtual Account Type - Choose between Bank Account and UPI ID.
- Create Virtual Account With - Select bank(s) to create a virtual account. You can select multiple banks to create multiple virtual accounts and receive payments. If one of the partner bank servers is down, you can share the alternate virtual account details to receive payments from your customer.
| Virtual Account Type | Description |
|---|---|
| Bank Account | For customers who prefer making payments through bank transfers - IMPS/NEFT/RTGS. |
| UPI ID | For customers who prefer making payments through UPI. |
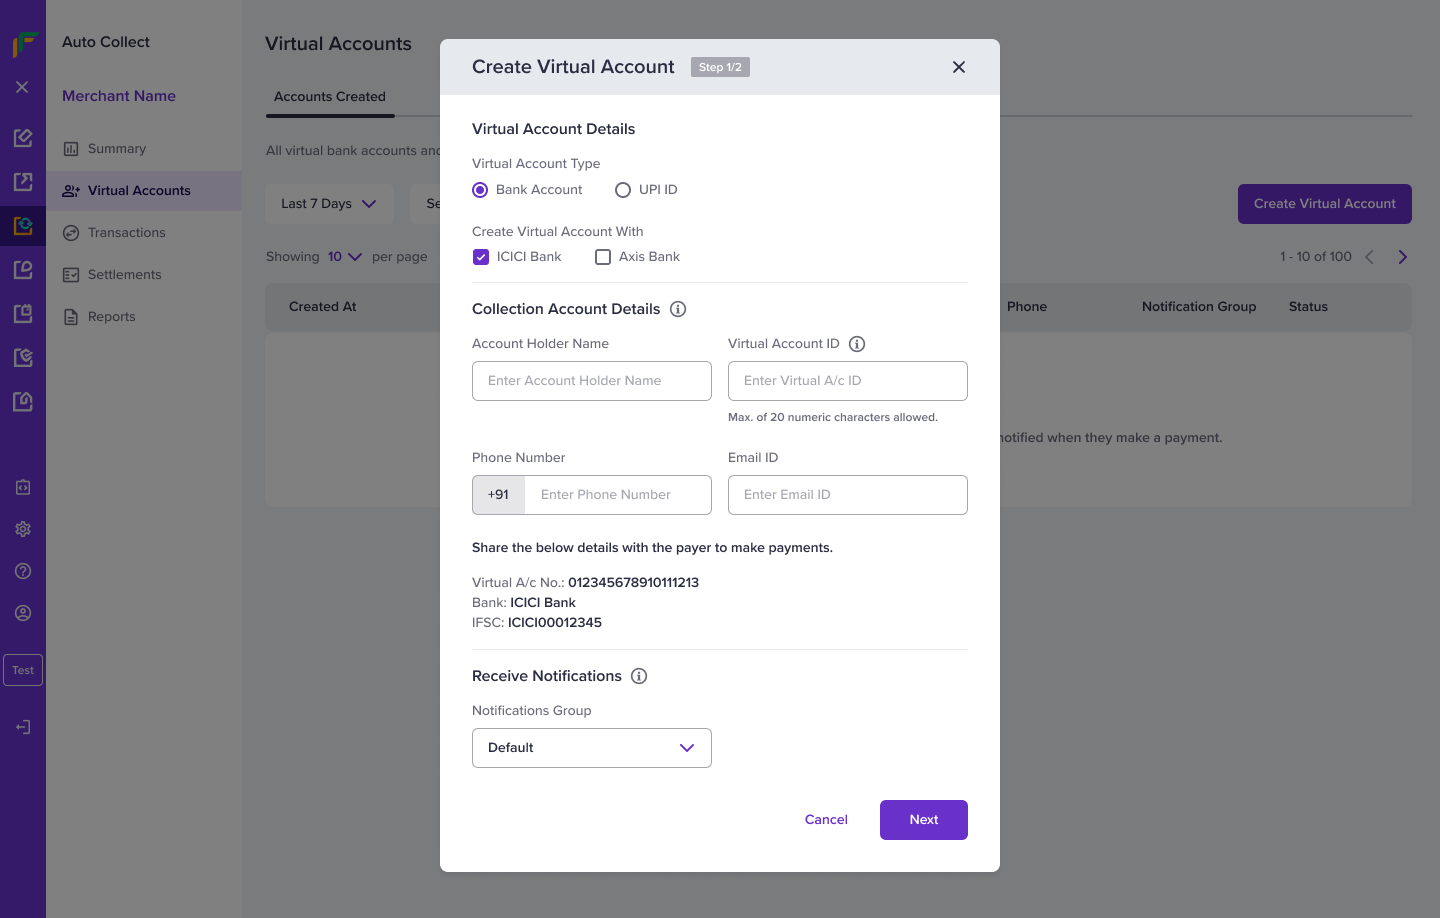
- In the Collection Account Details section, enter the following information and click Next:
- Account Holder Name - Enter the name of the customer.
- Virtual Account ID - Enter the unique identifier for the customer to accept payments through bank transfers like NEFT, RTGS, or IMPS.
- Phone Number - Enter the phone number of the customer.
- Email ID - Enter the email ID of the customer.
- Notifications Group - Select which group receives notifications when payments are processed. You can create notification groups in the Notification Group tab.
- Enter the following information in the KYC Details section:
- PAN - Enter the PAN information of the customer.
- Aadhaar Number - Enter the aadhaar number of the customer.
- GST Number - Enter the GSTIN information of the business.
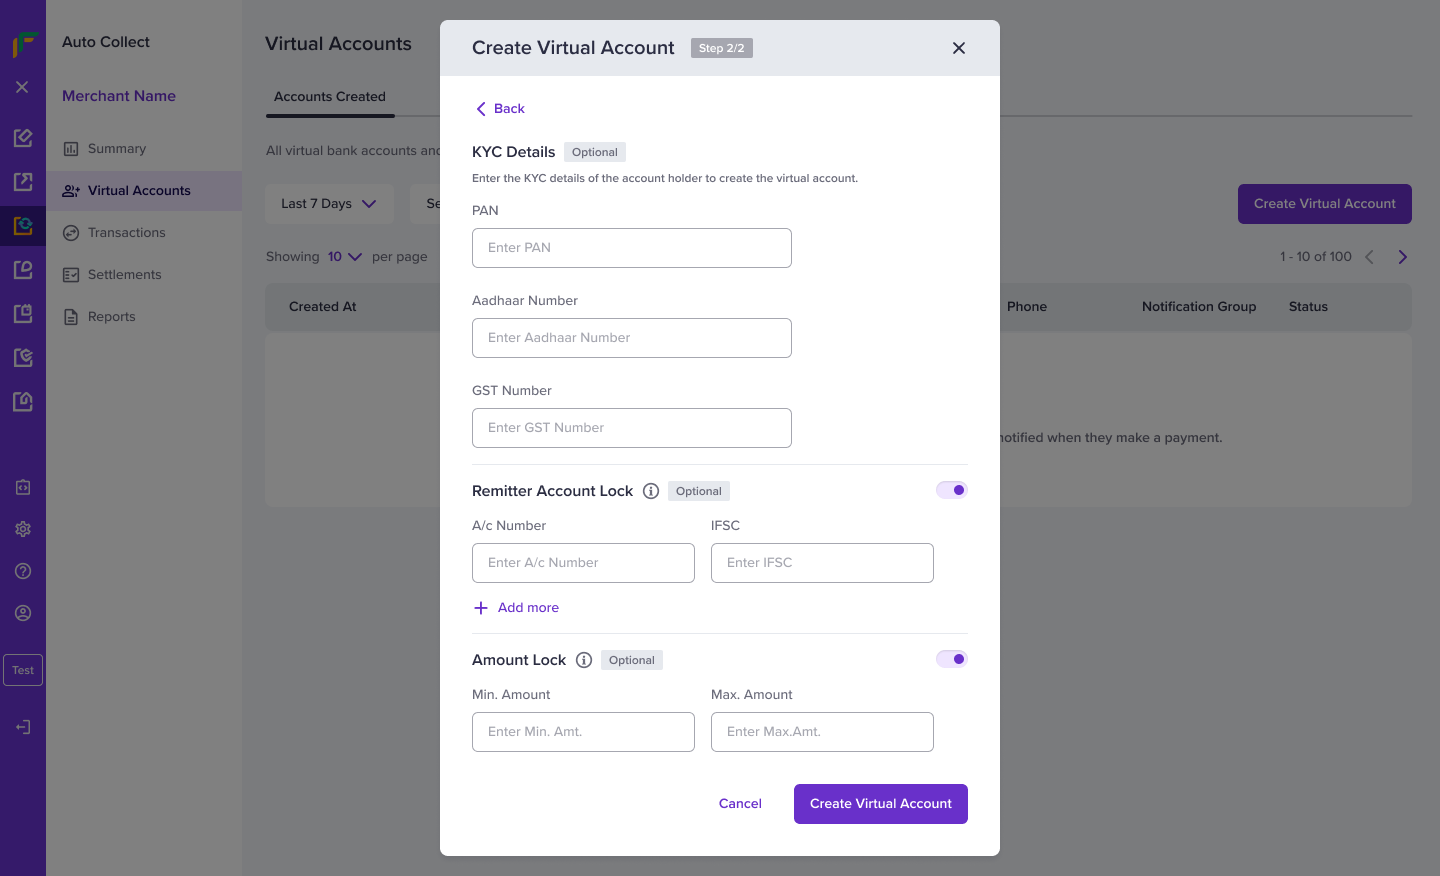
KYC Details
- In the Remitter Account Lock section, specify the payer account details to receive payments only from those accounts.:
- A/c Number - Enter the bank account number of the customer.
- IFSC - Enter the IFSC information of the customer.
- Add more - Click the option to add multiple bank account details.
You can add up to 10 remitter bank account details.
- In the Amount Lock section, set an amount range to receive as payments from the :
- Min. Amount - Enter the value to set the minimum amount.
- Max. Amount - Enter the value to set the maximum amount.
- Click Create Virtual Account. The virtual account for your customer is created successfully.
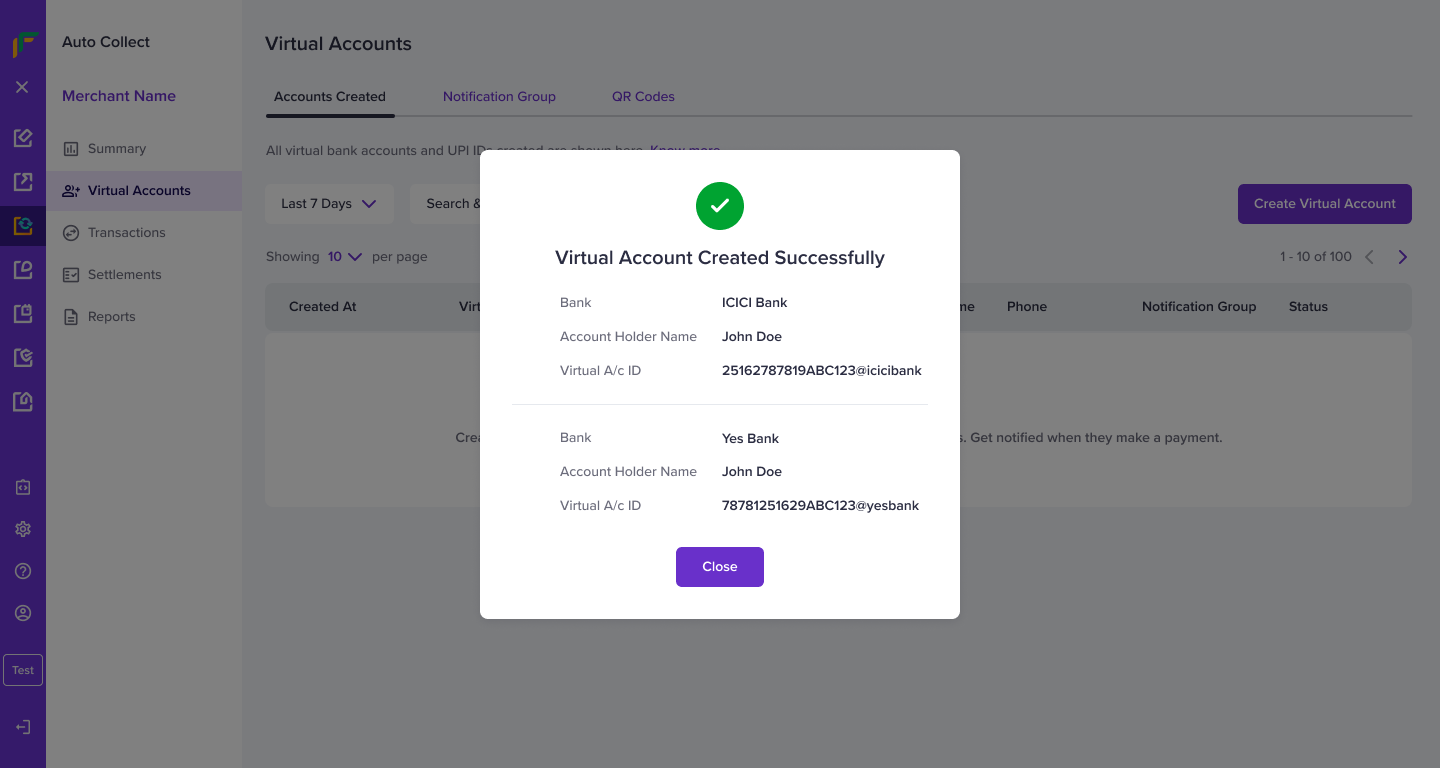
Virtual Account Created
Virtual Account Type: UPI ID
The Remitter Account Lock and Amount Lock sections are not applicable when creating a virtual account type using UPI ID.
Manage Accounts
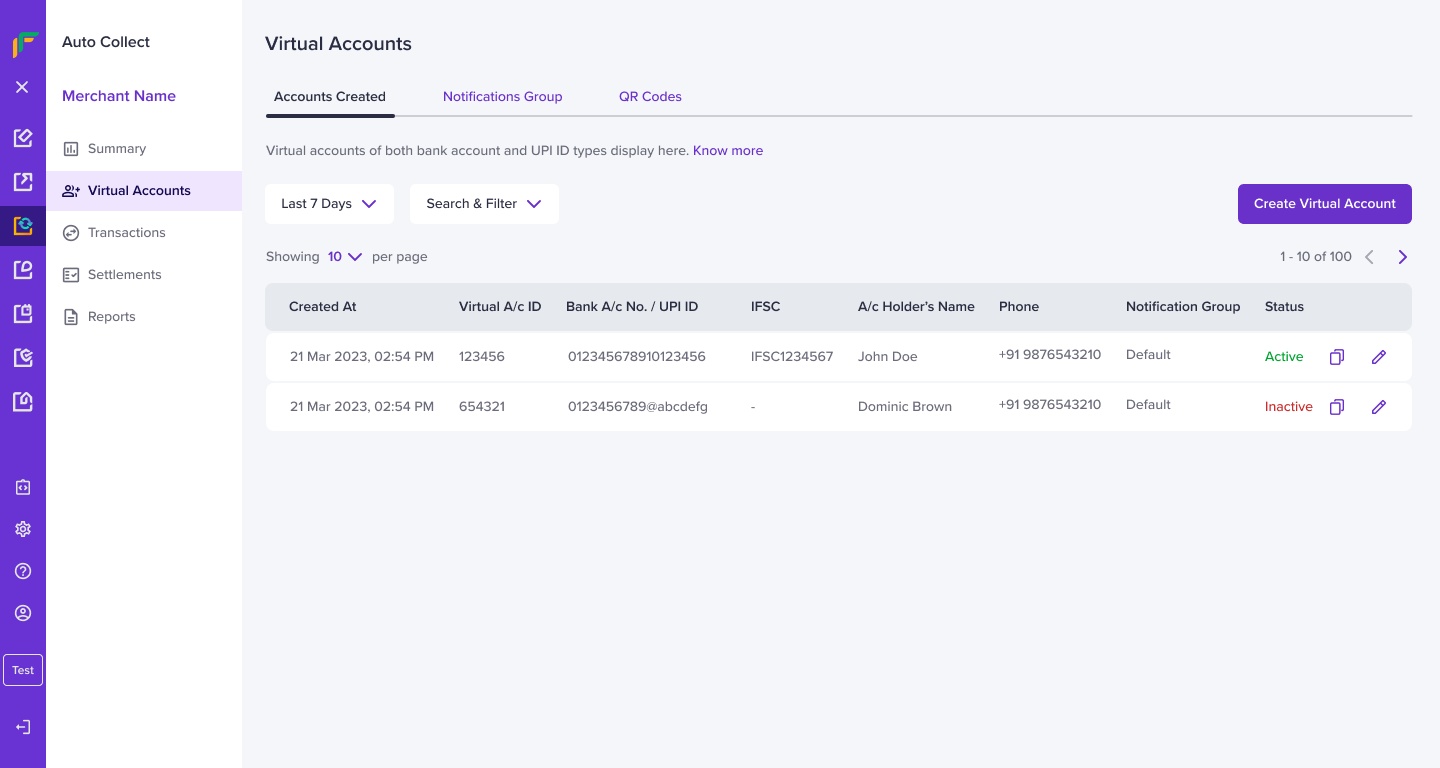
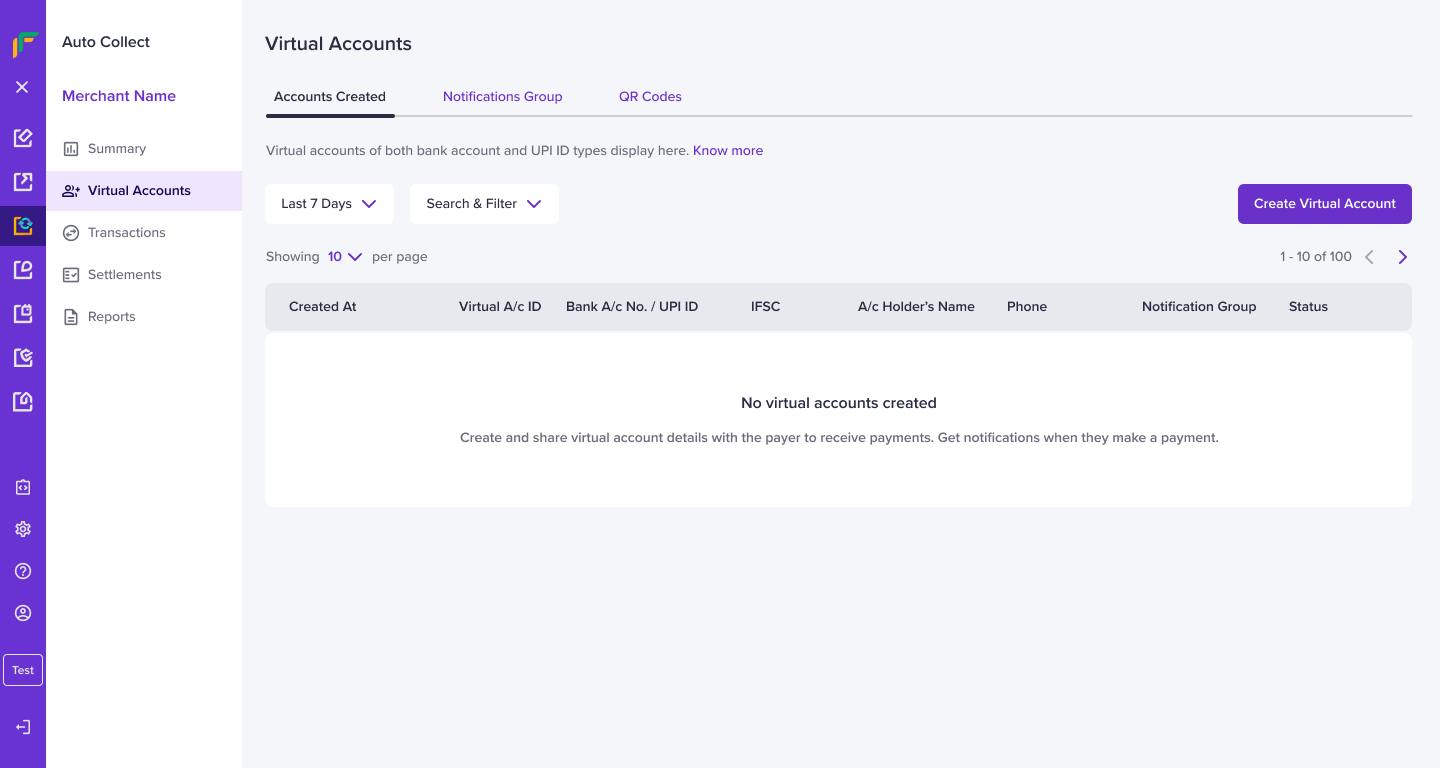
Accounts Created
You can view the created accounts in the Accounts Created tab.
Use the follow filters to search for specific accounts:
- Last 7 Days - Use this drop-down menu to set the date range. Determine the date range if you choose Custom Date Range and click Apply.
- Search & Filter - Use this drop-down menu to set the search filter and click Apply.
- Search - Use this drop-down menu to determine the search value and enter the value in the field. For example, if you choose Virtual A/c ID, enter the virtual account ID in the field.
- Status - Select the status of the virtual account.
From the list of the created accounts, click the Copy button to copy the virtual account ID details.
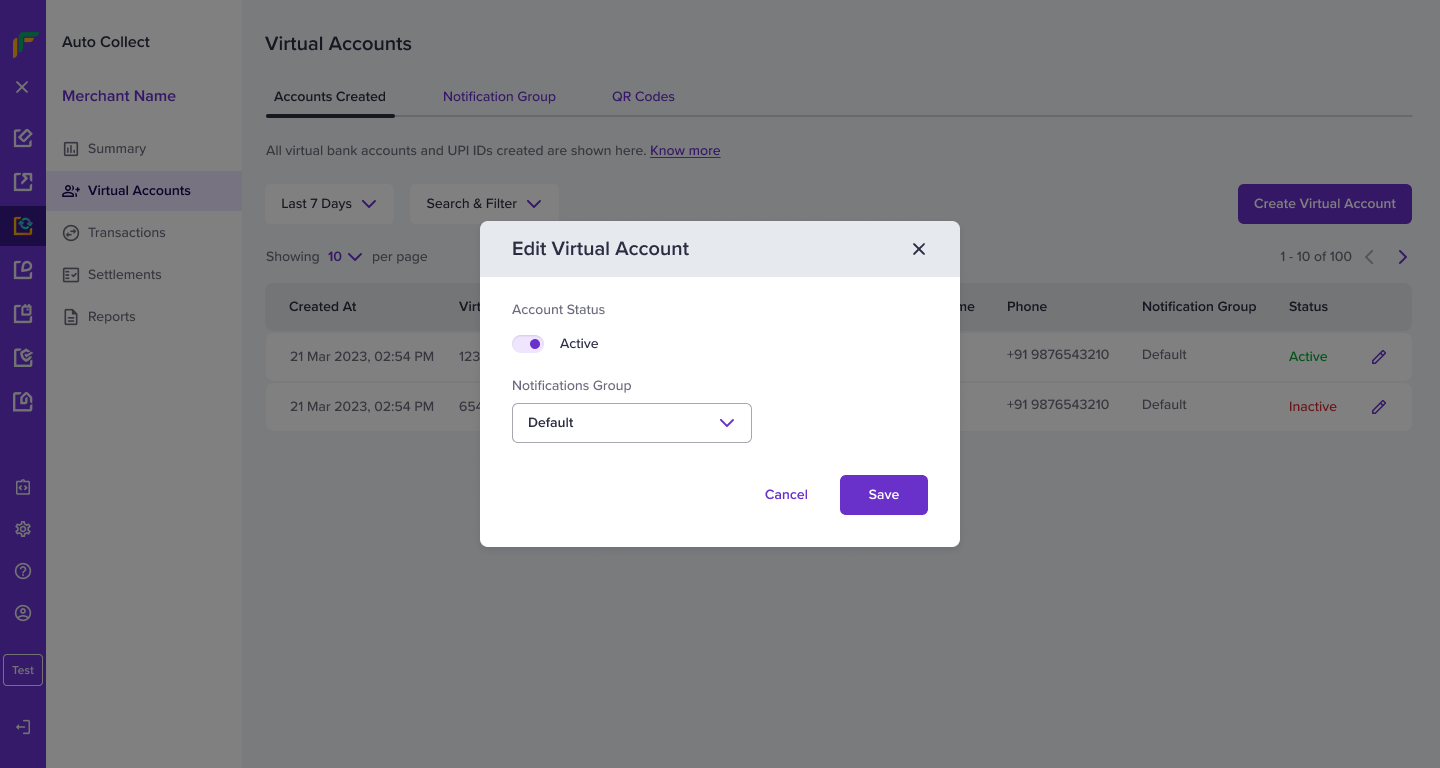
Edit Virtual Account
To edit the created virtual account, follow the instructions:
- Click Edit.
- In the Edit Virtual Account popup appears:
- Account Status - Switch the toggle to change the status of the virtual account to active or inactive.
- Notifications Group - Select which group receives notifications when payments are processed.
- Click Save.
Payments from inactive accounts are rejected, and you can view the details in the Rejected Payments section.
Use our API to create a virtual account. Click here to know more.
Transactions
Payments
View all the payments that you have received from your customers on the Payments screen. You can filter and see the transactions for the selected period. You can also filter for specific transactions by Virtual Account ID, Virtual UPI, and UTR number.
To view the payments received, go to Auto Collect Dashboard > Transactions > click Payments.

Payments
Use our APIs to know about the recent payments that you have received in all virtual accounts. Click here to know more.
Rejected Payments
You may sometimes have to reject the payments due to some business decisions, and you can keep track of all such rejected payments in the Rejected Payments report.
To not accept/reject payments from customers due to some business decisions, set the virtual account status to Inactive in the Create Virtual Account screen. Any payments initiated after you set the status to Inactive will be rejected, and you can view the details of such transactions in the Rejected Payments section.
To view the rejected payments, go to Auto Collect Dashboard > Transcations > click Rejected Payments.

Rejected Payments
Use our APIs to view all the rejected payments. Click here to know more.
Settlements
All settlement amounts will be credited to your bank account provided during your sign up process with Cashfree. The settlement amount will be credited to your account as per the settlement schedule. The settlement will be made after deducting the service charges that are agreed upon.
For payments made to virtual bank accounts or virtual UPI handles, and settlements to the merchant's payout or current a/c, Auto Collect supports three different settlement cycles - T+1*, T+0*, and Instant settlements.
T+1* Settlement: Settlement will be made the next day at 08:01 AM for transactions that happen today. You will receive settlements 6 days a week except on 3 national holidays (Republic day, Independence day, and Gandhi Jayanti) and 2nd, 4th Saturday.
T+0* Settlement: Settlement will be made once everyday at 6:01 PM and the remaining balance will be settled the next morning at 08:01 AM. You will receive settlements 6 days a week except on 3 national holidays (Republic day, Independence day, and Gandhi Jayanti) and 2nd, 4th Saturday.
T+x*
Settlement cycle is subject to bank approval and can vary based on transaction type, business category/model, risk parameters, and other factors.
Instant Settlement: Settlements will be made every 30 minutes from 8:15 AM to 6:15 PM. You will receive settlements 6 days a week except on 3 national holidays (Republic day, Independence day, and Gandhi Jayanti) and 2nd, 4th Saturday.
365 Days Settlement: Settlements will be made once every 30 minutes from 8:15 AM to 6:15 PM directly to the merchant's bank account every day of the year irrespective of bank holidays (this includes weekends and national holidays).
To view all the settlements made, go to Auto Collect Dashboard > Settlements.

Settlements
You can download the settlements report month-wise. Go to Auto Collect Dashboard > Settlements > Invoice, select the month, and click Download.
Webhooks
Webhooks are server callbacks to your server from Cashfree. Webhooks are event-based and are sent when specific events related to the transaction happen.
To configure webhooks,
- Go to Auto Collect Dashboard > on the left navigation click Developers.
- In the Auto Collect section, click Webhooks > Add Webhook URL.
- Enter the URL where you want to receive the updates in the Webhook URL field, and click Test & Add Webhook.

Webhook
There are 3 webhooks that you can configure for your account:
AMOUNT COLLECTED
The AMOUNT_COLLECTED webhook notifies that the amount has been received in your Cashfree Virtual account through Auto Collect.
TRANSFER REJECTED
The TRANSFER_REJECTED webhook notifies that the transfer request was received, but has been rejected due to some reason (mentioned in the field reason).
AMOUNT SETTLED
The AMOUNT_SETTLED webhook notifies that the settlement has been made.
Click here to know more about webhooks.
Notifications
Cashfree allows you to configure your email IDs or phone number to receive transaction-related notifications. When customers make payments you will be instantly notified on the email/phone number you have provided.
To configure your account to receive notifications when your customers make payments,
- Go to Auto Collect Dashboard > Notifications > Add New Notification Group.
- Enter a Group Name. This will help you identify and select the group to be notified when you create a virtual account.
- Select the Notification Type, either Phone or Email. You can add more than one email/phone to be notified.
- Click Add. Every time a payment is made, a notification will be sent to the respective group selected during the virtual account creation process.

Notification Group
Access Control
Access control feature allows you to,
- Generate new API Keys, and deactivate existing API Keys which are not required.
- Submit an IPv4 address for whitelisting. View and remove added whitelisted IP address, which is not required.
To add or delete API keys and IP addresses, go to Auto Collect Dashboard > Access Control. Select API Keys or IP Whitelist as per your need.
You can create a maximum of 5 API key pairs, and whitelist a maximum of 5 IP addresses. Write to [email protected] for help.
Preferences
You can configure your Auto Collect account to notify your customers when you have received the amount and when you have rejected the transferred amount. You can also configure your account to receive an email when your customers transfer the amount to you.
To set the notification preferences, go to Auto Collect Dashboard > Preferences and enable the required options.

Notification Preferences
User/Alias Access
You can add users and assign permissions based on the requirement and role of the users using the User/Alias Access feature. You can also edit details and permissions of existing users.
To add/manage users, go to Auto Collect Dashboard > User/Alias Access.
Updated 4 months ago