Issue Prepaid Cards
You can issue prepaid cards to your customers after you store their details in the dashboard. Once the customer is created, create a prepaid card and assign the customer to it. An OTP is sent to the customer phone number for verification. In this article, we will cover issuing prepaid cards to:
New Customer
You can add a new customer in the Customers screen, or you can create one while adding a prepaid card. To create a new customer while issuing the prepaid card, follow the instructions below:
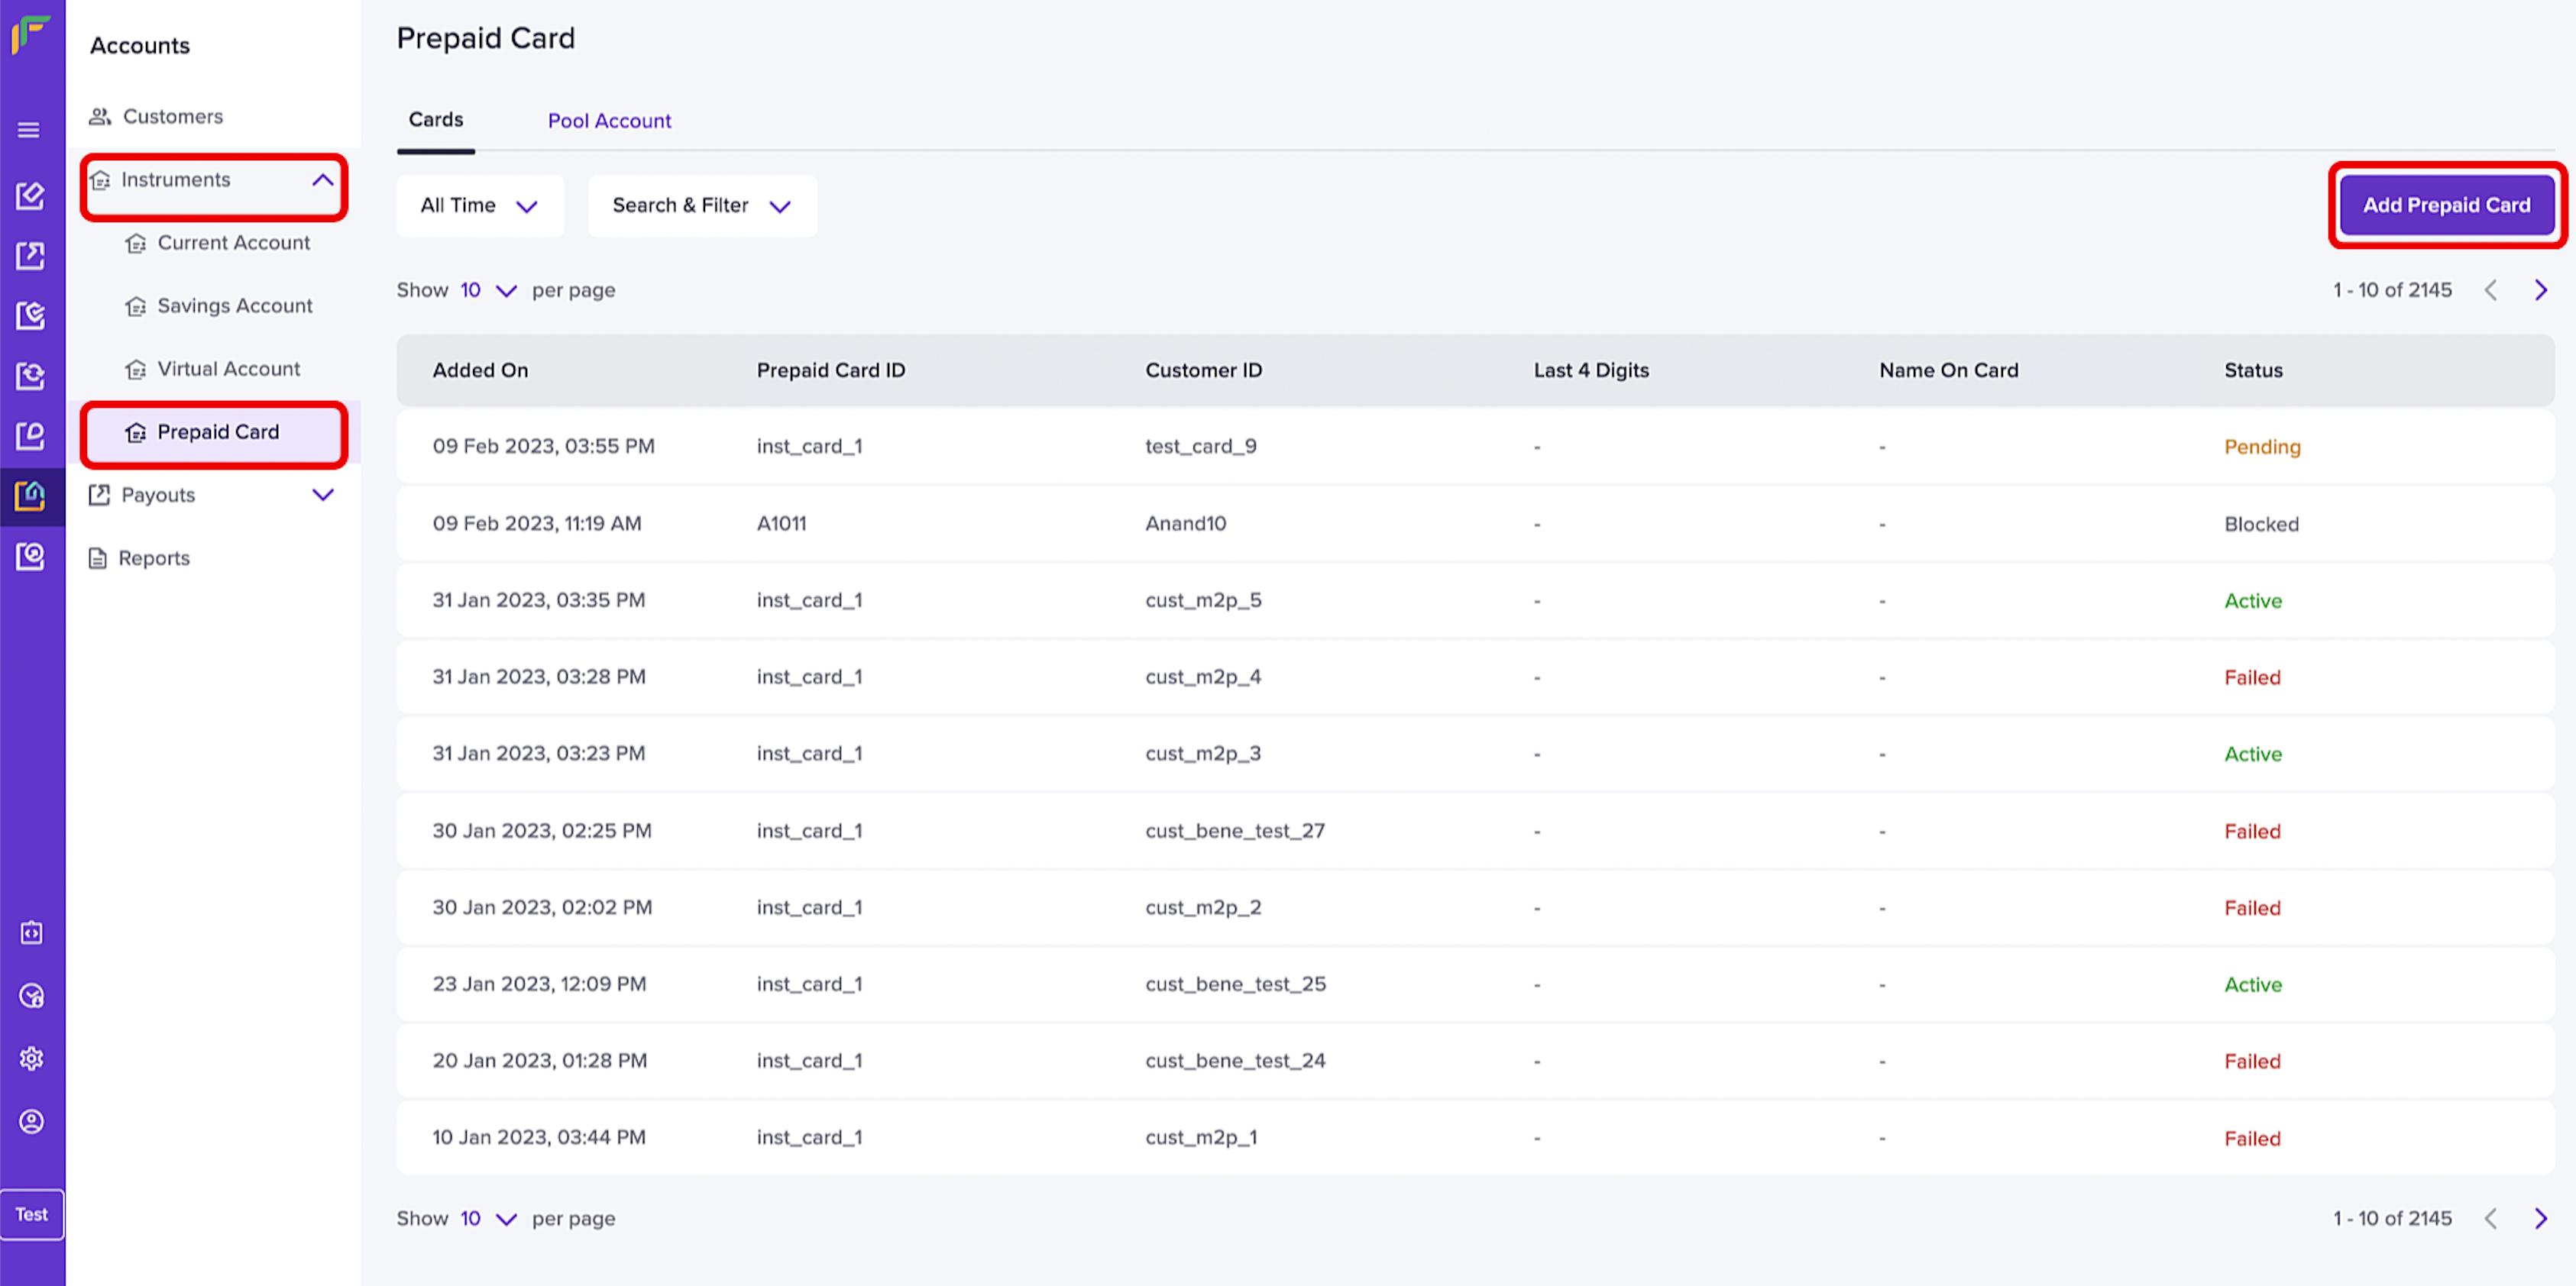
Prepaid Card
-
From the BaaS landing page, select Instruments > Prepaid Card.
-
Click Add Prepaid Card.
-
In the Add prepaid card popup, click the Customer ID field. Select the ADD CUSTOMER option that drops down from the field.
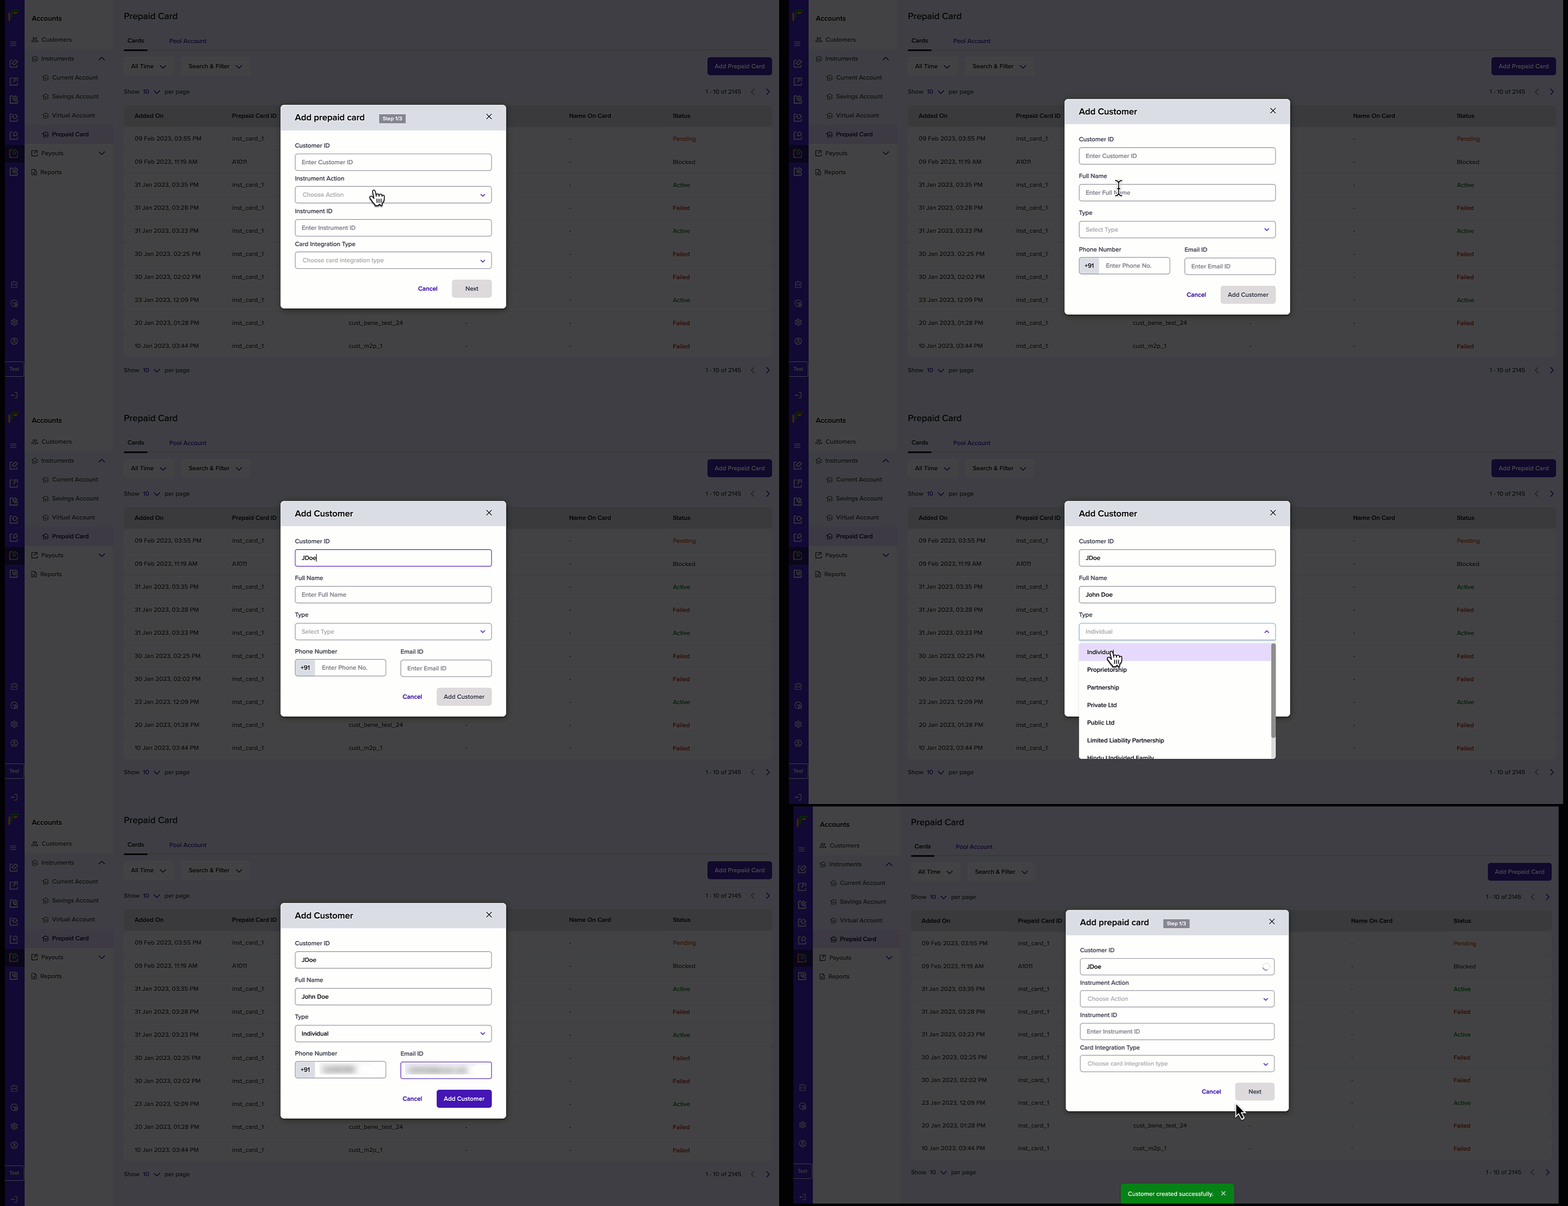
Add Customer
- Enter the following information in the Add Customer popup:
- Customer ID - Enter a unique ID to identify the customer.
- Full Name - Enter the full name of the customer.
- Type - Choose the type of customer from the drop-down menu.
- Phone Number - Enter the phone number of the customer.
- Email ID - Enter the email address of the customer.
-
Click Add Customer.
-
In the Add prepaid card popup, enter the following information and click Next:
- Customer ID - Enter the existing customer ID in this field.
- Instrument Action - Choose Create Prepaid Card from the drop-down menu.
- Instrument ID - Enter a unique ID to identify the instrument.
- Card Integration Type - Choose Prepaid Card from the drop-down menu.
- Enter the following information:
- Card Mode - Choose a card mode from the drop-down menu. The available options are digital and physical.
- First Name - Enter the first name of the customer in this field.
- Last Name - Enter the last name of the customer in this field.
- Program Uid - Choose a program Uid from the drop-down menu. Cashfree Payments share the program Uid.
- Name On Card - Enter the name in this field. The entered name displays on the card.
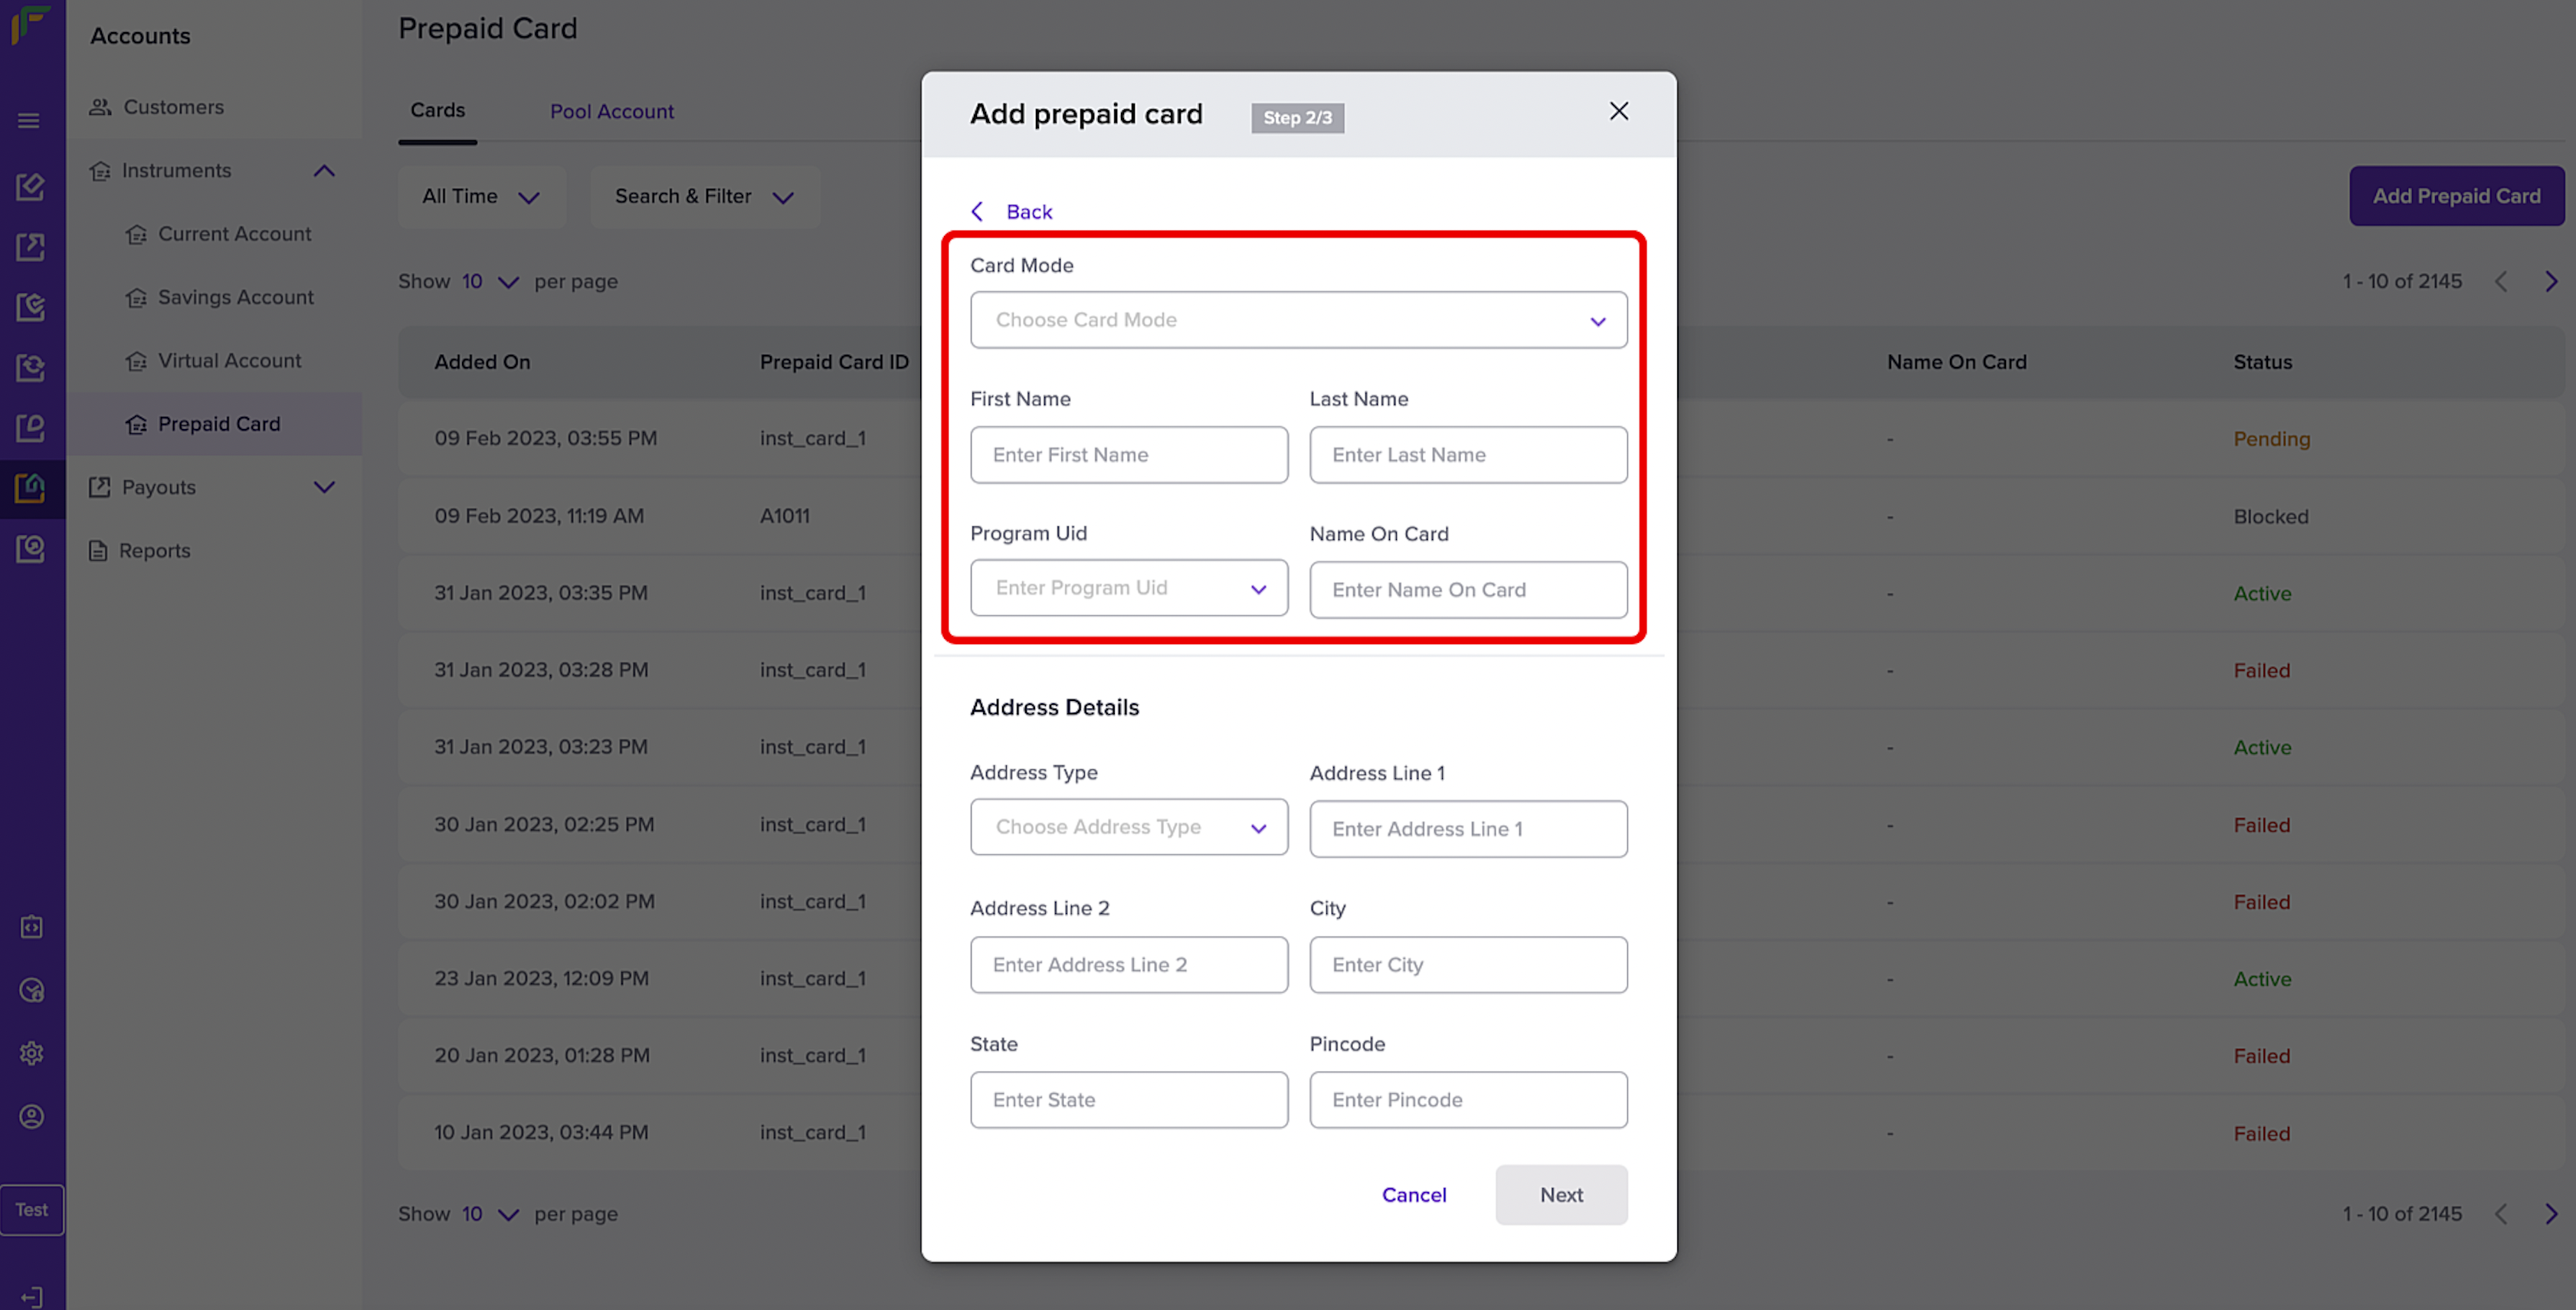
Card Details
- In the Address Details section, enter the following information and click Next:
- Address Type - Choose DELIVERY_ADDRESS from the drop-down menu.
- Address Line 1 - Enter the address of the customer in this field.
- Address Line 2 - Enter the address of the customer in this field.
- City - Enter the city as mentioned in the customer address.
- State - Enter the state as mentioned in the customer address.
- Pincode - Enter the PIN code as mentioned in the customer address.
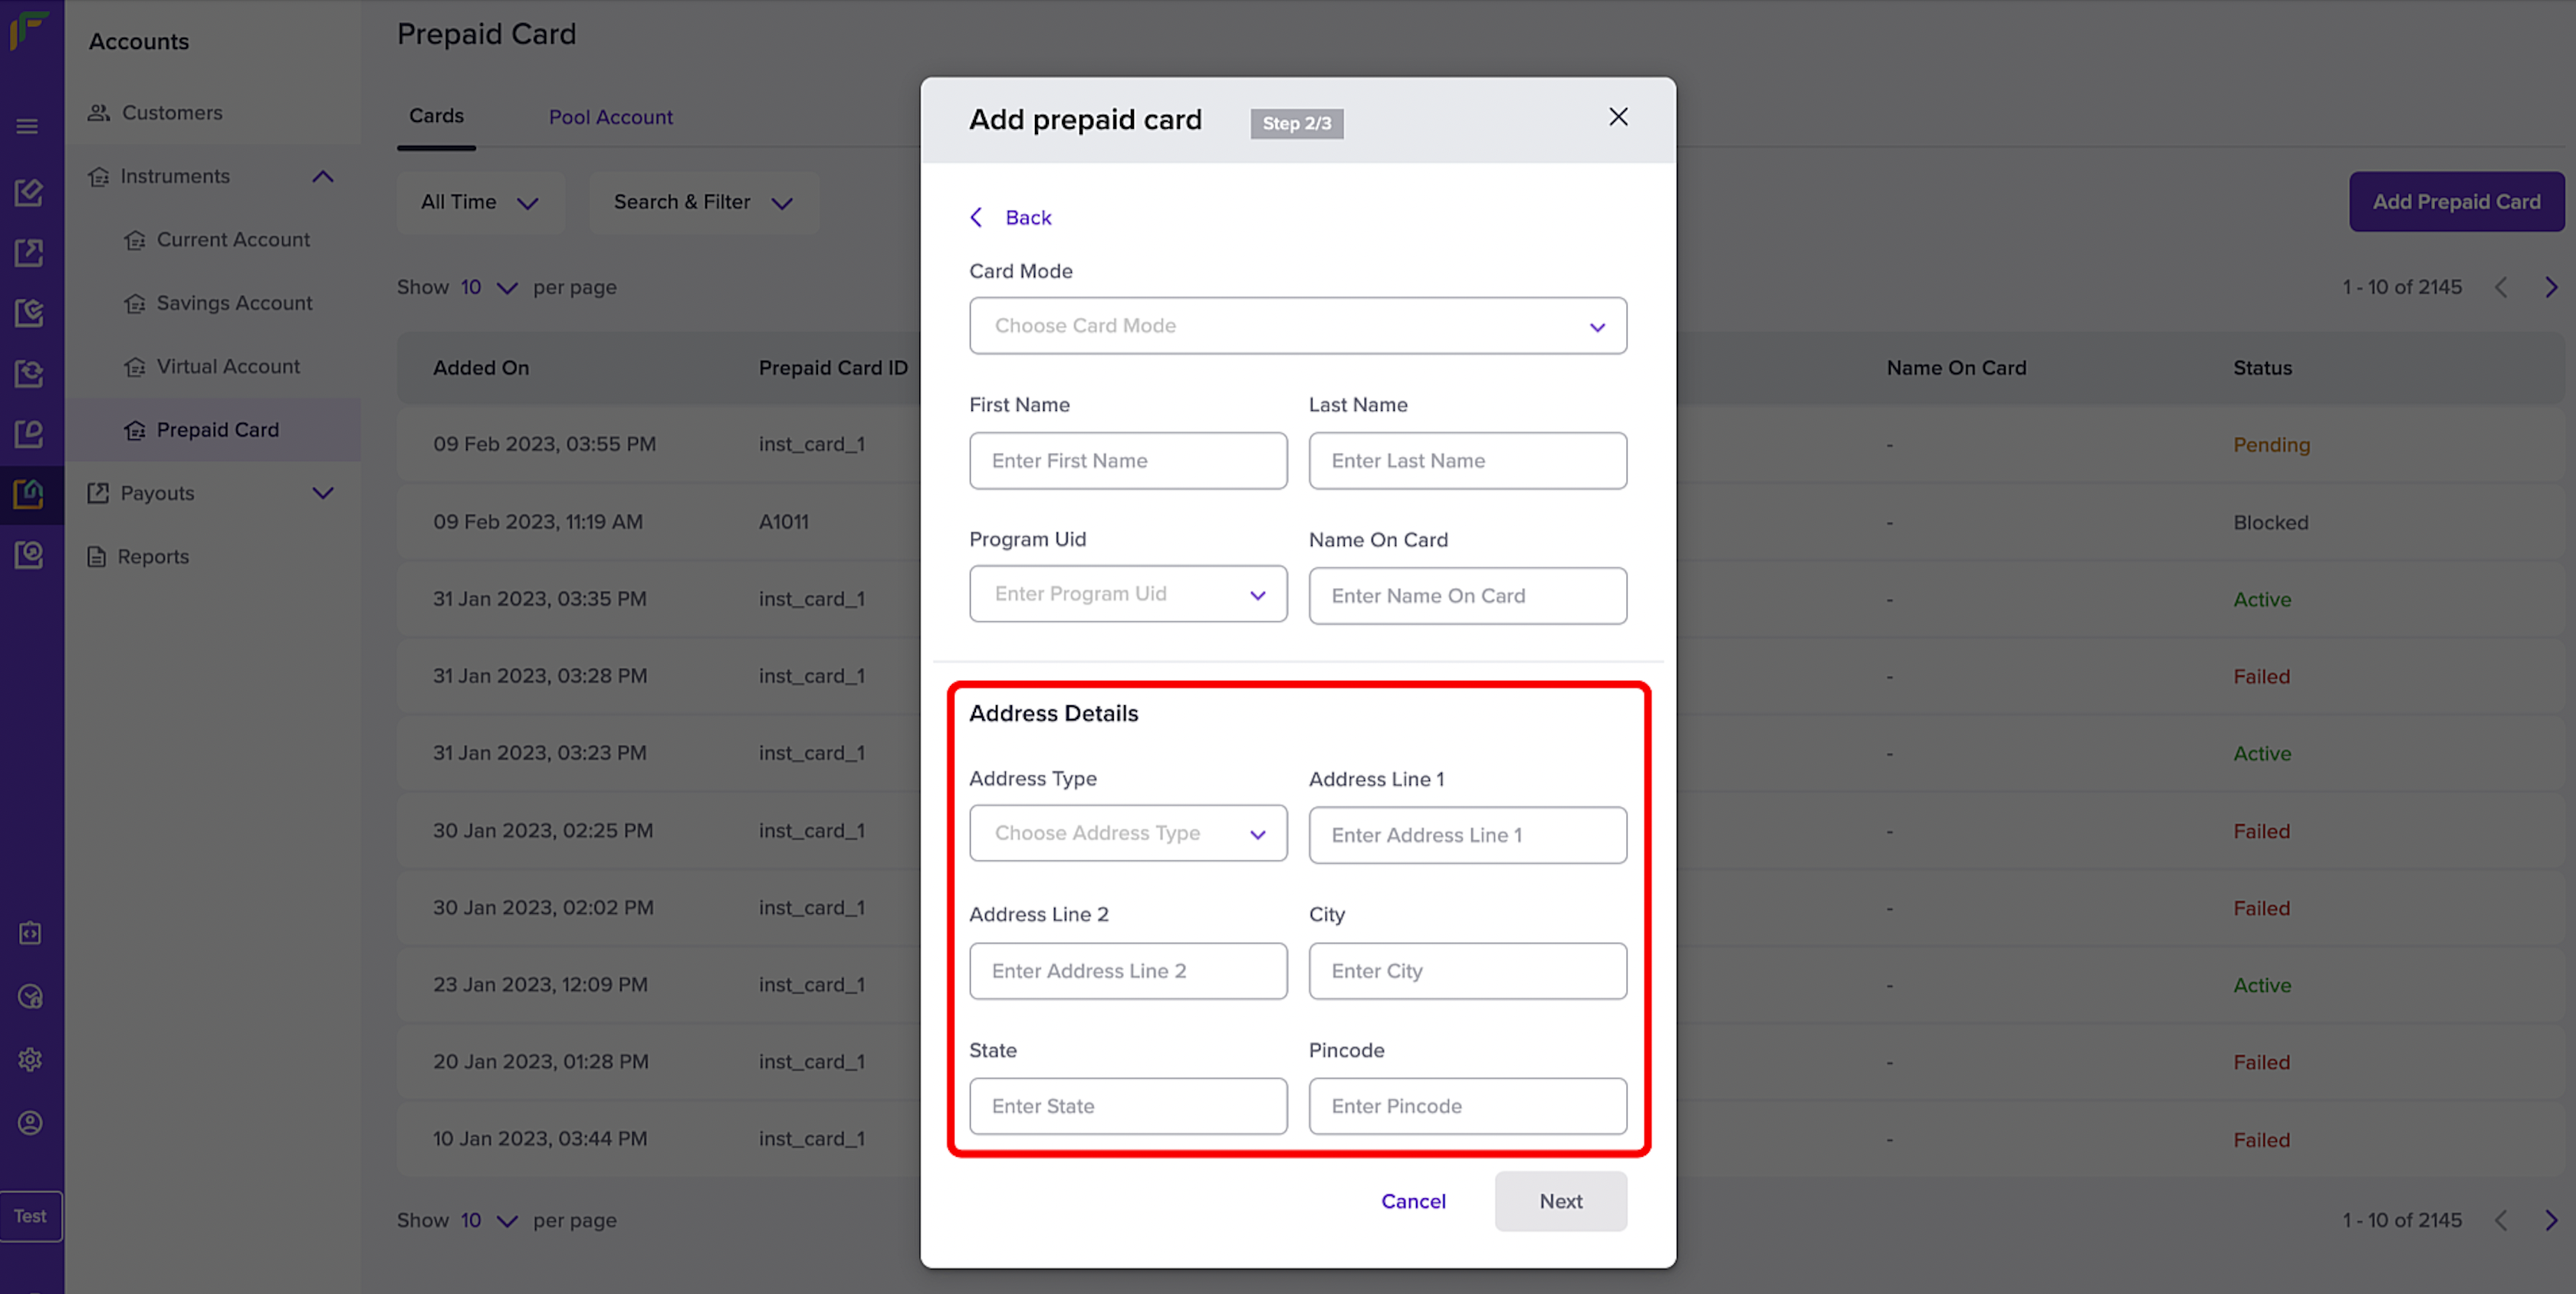
Address Details
- In the KYC Details section, enter the following information and click Add Instrument:
- Document Type - Choose a document type from the drop-down menu.
- Document Number - Enter the selected document's number in this field.
- Full Name - Enter the full name of the customer.
- Address Line 1 - Enter the address of the customer in this field.
- Address Line 2 - Enter the address of the customer in this field.
- Date of Birth - Enter the date of birth of the customer. Use the Calendar icon to select the date, month, and year, and click Apply.
- Pincode - Enter the PIN code of the customer's address in this field.
- Gender - Choose the gender of the customer.
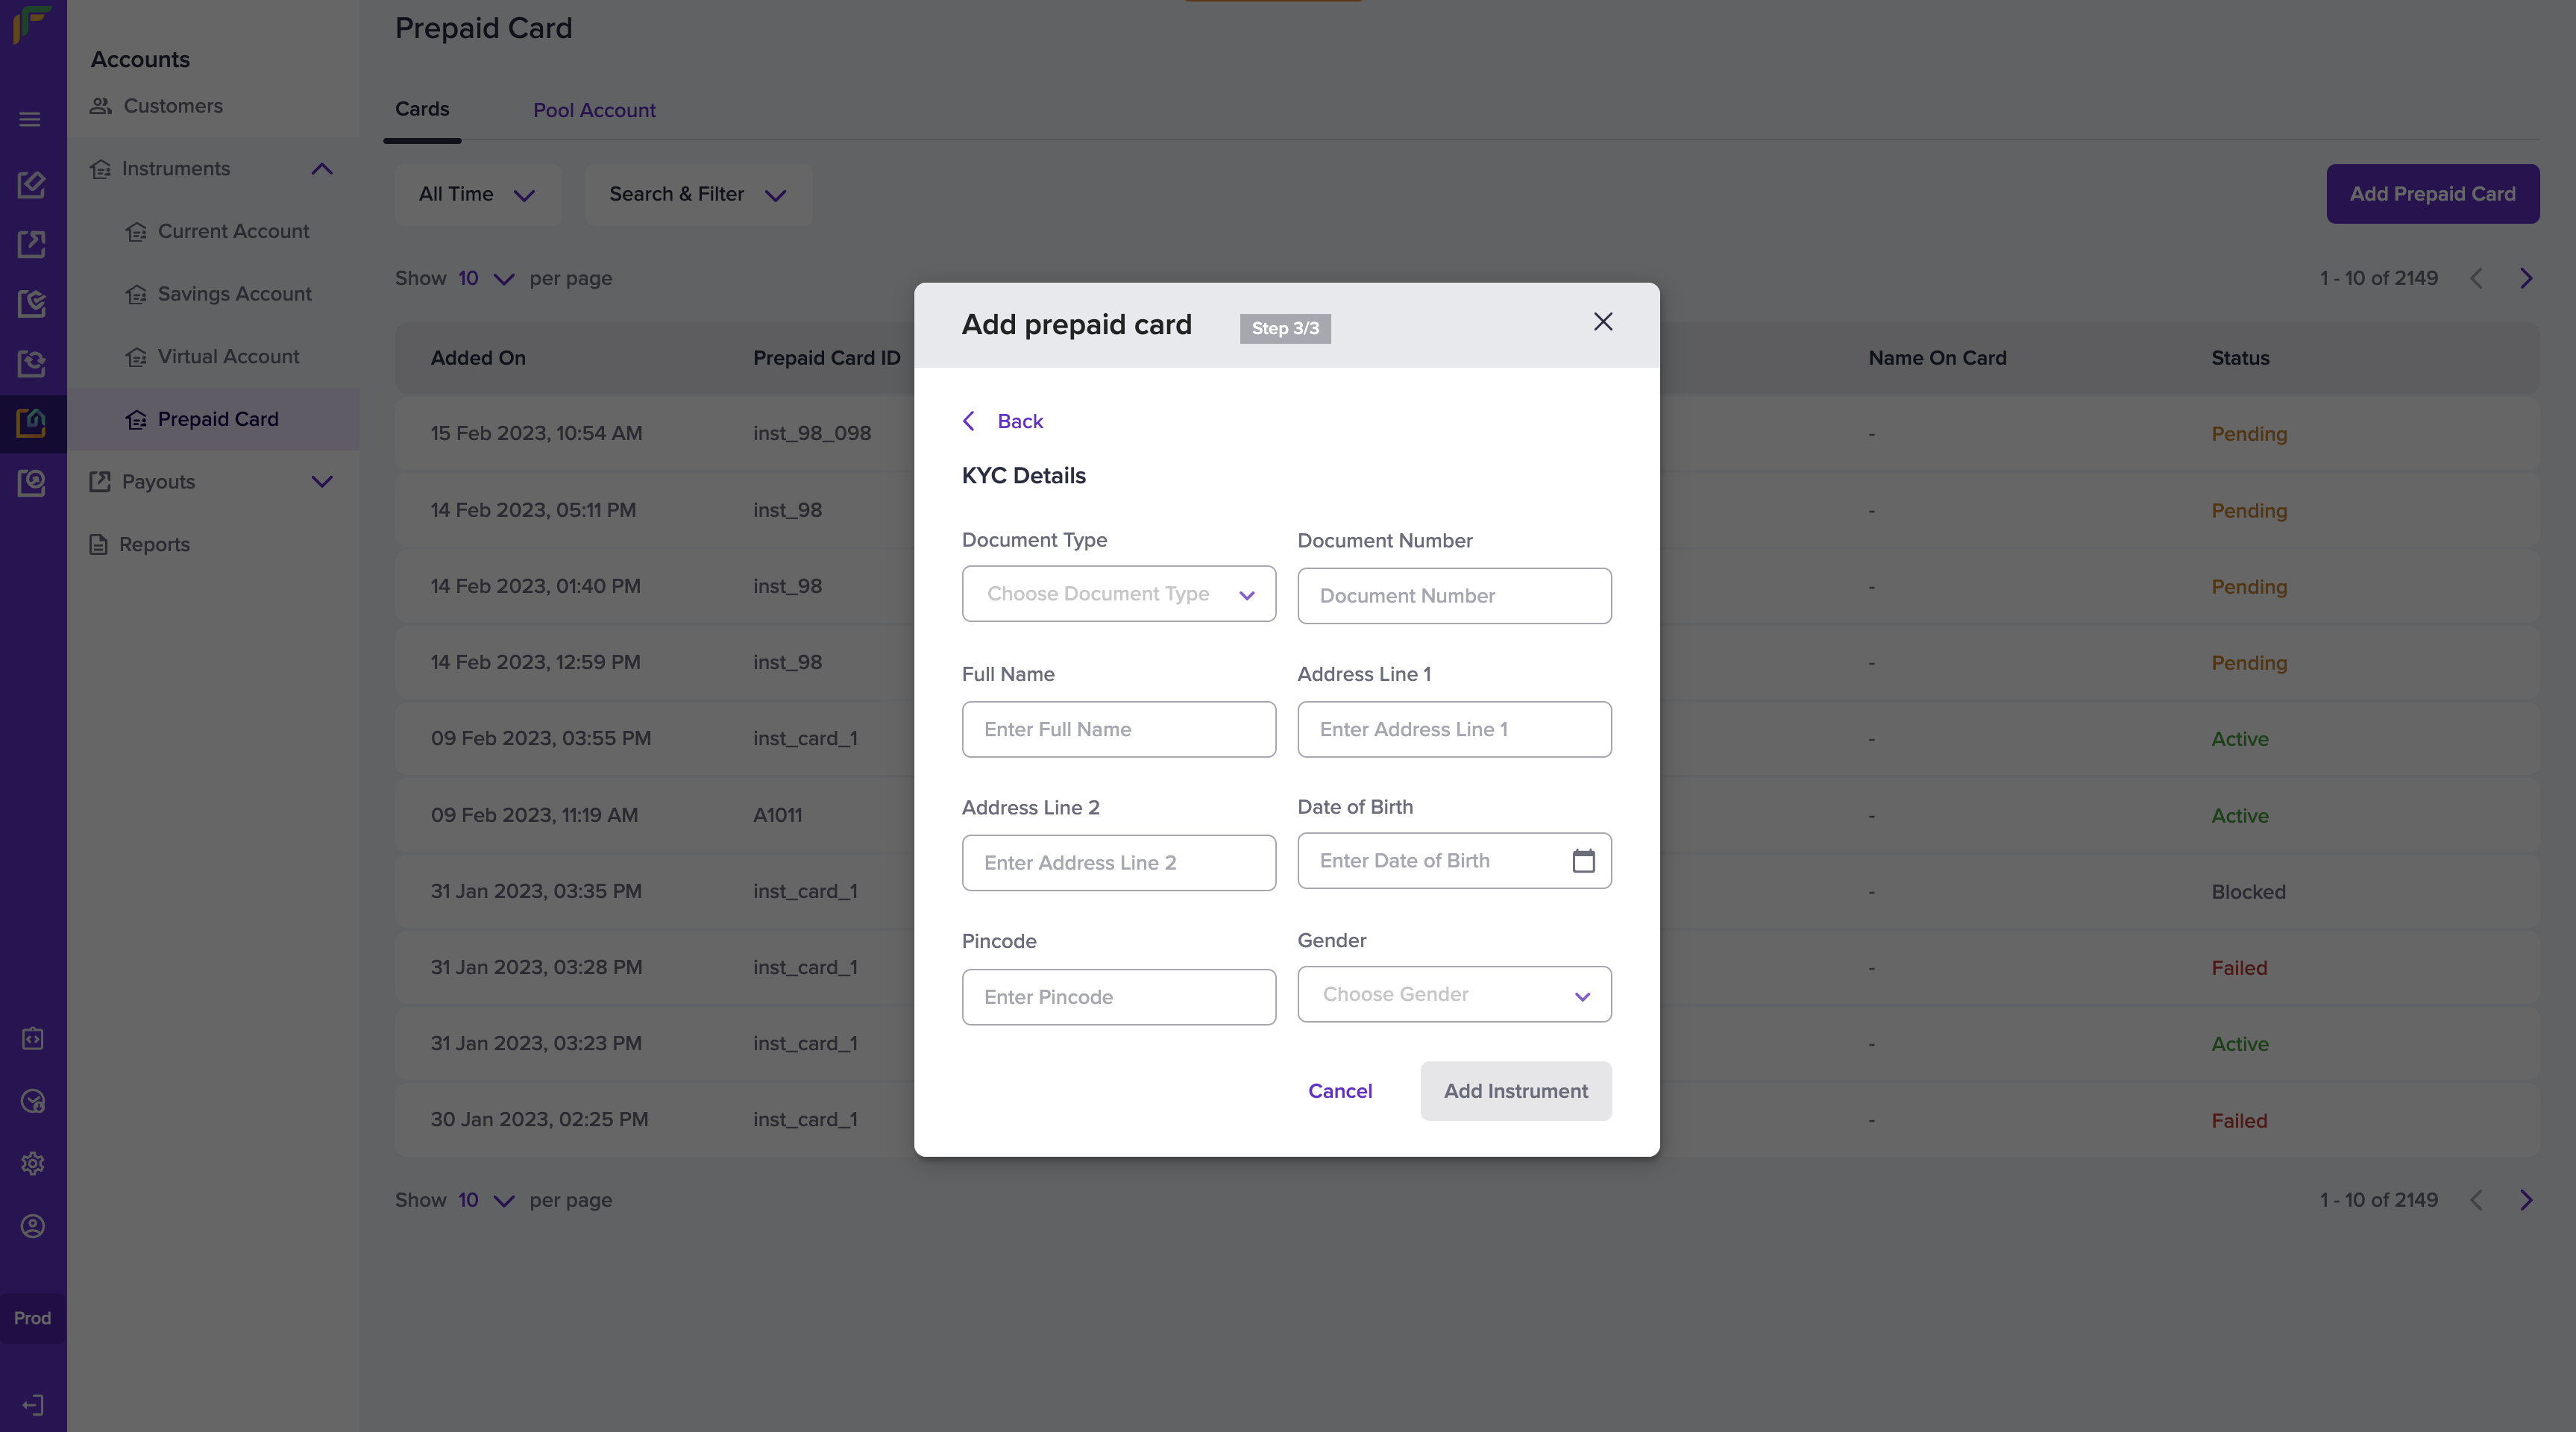
KYC Details
Existing Customer
Onboard your existing customers to use your prepaid cards with a few simple steps. Swap the other payment tools for prepaid cards and provide your customers with a hassle-free experience.
-
From the BaaS landing page, select Instruments > Prepaid Card.
-
Click Add Prepaid Card.
-
In the Add prepaid card enter the customer ID in the respective field and follow the instructions mentioned above to add a prepaid card to the existing customer ID.
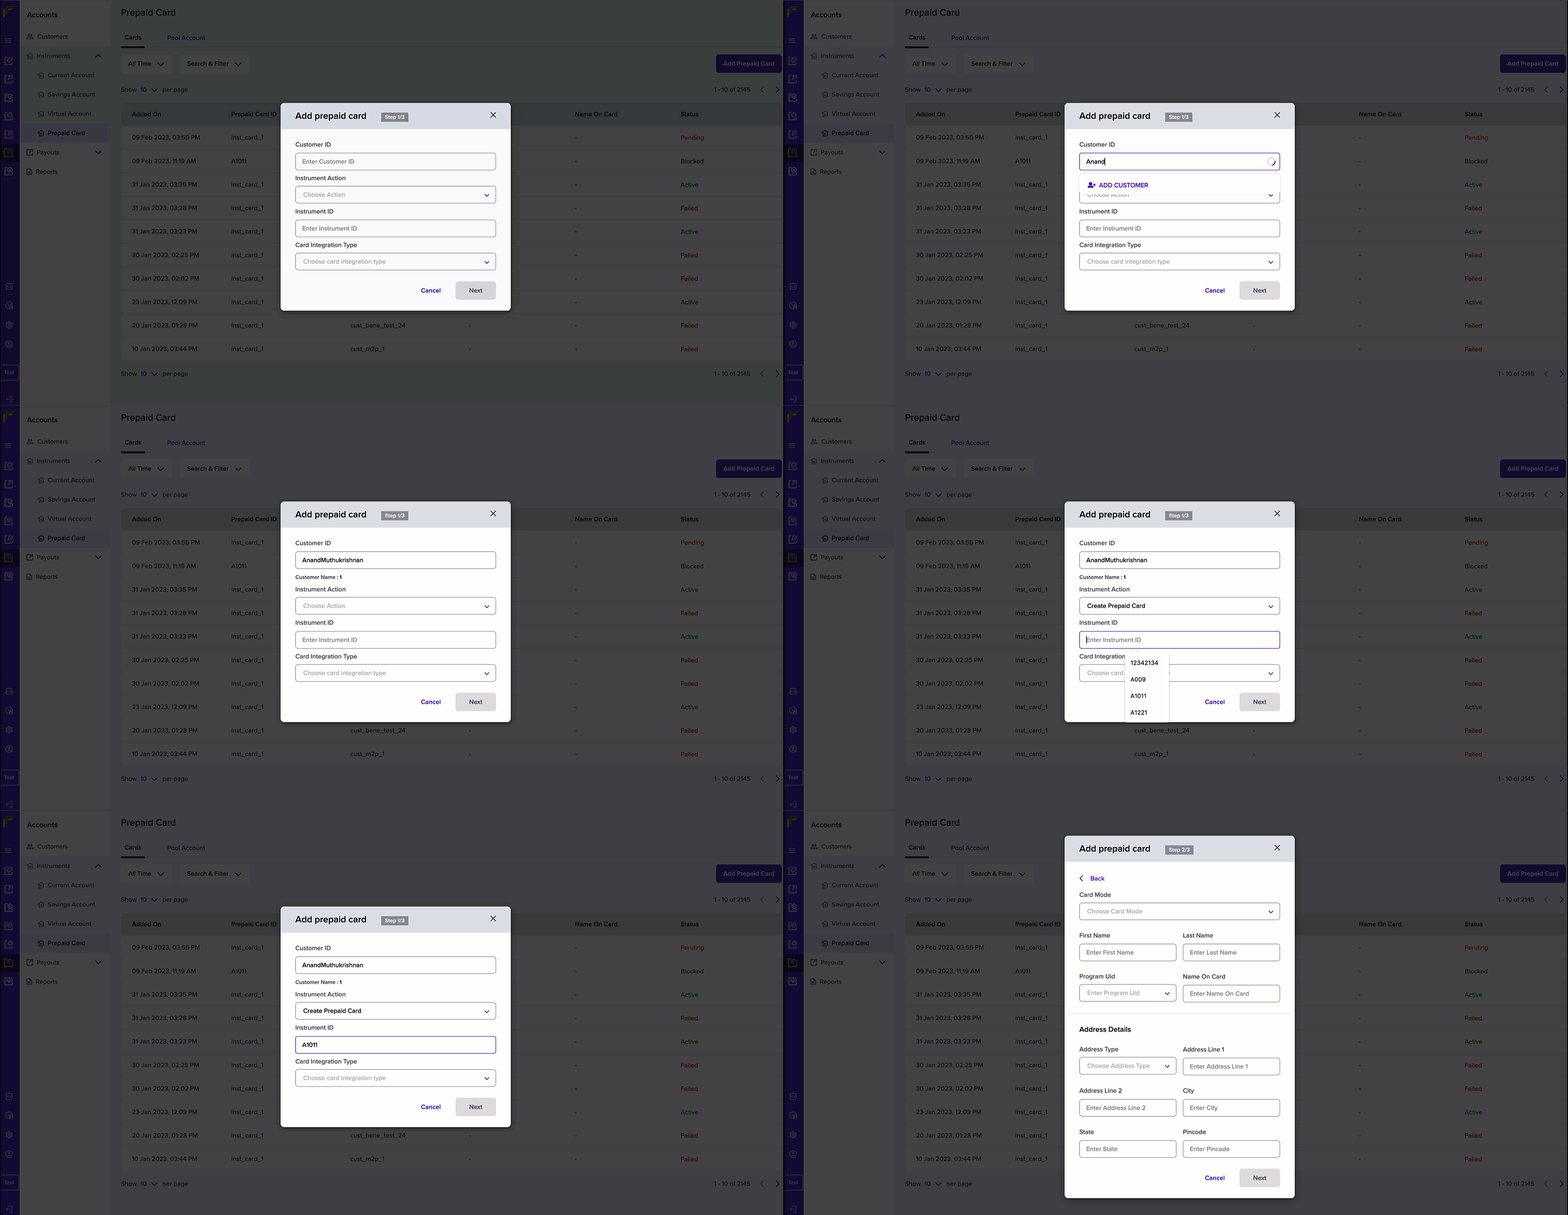
Existing Customer
OTP Verification
The prepaid card request initiates, and Cashfree Payments creates a prepaid card with authorisation pending. The customer receives an OTP to the provided mobile number. The activation of the prepaid card is complete after the OTP validation.
Mobile Flow
Your customer needs to click the link they received in the message and follow the instructions below to complete the OTP authentication:
- In the Welcome screen, enter the phone number in the respective field and click Generate OTP.
- Enter the OTP in the Enter OTP popup and click Confirm.
The status of the prepaid card changes to Active after successful OTP authentication.

OTP Verification Mobile Flow
Resend OTP
If you need to resend the OTP to the customer, follow the instructions:
- In the Prepaid Card screen, use the following filters to search for prepaid cards that requires activation:
- All Time - Use this drop-down menu to set the date range.
- Search & Filter - Use this drop-down menu to set the search filter.
- Search - Use this drop-down menu to determine the search value and enter the value in the field. For example, if you choose Instrument ID, enter the specific instrument ID in the field.
- Filters - Select Pending using the checkbox.
-
Select Apply.
-
The results display in the form of a grid. Click a card from the grid to view the instrument details.
-
Click the URL in the Card Issuance Redirection URL field to send the OTP to the customer phone number for verification.
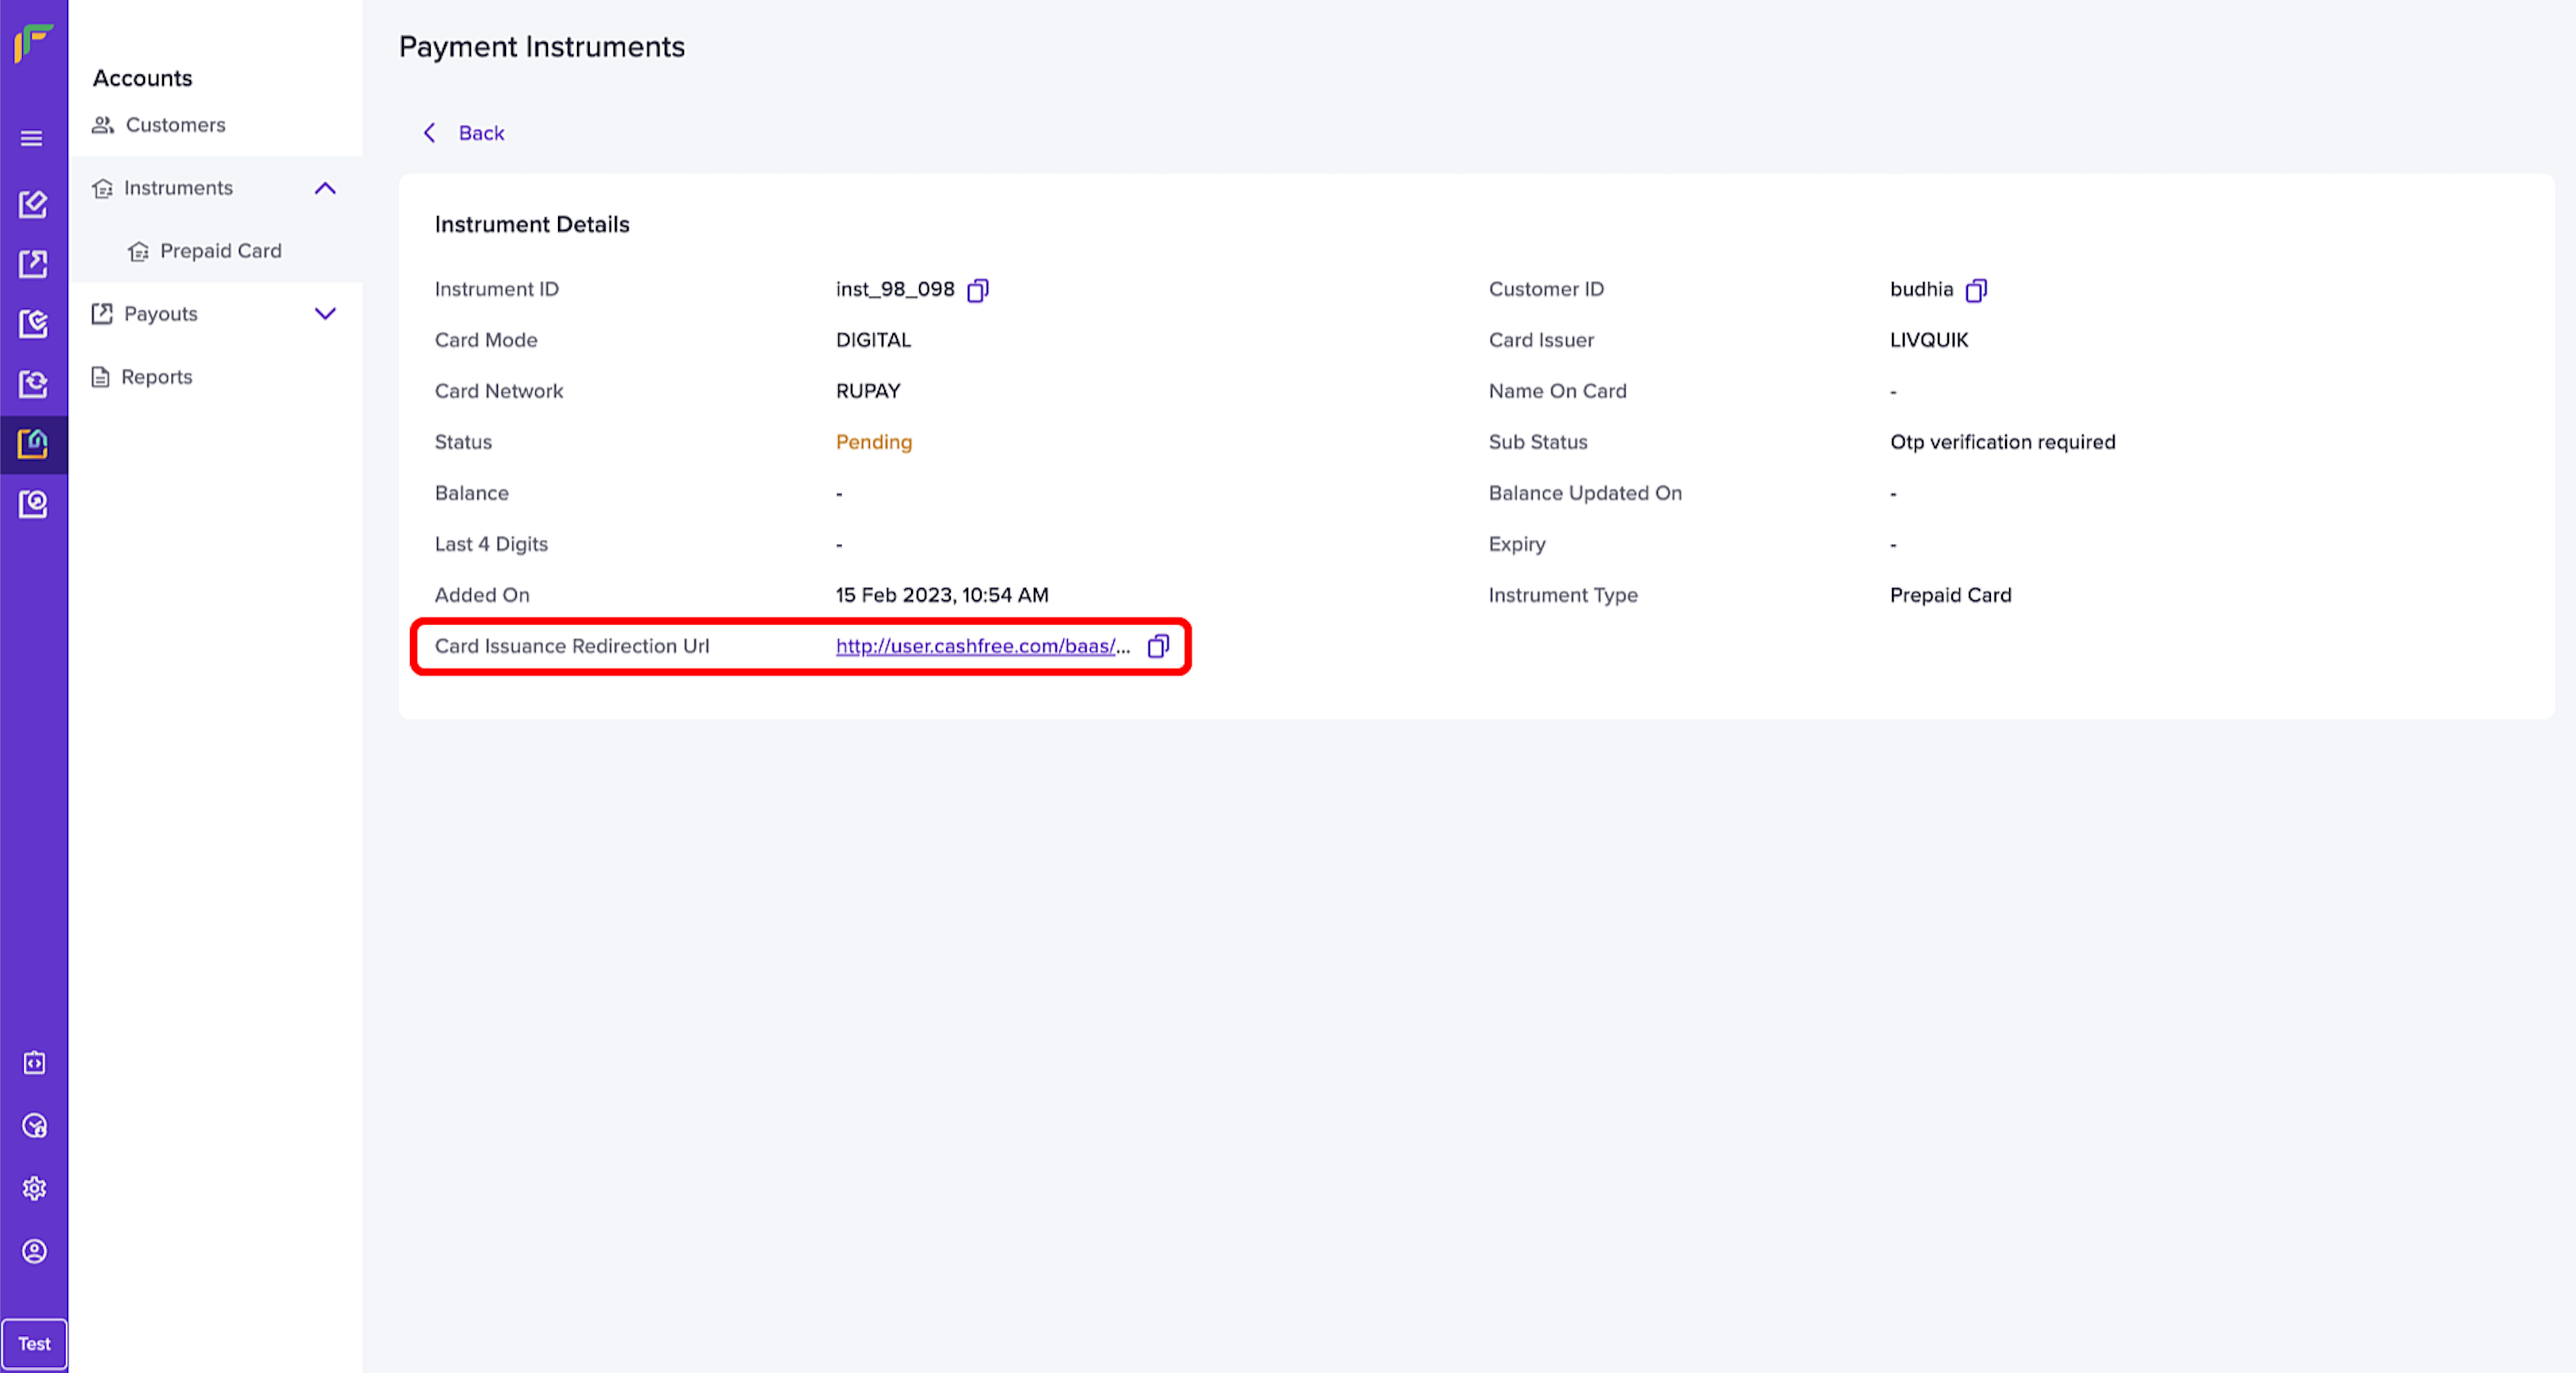
Card Issuance URL
When the user tries to view the prepaid card details in the merchant app or website, the Get SDK Token API sends a request to the Cashfree Payments server with the customer ID. The card details are then visible only to your customer.
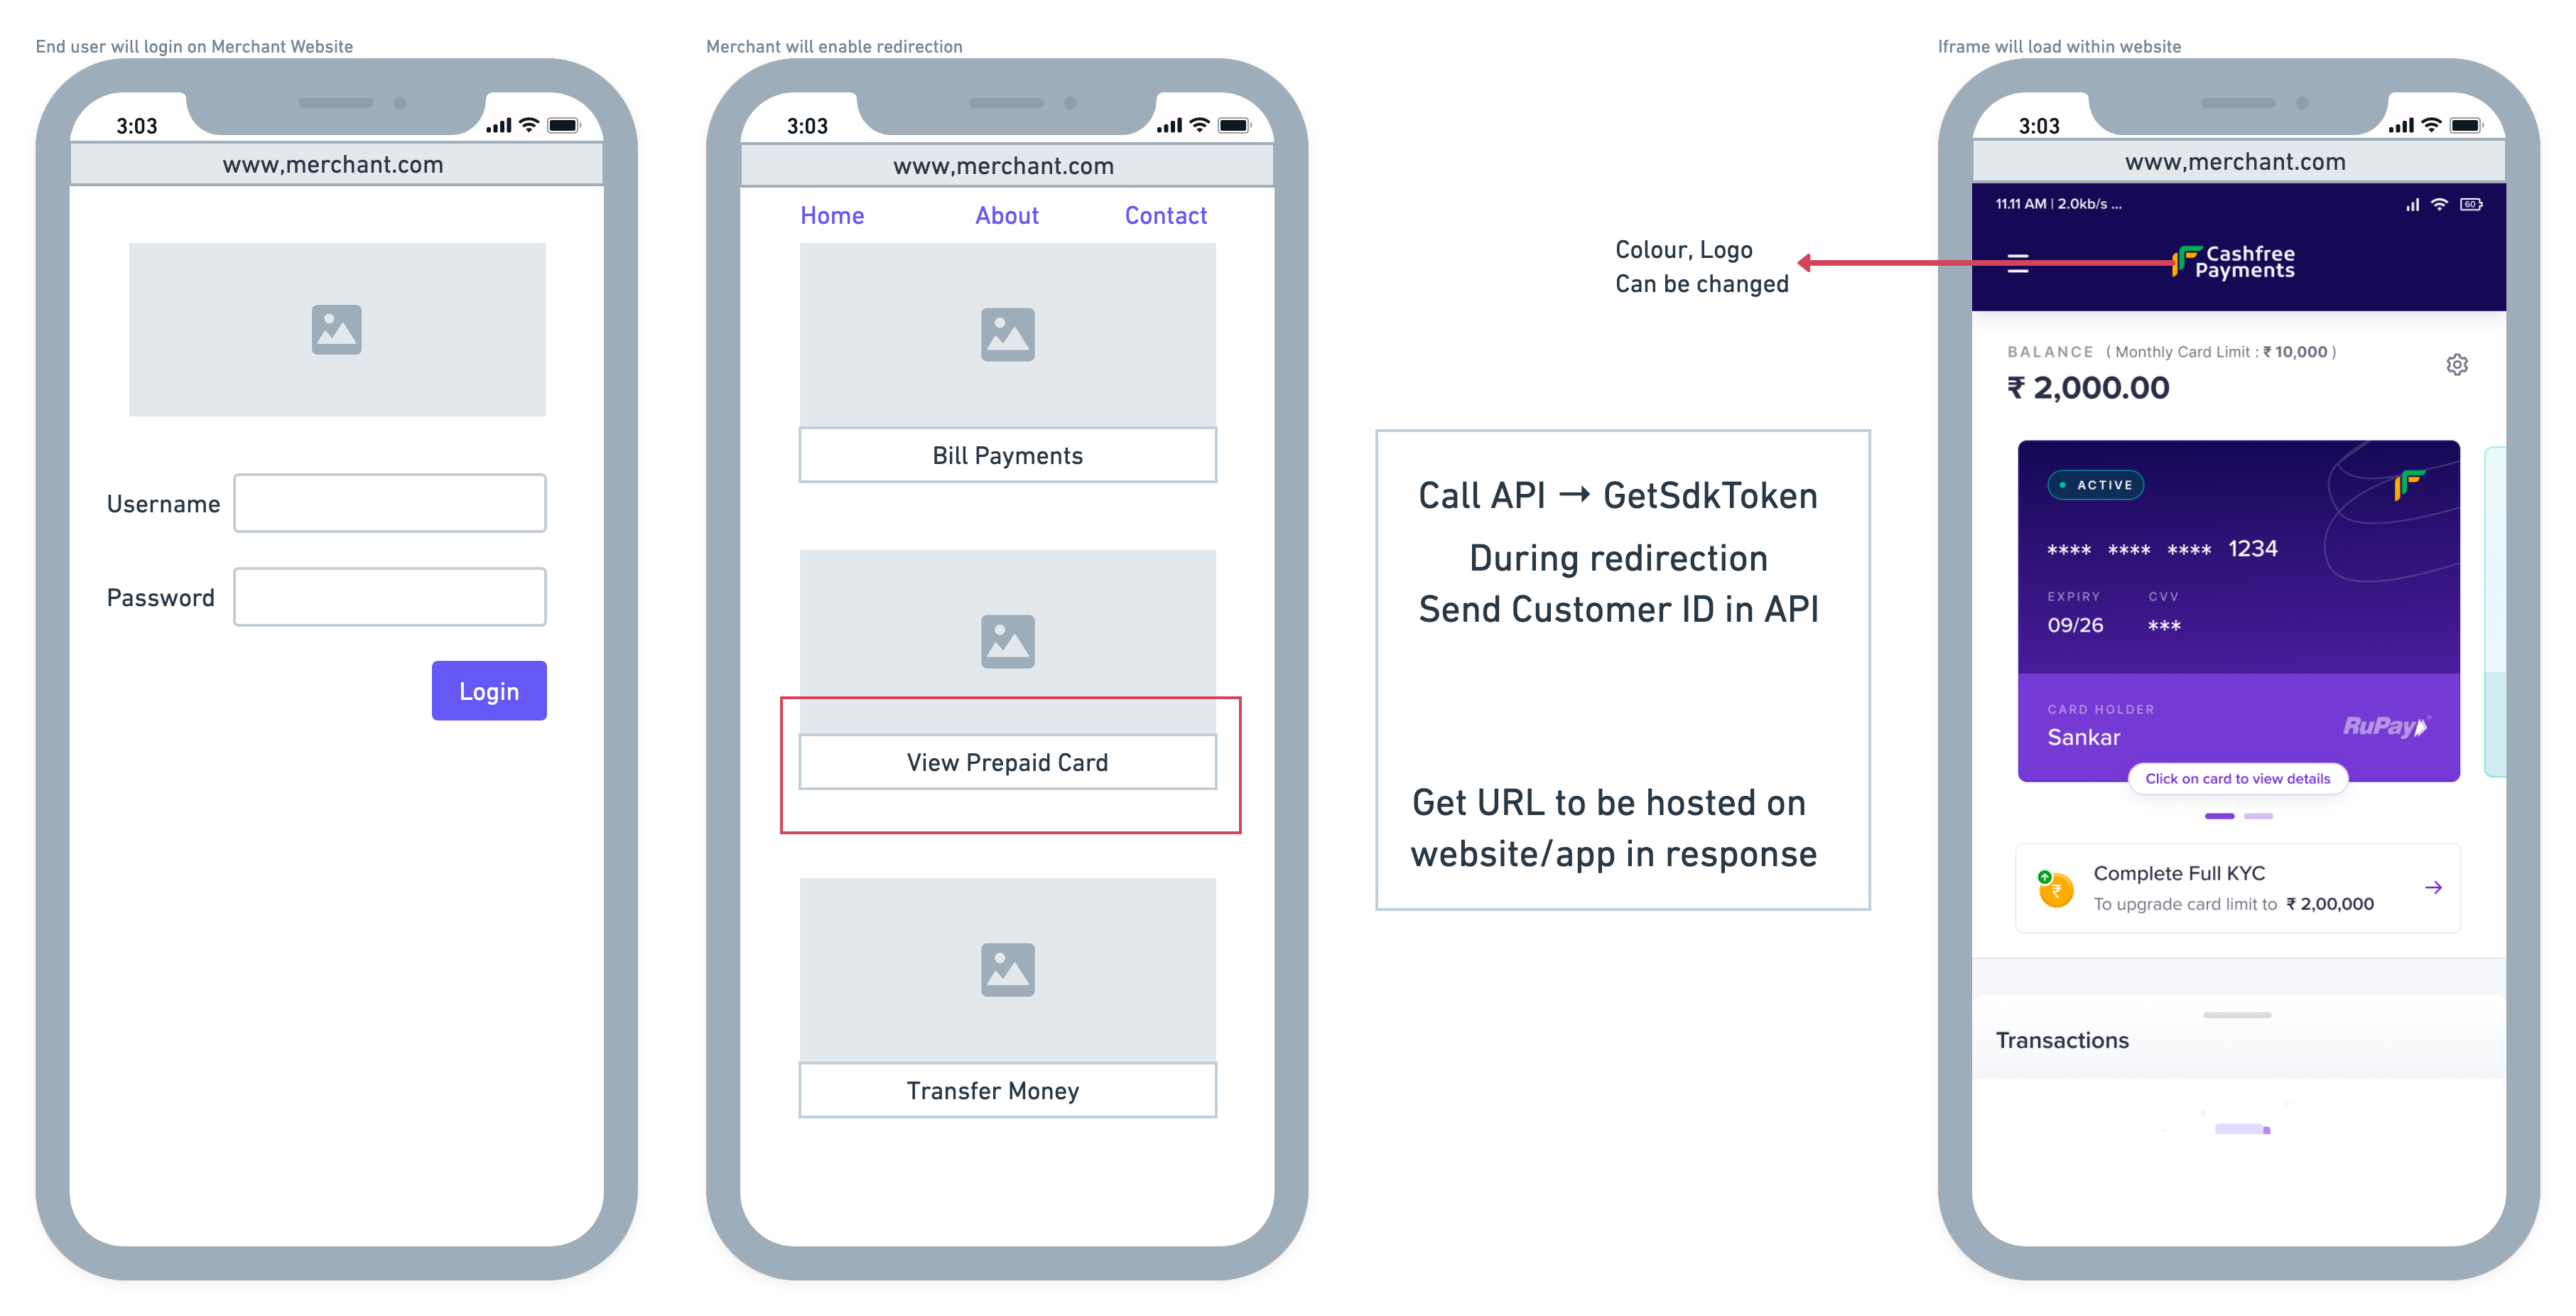
View Card Details
Updated about 1 year ago