Payouts Classic Dashboard
Payouts dashboard helps you with active disbursal management. With our dashboard, you can effectively operate, automate, and monitor your account. You can use it to manage transfers and reversals, handle disputes, and gain insight into the overall disbursals of your business.
To get started you must first signup with Cashfree and activate your account. Once you have set up your account, you can use it to access the dashboard and to create actual transfers.
Summary
The summary provides high-level insight into your payouts account. It gives you information about the available balance and transferred amount. It provides you with some statistics about your daily and weekly transfers. The Summary dashboard provides useful at-a-glance insight about the payout disbursals in your business.
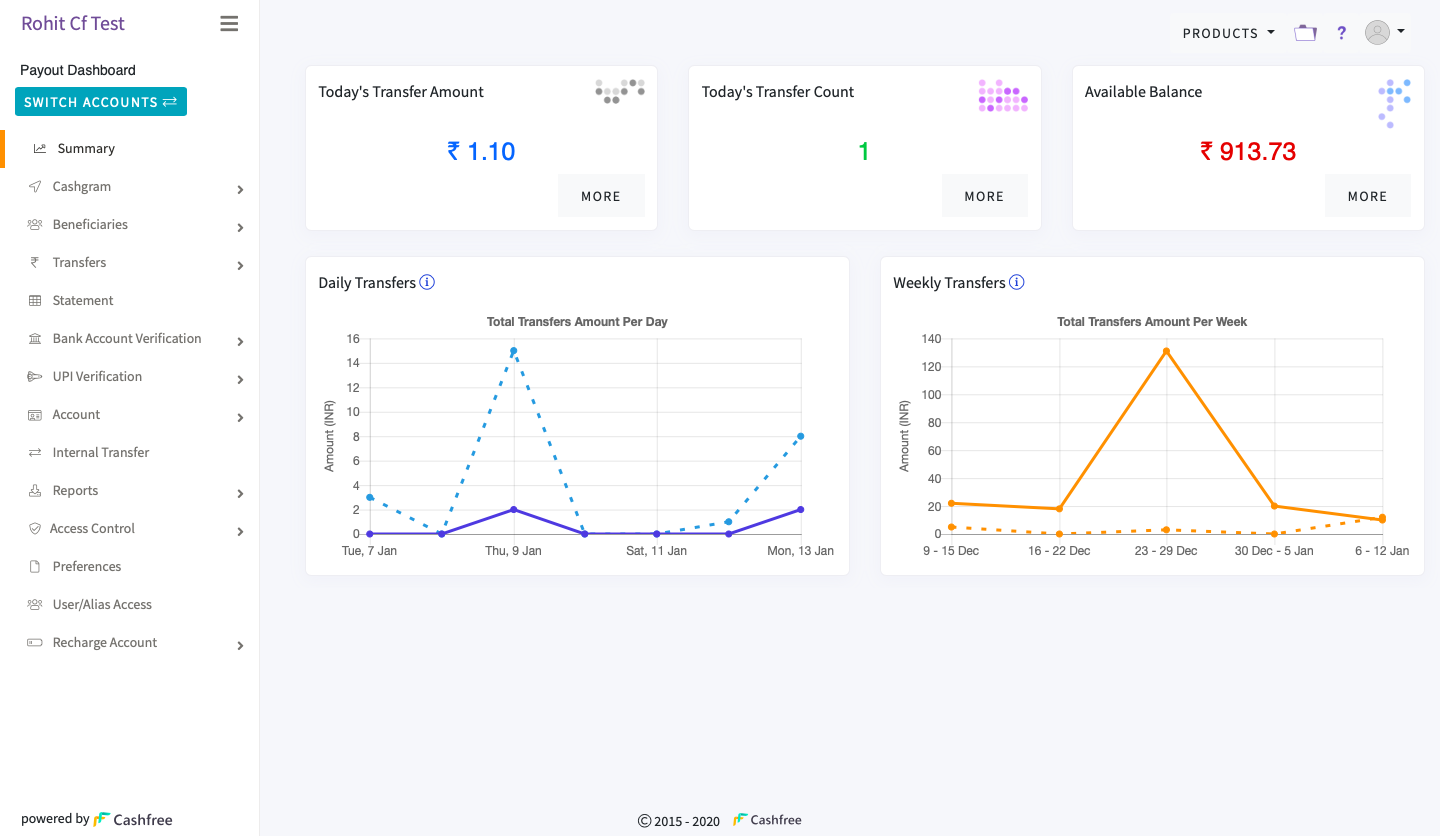
Summary
Cashgram
Payouts Cashgram is a specially crafted web link to send money to your customers. With Cashgram you can send instant refunds for COD payments, cash prizes to the customers, security deposits that need to be returned, and so on, even if you do not know their bank account details. Users have to simply click on the link received on Whatsapp, email or SMS and accept the payment using one of the payment methods provided.
Cashgram reduces the processing time for refunds/payments by eliminating the extra manual work that you would have to do to collect users bank details and process them further.
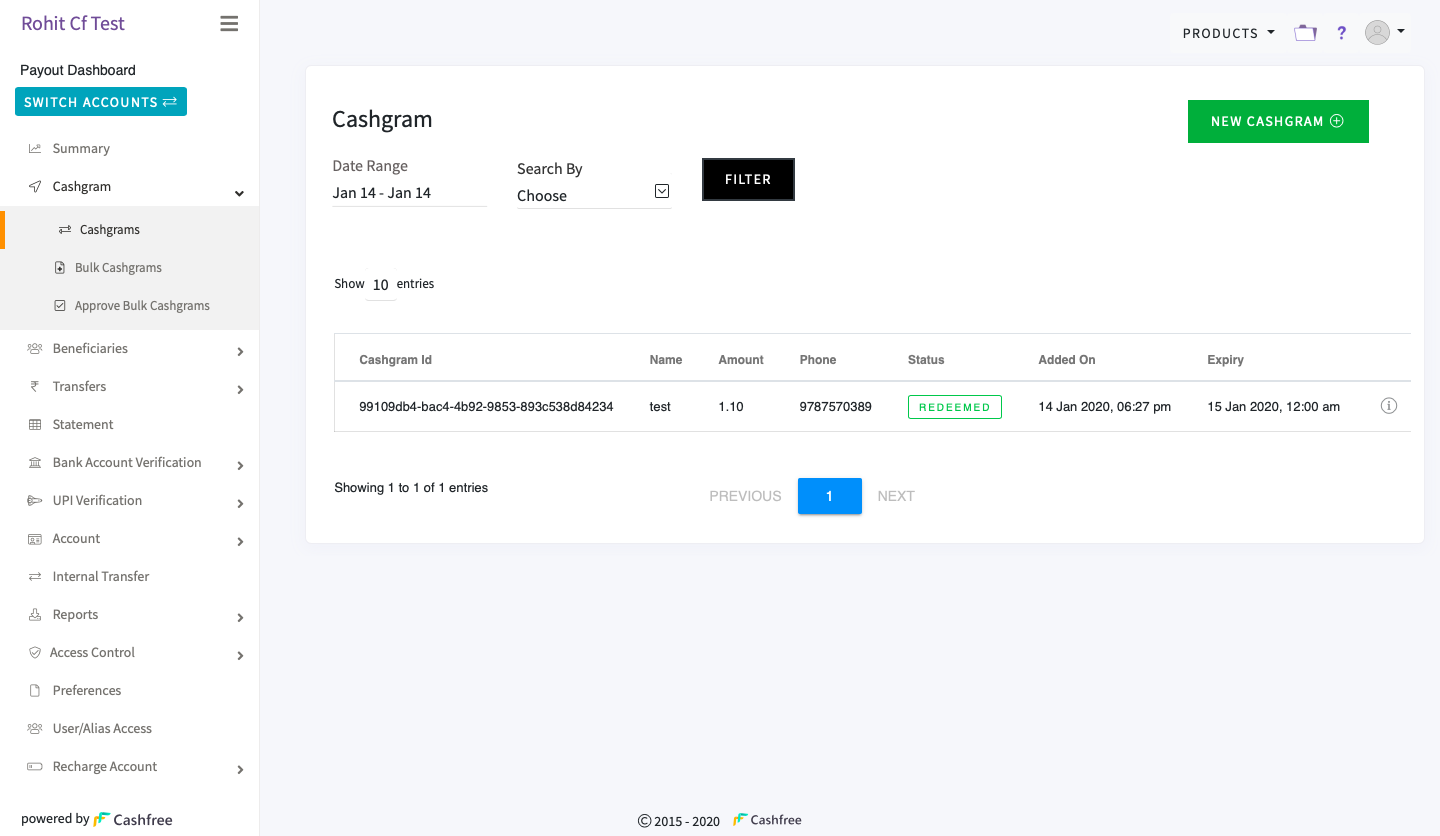
Cashgram
To generate a Cashgram,
- Go to Payouts Dashboard > Cashgram > Cashgrams > click NEW CASHGRAM. OTP is sent to your registered phone number.
- Enter the OTP received on your phone, and click Submit. You can also set up google-authenticator to verify.
- Enter the Cashgram Id, Customer Name, Amount to be transferred, Customer Phone, and Customer Email.
- Select an Expiry date. The Cashgram link will not be valid beyond this date.
- Enter the Remarks.
- Select the checkbox Send Cashgram Link via WhatsApp, Email, and SMS to send the link to the user.
- Click CREATE. The Cashgram link is created and sent to the customer.
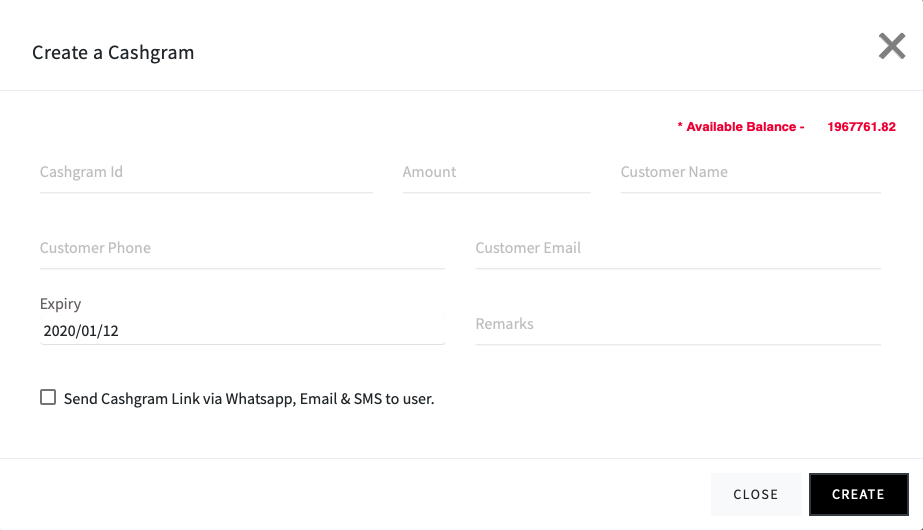
Create Cashgram
You can also use our API to create Cashgram. Click here to know more.
Bulk Cashgrams
When you have to send cashgrams to a large number of customers you can use the Bulk Cashgram feature.
You can view the status of the uploaded files and also download them to view the details.
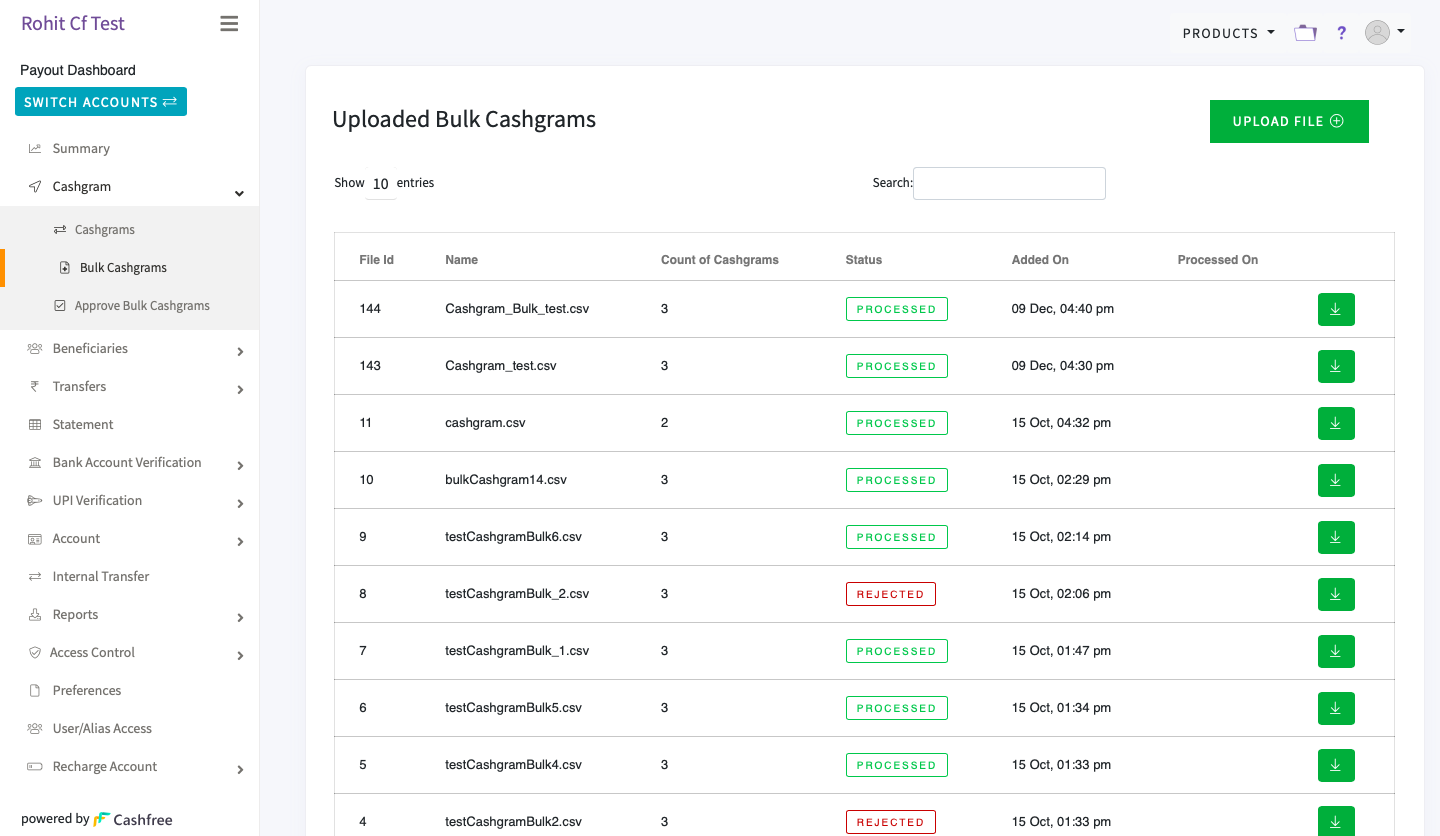
Bulk Cashgrams
To upload a bulk Cashgram file,
- Go to Payouts Dashboard > Cashgram > Bulk Cashgrams > click UPLOAD FILE.
- Download a sample format in which you need to provide the Cashgram details.
- Fill in the details and save the file.
- Click CHOOSE FILE to select the file and then click UPLOAD.
Approve Bulk Cashgrams
The approve bulk cashgrams feature allows you to approve or reject any bulk cashgrams file for payouts.
Cashfree enables Approve Bulk Cashgrams on request by the merchant.
Beneficiaries
Add your customers as beneficiaries using their bank account details or UPIs to make instant and automated payments.
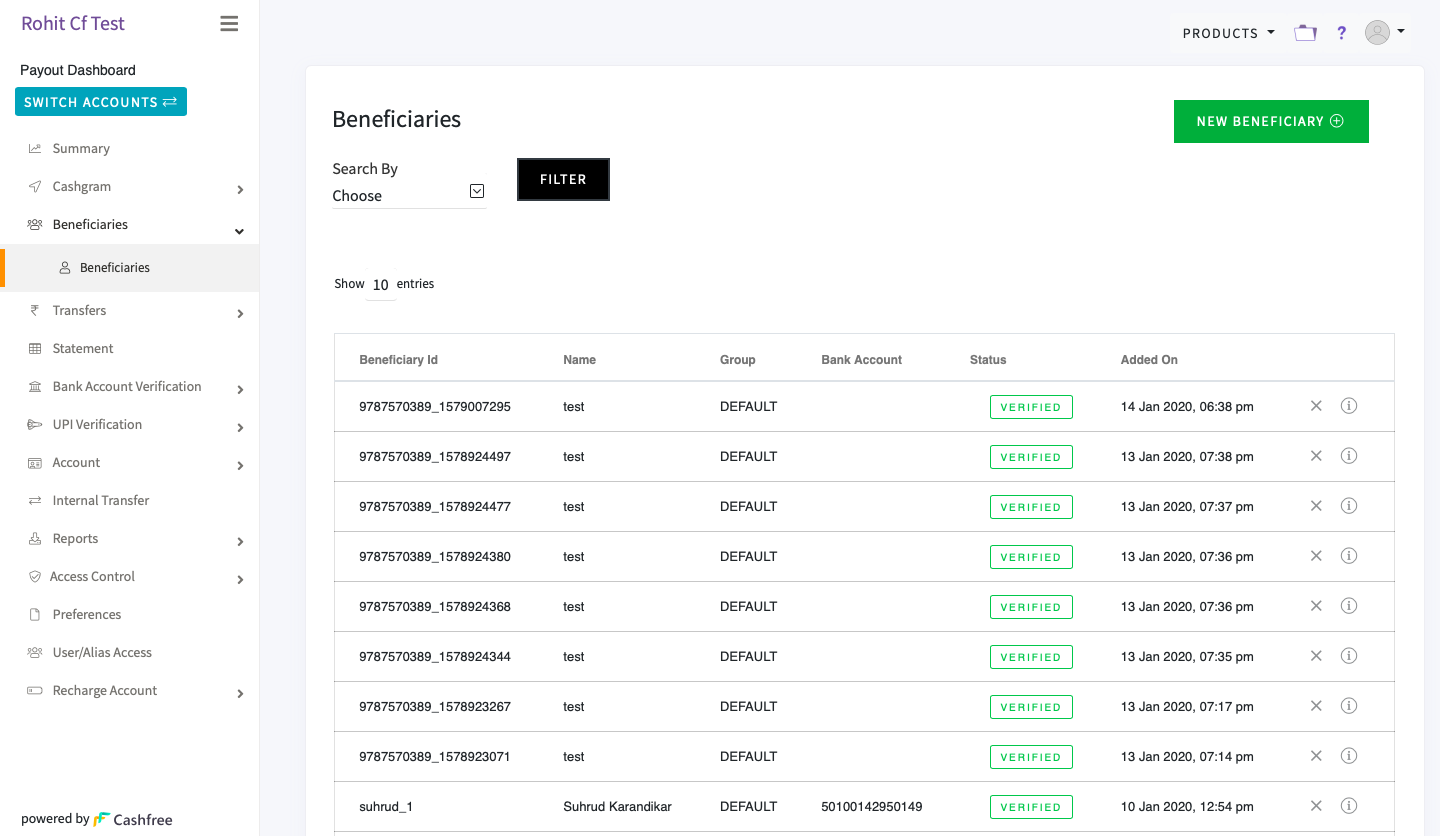
To add a beneficiary,
- Go to Payouts Dashboard > Beneficiaries > Beneficiaries > click NEW BENEFICIARY.
- Enter the Beneficiary Id, Name, Phone, UPI or Bank Account details, and the address.
- Click ADD BENEFICIARY.
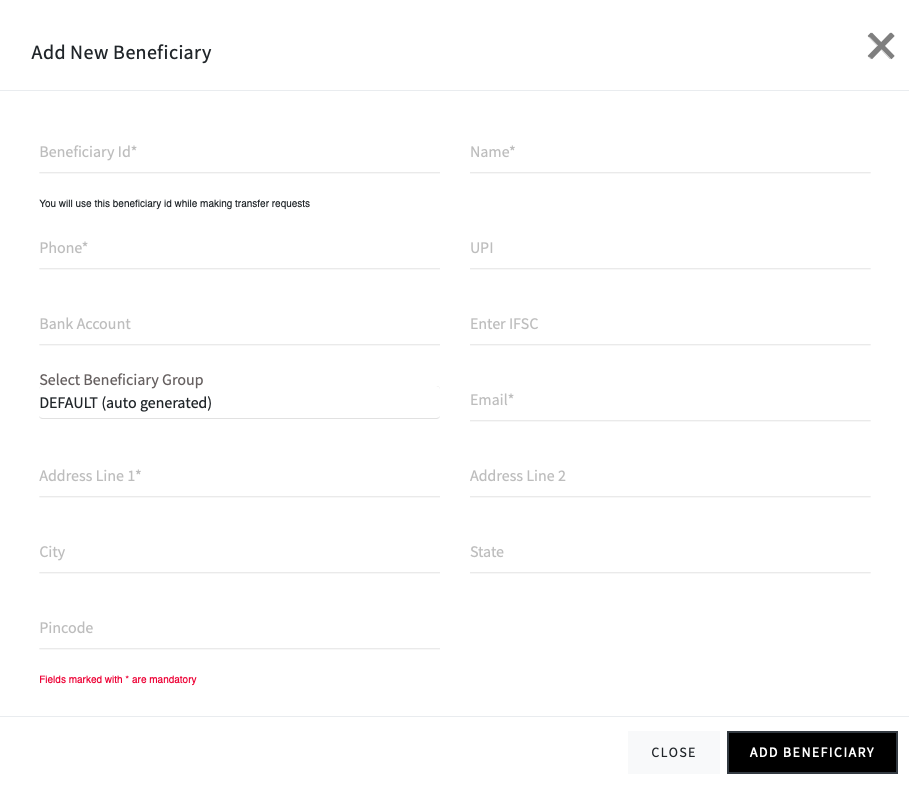
Add Beneficiary
Transfers
Payouts to your vendors, suppliers, employees and others involved in your business can be done instantly with Cashfree Payouts. You need to have a sufficient balance in your account to make a payout.
You can make a payout using the Payout Dashboard or using the APIs. You can also make bulk transfers when you have to make payouts to a large number of customers.
Quick Transfer
Let us see how to make a payout to customers using the Payout Dashboard. Ensure you have sufficient funds in your Payout Recharge Account.
- Add your customer as a beneficiary to whom you want to make a payment.
- Go to Payouts Dashboard > Transfers > click QUICK TRANSFER in the Payout Transfers screen.
- Enter the beneficiary Id, and the amount that you want to transfer, and click NEXT.
- Select the transfer mode. Bank, UPI, and wallet transfers are available. Click SUBMIT.
- Review the transfer details, and click TRANSFER. The specified amount gets credited to the customer account.
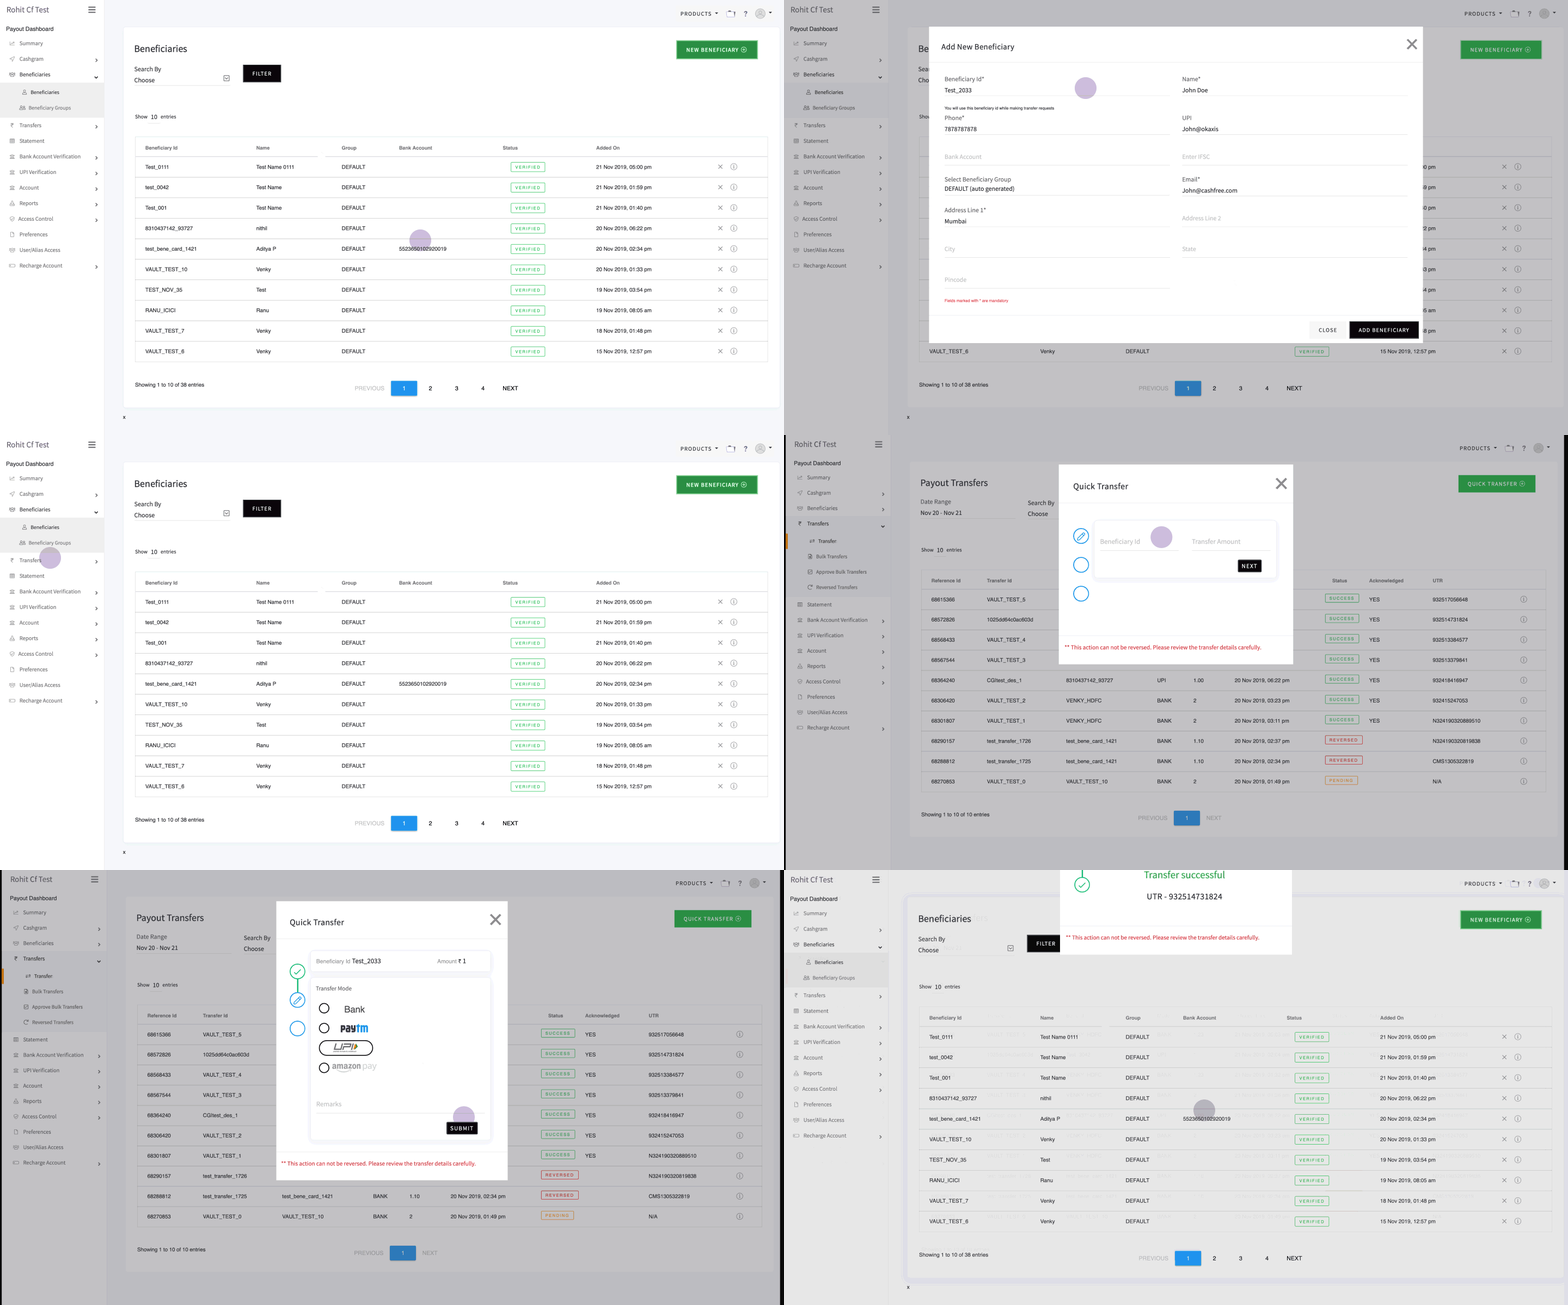
Payouts Workflow
Bulk Transfers
When you have a large number of transfers to make to your customers, you can use the Bulk Transfer feature. You may want an approval from the approver in your company before making the transfer to the customers. An approver can verify and approve the transfer, and then send it to the customers.To do a bulk transfer you need to upload a .csv file that contains the beneficiary details.
You can view the status of the uploaded files and also download to view the details.
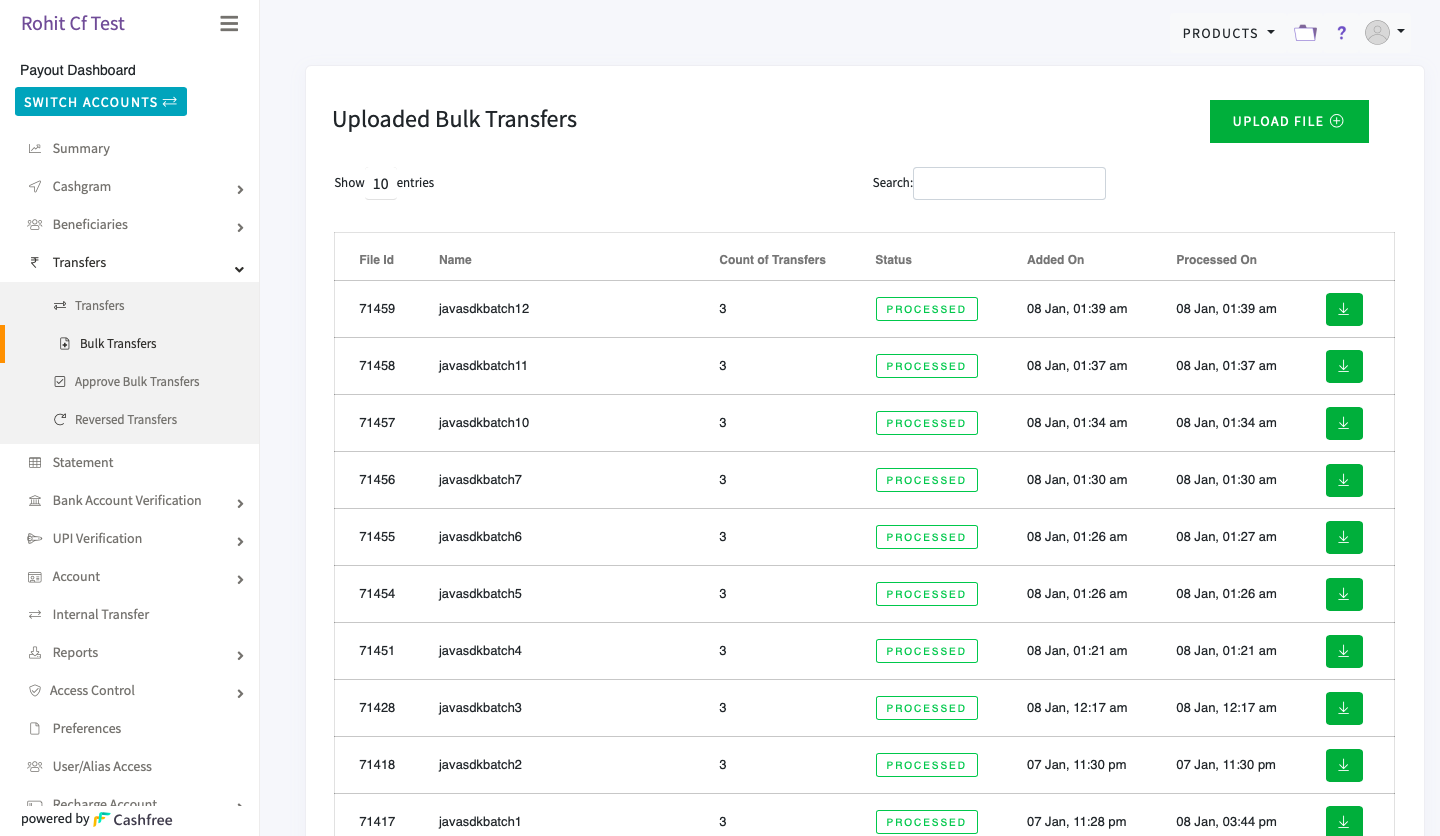
Bulk Transfers
To upload a file for bulk transfer,
- Go to Payouts Dashboard > Transfers > Bulk Transfers > click UPLOAD FILE.
- Select the format in which you have provided the beneficiary details.
- Click CHOOSE FILE to select the file, and click UPLOAD.
If you are yet to add the details to the file, download the sample format, and then fill in the details.
Approval for Bulk Transfers
The approve bulk transfer feature allows you to approve or reject any bulk transfer file for payouts.
To approve the bulk transfers, go to Payout Dashboard > Transfers > Approve Bulk Transfers. You can accept or reject the transfers here.
The option to create multiple users and assign permissions can be done in the Account section.
You can transfer money using the APIs. Click here to know more. Webhooks help you get notifications about your transfer automatically.
Cashfree enables Approve Bulk Transfer feature on request by the merchant. Contact your Account Manager to use this feature.
Reversed Transfers
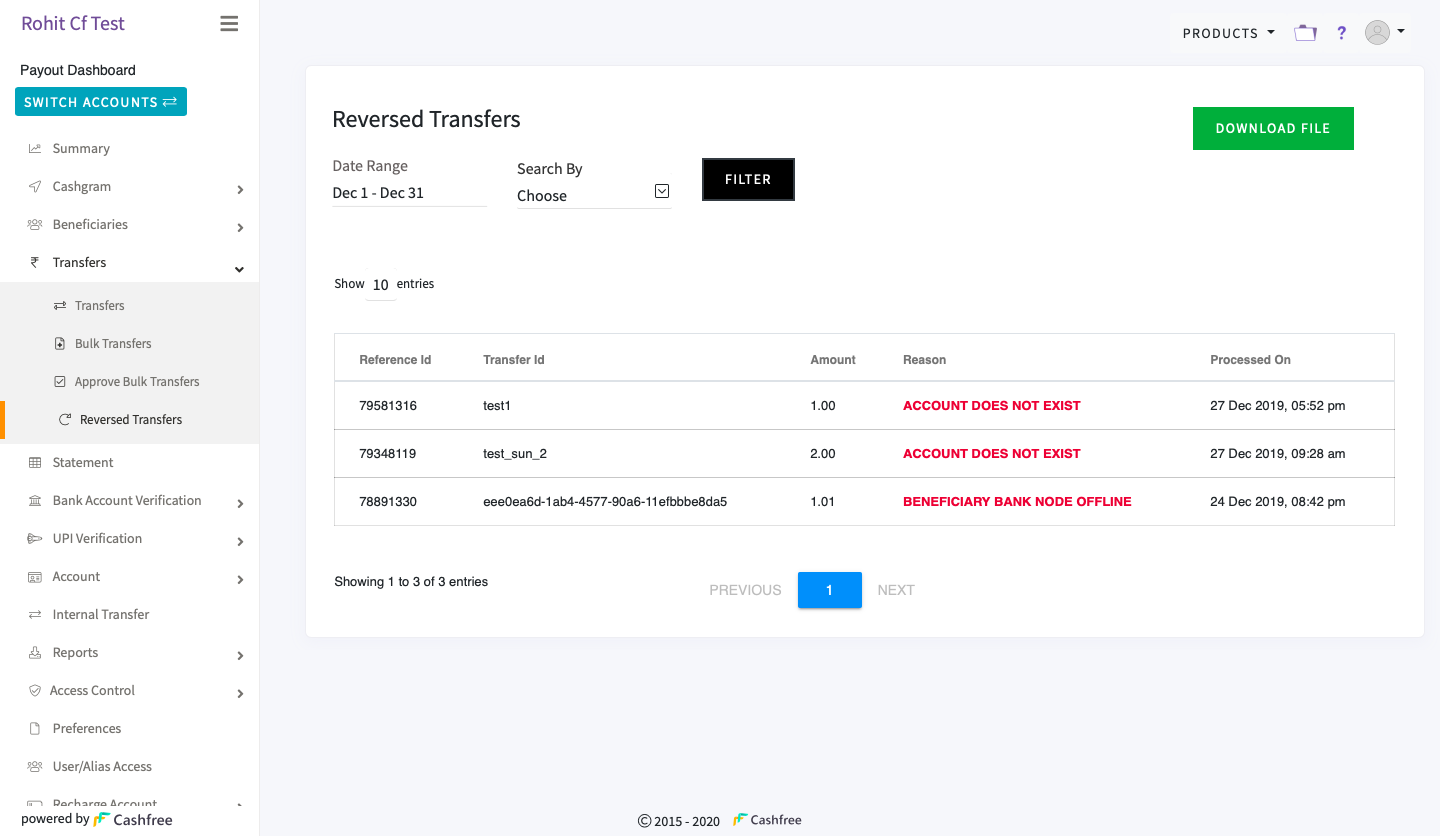
The Reversed Transfers section gives you details of all the transfers that have been reversed by the bank. To view the reversed transfers, go to Payouts Dashboard > Transfers > Reversed Transfers. You can also download all the transfers for further analysis.
Statement
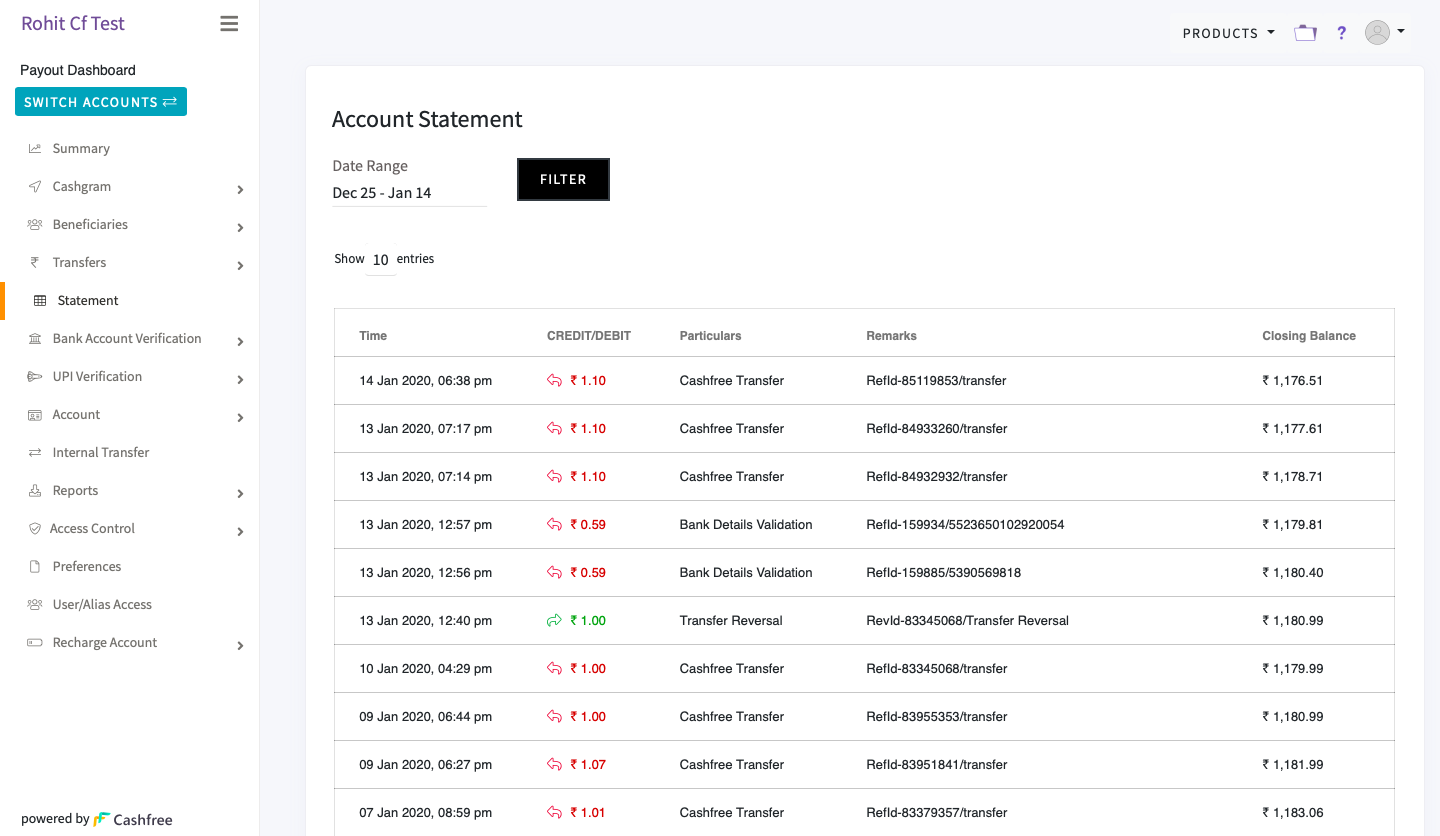
You can view all the transactions made with your Payouts account in the Statement section. To view your account statement, go to Payouts Dashboard > Statement. It includes the Cashfree transfers, account credits, reversals, withdrawals, bank details verification, and transfer between your payout accounts.
Statement
Bank Account Verification
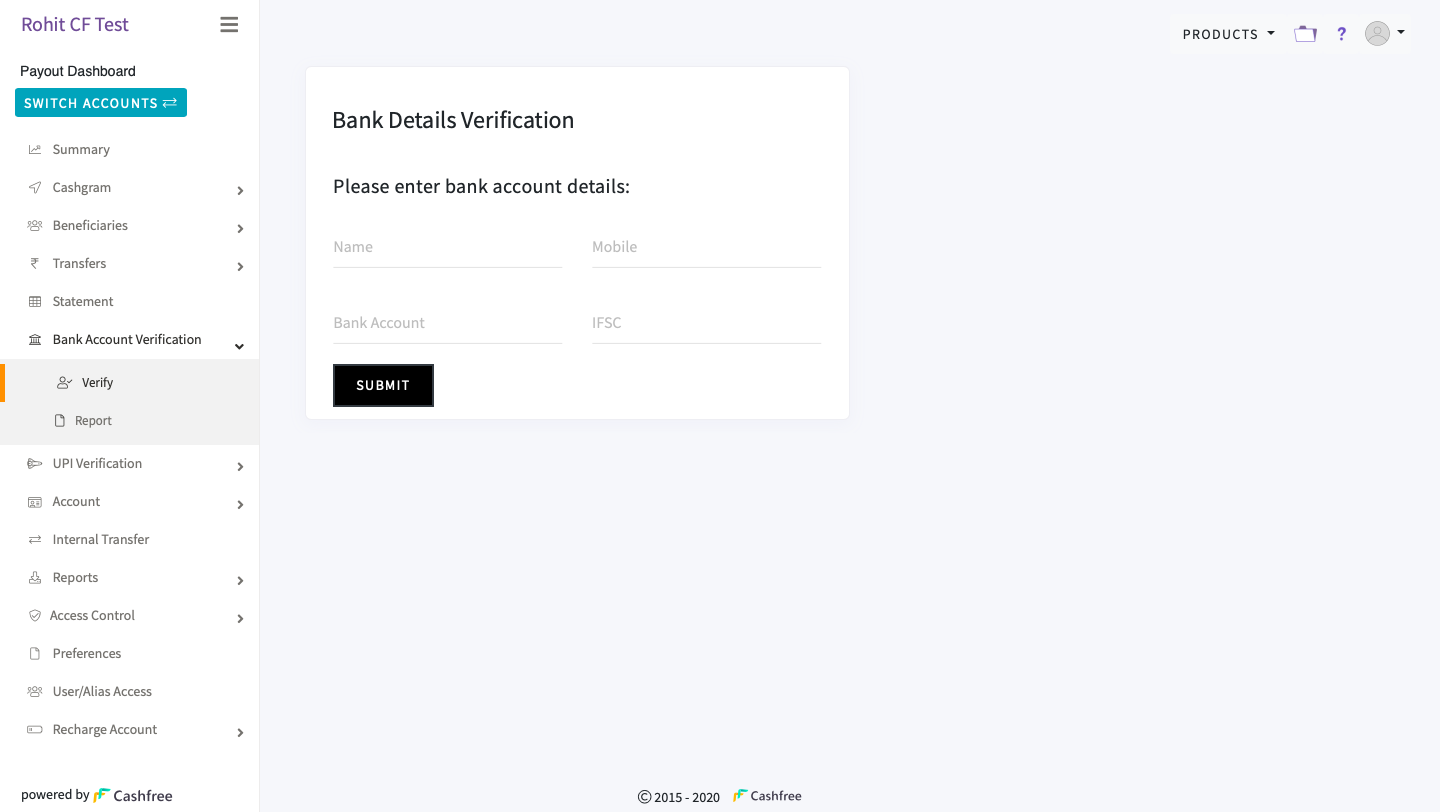
You can verify the bank account details of your beneficiaries before adding them to your payouts account using the Bank Account Verification feature. This helps you in making successful transfers to your beneficiaries.
Bank Account Verification
To verify the beneficiary bank details,
- Go to Payouts Dashboard > Bank Account Verification > Verify.
- Enter the bank account details and click Submit to verify the beneficiary bank details.
Bulk Verification of Bank Accounts
When you have a large number of bank accounts to be verified, you can use the bulk bank account verification feature to verify all the accounts in one go.
To do a bulk bank account verification, you need to upload a .csv file that contains all the details of the bank account which has to be verified.
The details required are:
- Name of the account holder
- Phone number of the account holder
- Bank account number
- IFSC
To upload a file for bulk bank account verification,
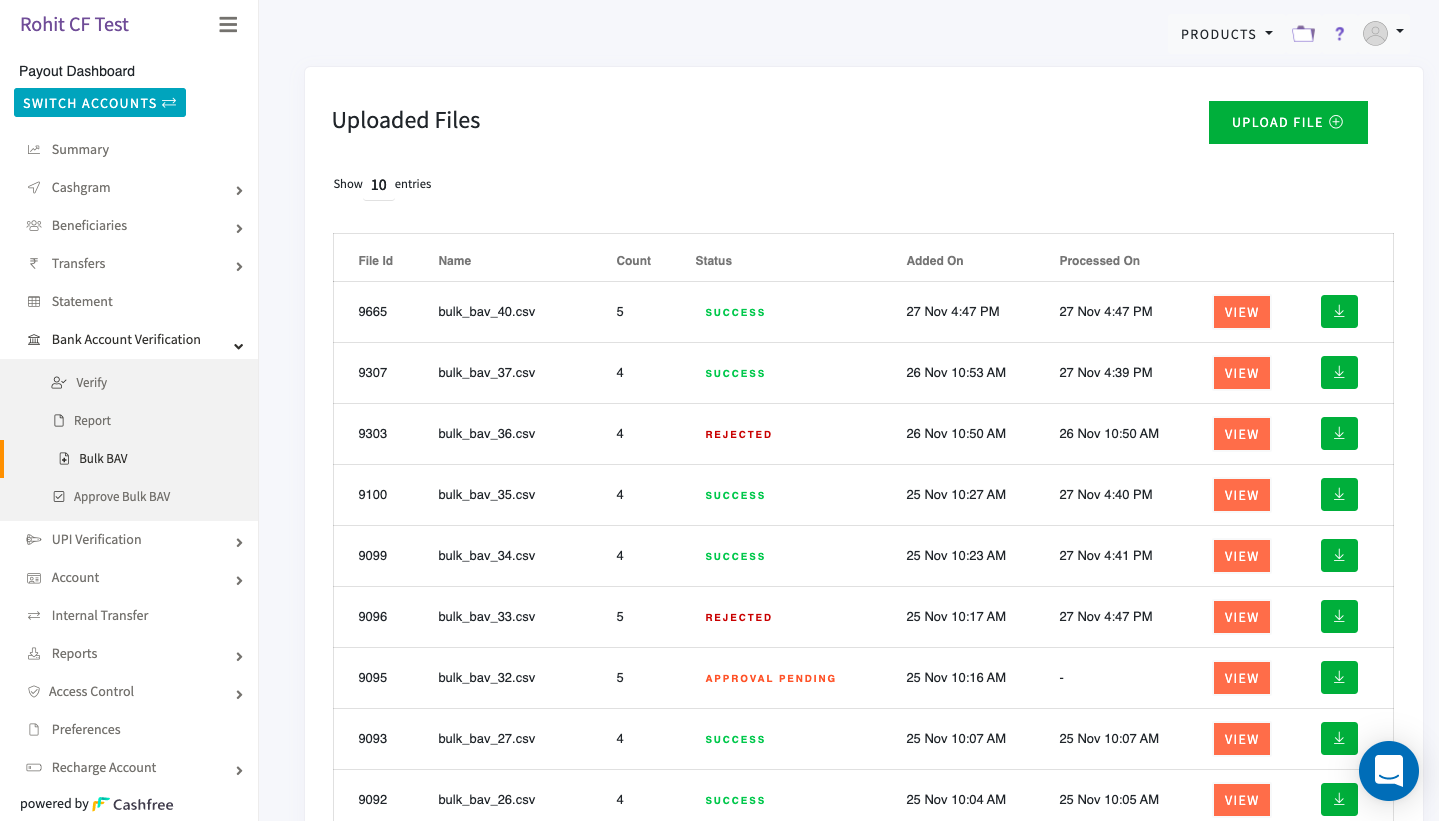
- Go to Payouts Dashboard > Bank Account Verification> Bulk BAV > click UPLOAD FILE.
Download the sample file to see the format in which you have to provide the details. The file will get rejected if the format is incorrect. - Fill in the details and save the file.
- Click CHOOSE FILE to select the file with all the details, and click Upload.
Once the file has been successfully uploaded, you should be able to view it in the Bulk BAV section. You have the option to view each entry added in the file and also download the file. The maximum number of entries allowed per file is 1000. Contact your account manager if you want to add more entries to the file.
Bulk BAV
Approve Flow for Bulk Verification
Cashfree supports a maker-checker flow for uploaded bulk bank verification files. You can have a maximum of 3 approvers for your file. If the approval flow is activated for your account, the bulk BAV file will be visible in the Approve Bulk BAV section. Users who have the required permission can view and approve/reject the file.
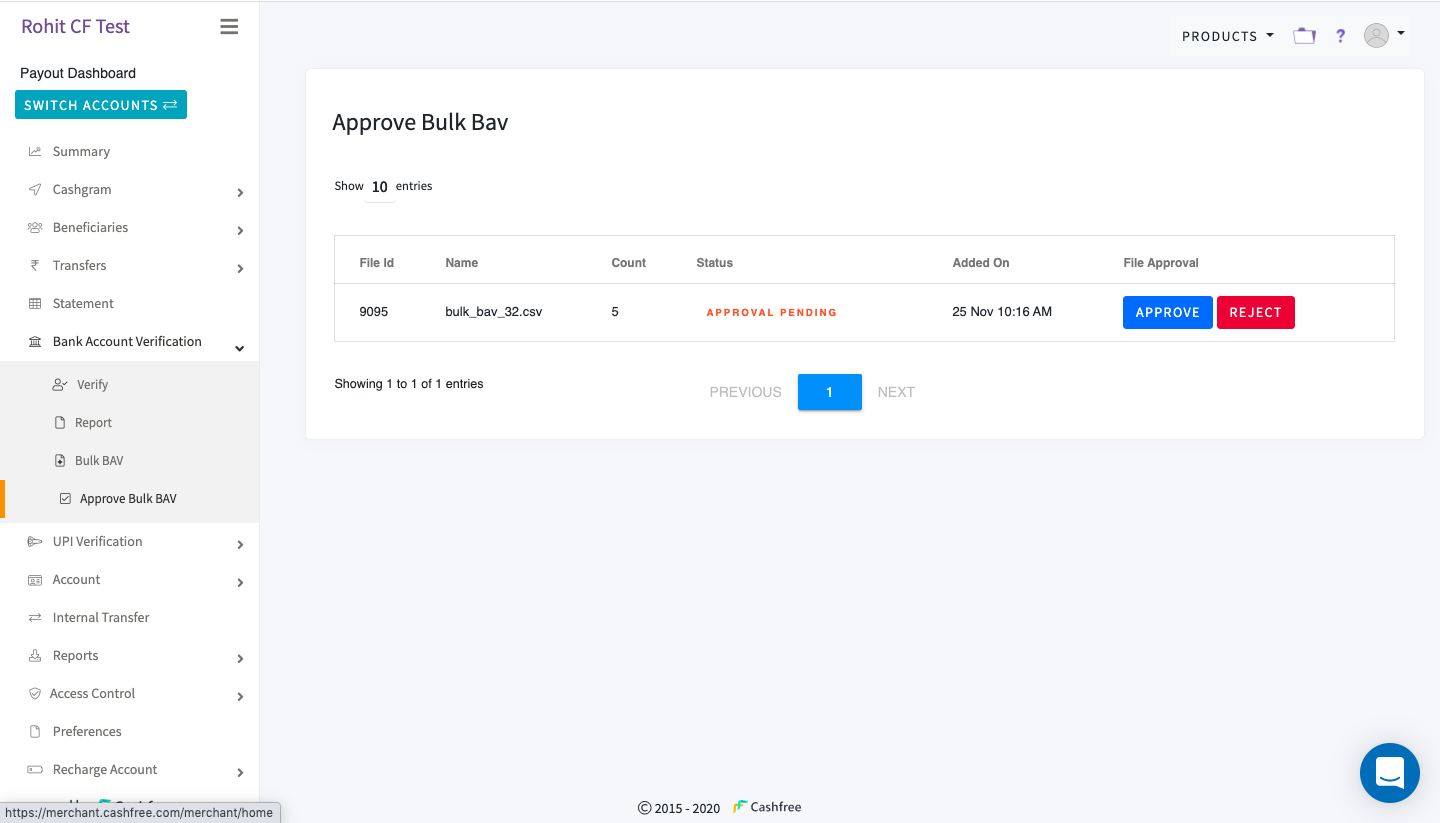
Approve Bulk BAV
The status of all entries in the file will be Approval Pending till the file has been approved.
Once approved, Cashfree will process the file and the results of all the bank verifications will be available in the Bulk BAV section of the dashboard.
Approval flow is not enabled by default. Contact your Account Manager to activate this.
Bank Verification Report
You can view the verified bank account details of the beneficiary in the Bank Verification Report.
To view the verified details,
- Go to the Payouts Dashboard > Bank Account Verification > Report.
- In the Bank Verification Report screen, specify the date for which you want to see the details, and click Download, to download and view the details.
UPI Verification
You can verify the UPI details of your beneficiary before adding them to your payouts account using the UPI Verification feature. This helps you in making successful transfers to your beneficiaries.
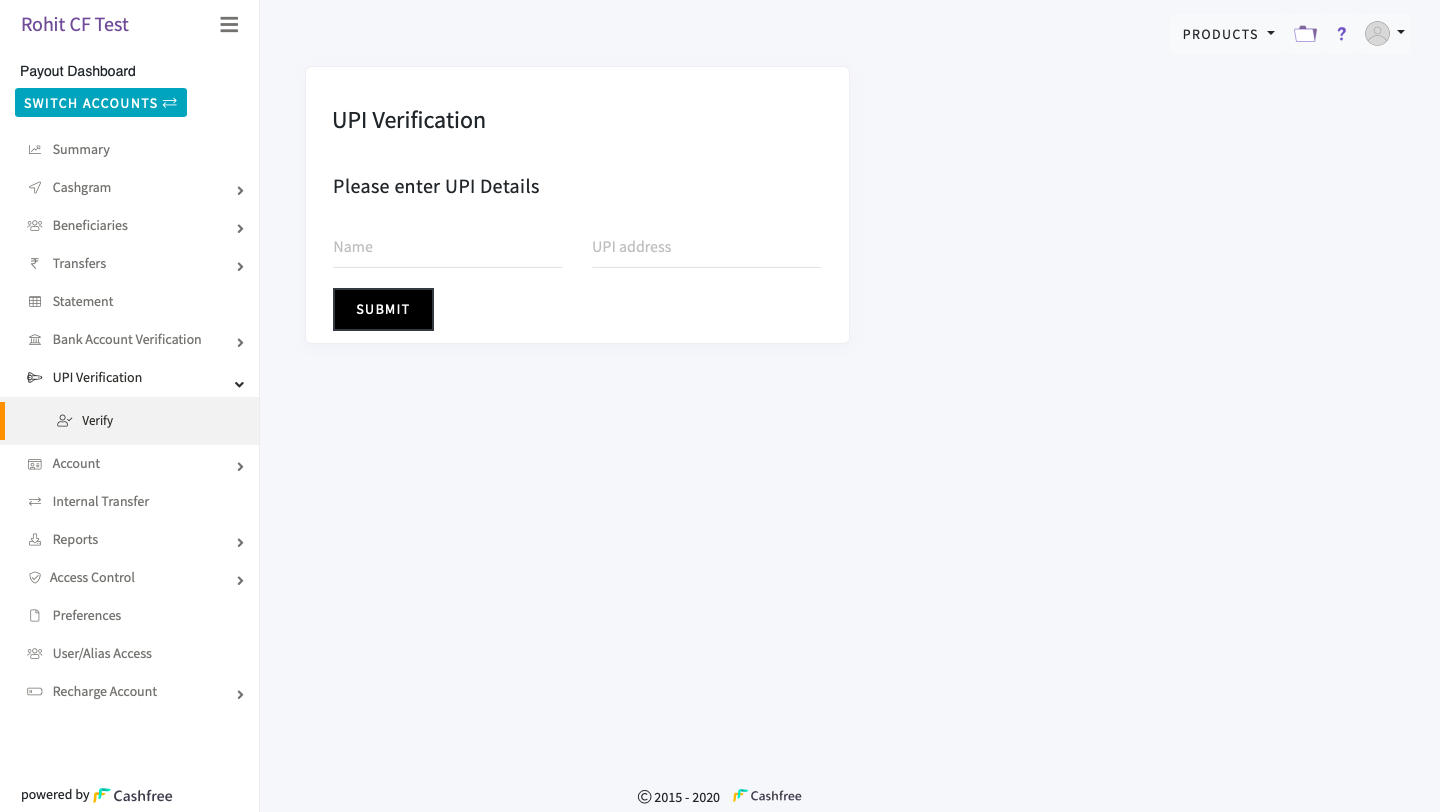
UPI Verification
To verify the beneficiary UPI,
- Go to Payouts Dashboard > UPI Verification > Verify.
- Enter the beneficiary UPI details in the UPI Verification screen, and click Submit to verify the UPI.
Account
You can view your personal details related to the Payouts account and the registered bank details in the Accounts section. You can view the account balance and credit information, and manage some of the actions related to your account.
To view the account details, go to Payouts Dashboard > Account > Basic Info.
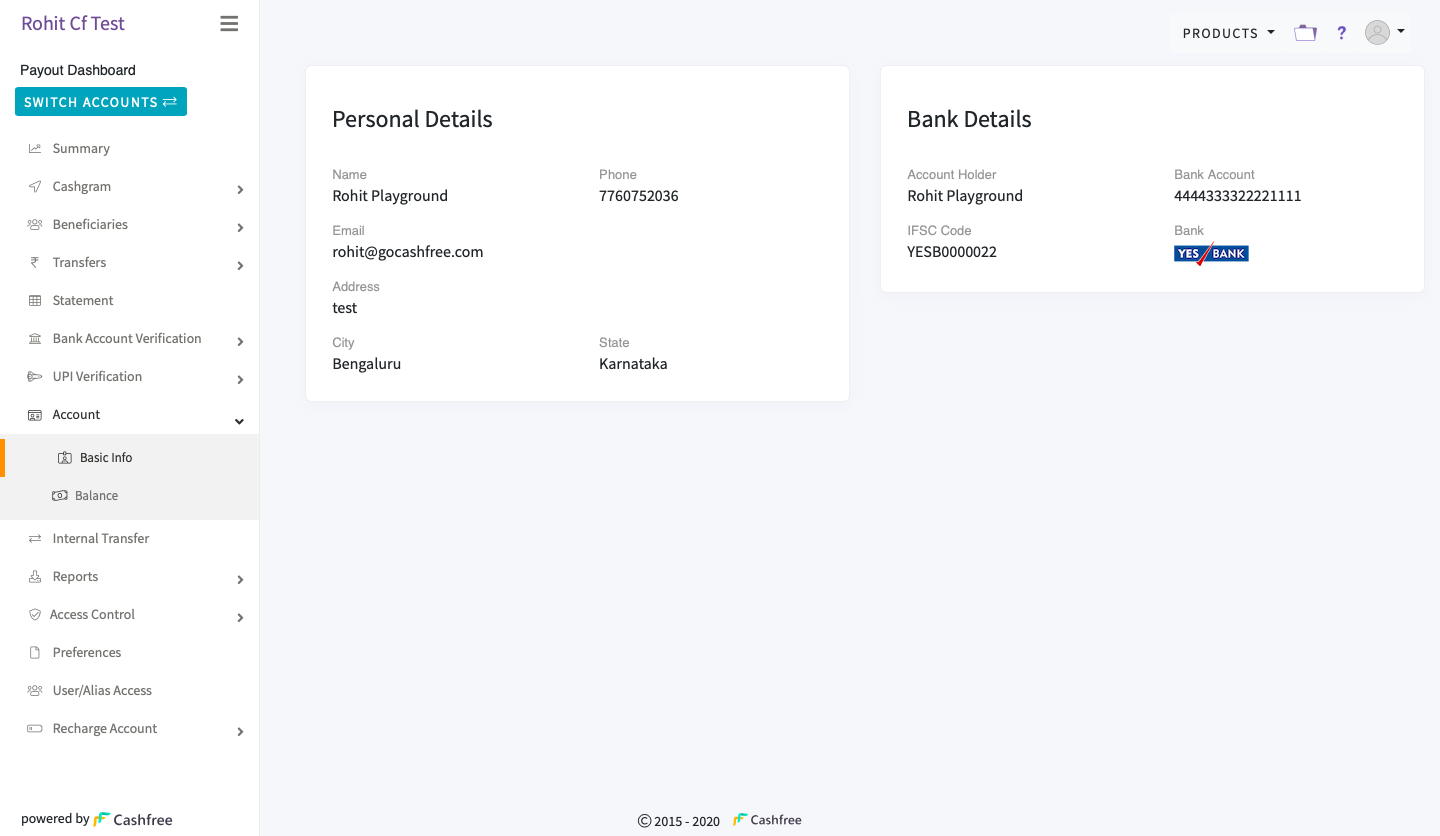
Account - Basic Information
Account Balance
You can keep a check on your payouts account balance and account credit. You can also manage your withdrawals, and set a low balance alert for your Payouts Recharge Account.
To view the balance details, go to Payouts Dashboard > Account > Balance.
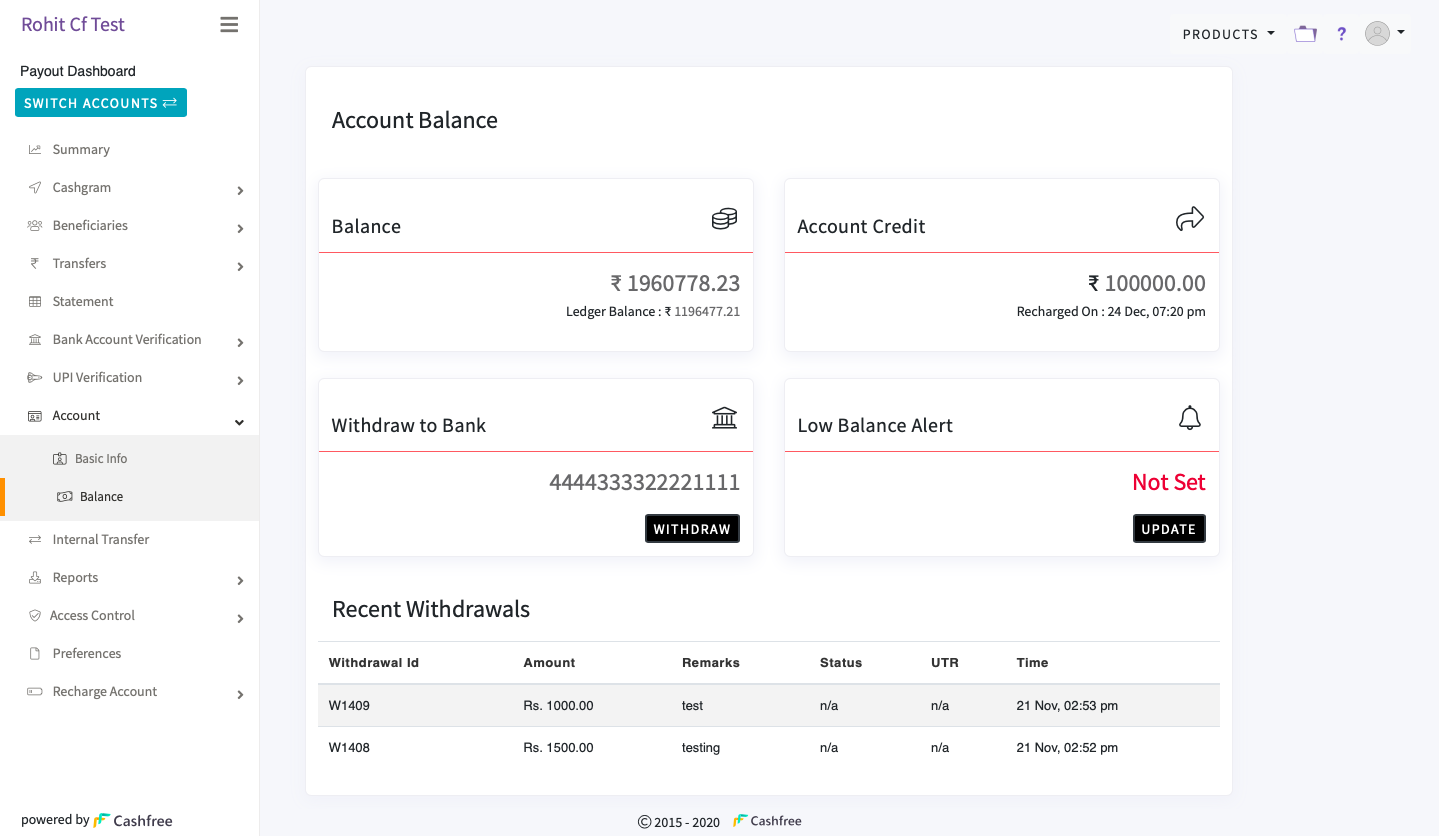
Account Balance
Reports
Monitoring fund flow in the account is important for every business. Cashfree provides various reports that can help you streamline the payment flow of your business. You can access the reports in your payouts dashboard to get a view of the business health either for a day or for a particular date range.
Payouts reports include the following sections:
Transfer Reports
Transfer reports contain all the necessary details of transfers made using your payouts account. It includes transfer statuses, events, beneficiary details, reference numbers, and other financial information related to each transfer.
Generate Transfer Reports
You can generate transfer reports, either for a day or for a particular date range. The maximum permitted date range is 31 days.
To generate the transfer report,
- Go to Payout Dashboard > Reports > Transfers > GENERATE REPORT.
- Select the required date range and click GENERATE.
Sometimes it may take longer than usual to generate the report for a more significant date range.
The report is available for download after it is generated. To download, click the download icon that is available in-line with the generated report.
Summary Reports
Summary reports are detailed statements of all the transactions made using your payouts account. It includes all the credit and debit information, along with the event details and remarks.
To download the summary report,
- Go to Payout Dashboard > Reports > Other Reports.
- In the Summary Report section, select the Report Type as Statement, and select the Date Range.
- Click Download.
Monthly Invoices
Cashfree provides monthly invoices for all the transactions made using your payouts account for that particular month.
Two types of invoices are available for download:
- Payouts invoice: An invoice for all the transfers and the corresponding charges.
- Verification invoice: An invoice for all the bank account verifications and the corresponding charges.
To download the monthly payouts invoice,
- Go to Payout Dashboard > Reports > Other Reports.
- In the Monthly Invoice section, select the month, and select Payout option.
- Click Download.
To download the monthly verification invoice,
- Go to Payout Dashboard > Reports > Other Reports.
- In the Monthly Invoice section, select the month, and select Verification option
- Click Download.
Access Control
Access control feature allows you to,
- Generate new payouts API Keys, and deactivate existing API Keys which are not required.
- Submit an IPv4 address for whitelisting. View and remove added whitelisted IP address, which are not required.
To add or delete API keys and IP addresses, go to Payouts Dashboard> Access Control. Select API Keys or IP Whitelist as per your need.
Reach out to the Cashfree team at [email protected] to approve an added IP for whitelisting.
Preferences
Payout preferences feature allows you to,
- Set email preference for daily reports and transfer notifications.
- Enable or disable transfer initiation email.
- View the current webhook endpoint.
To set your preference, go to Payouts Dashboard > Preferences.
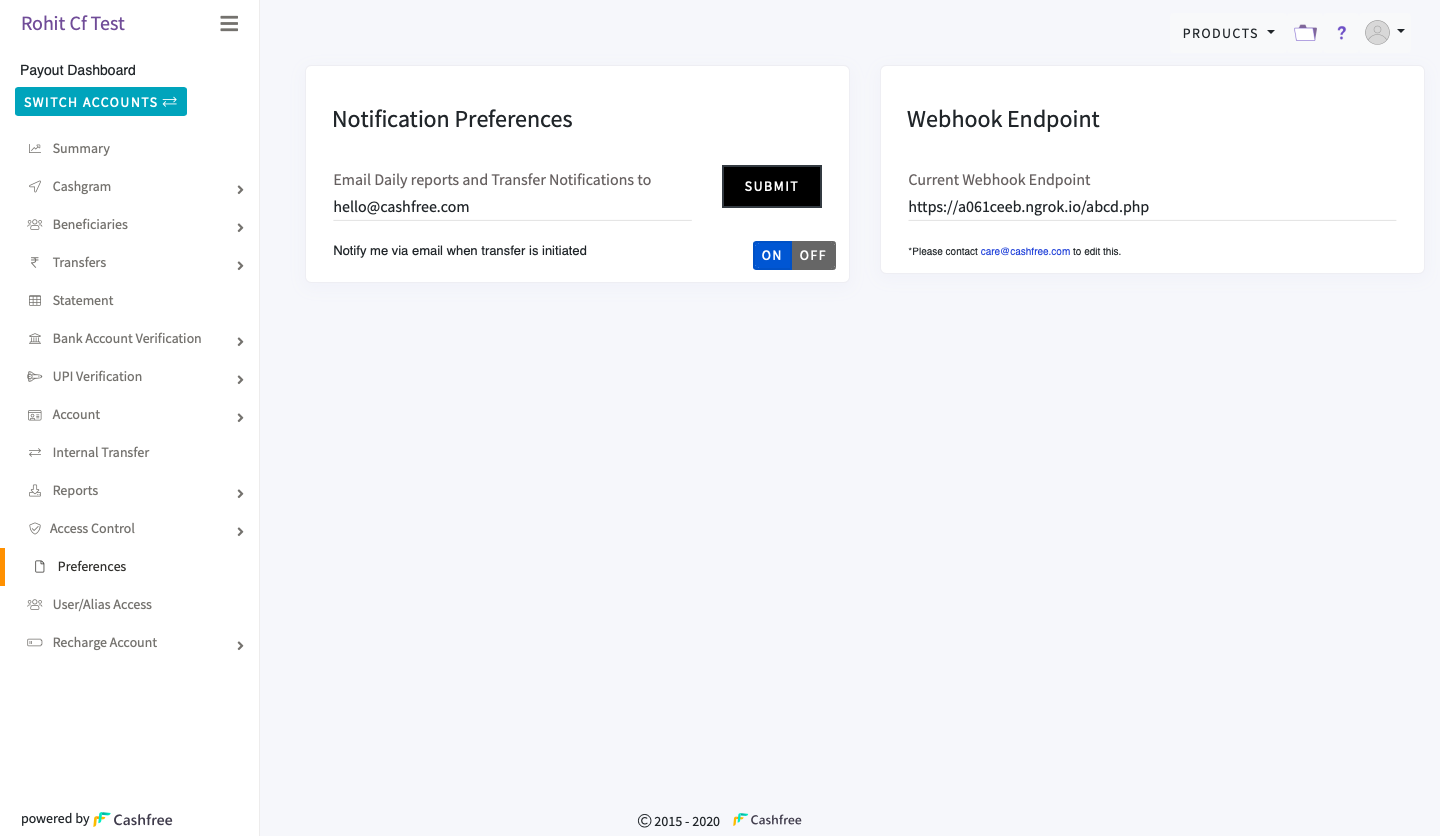
Preferences
User/Alias Access
You can add users and assign permissions based on the requirement and role of the users using the User/Alias Access feature. You can also edit the details and permissions of existing users.
To add/manage users, go to Payouts Dashboard > User/Alias Access.
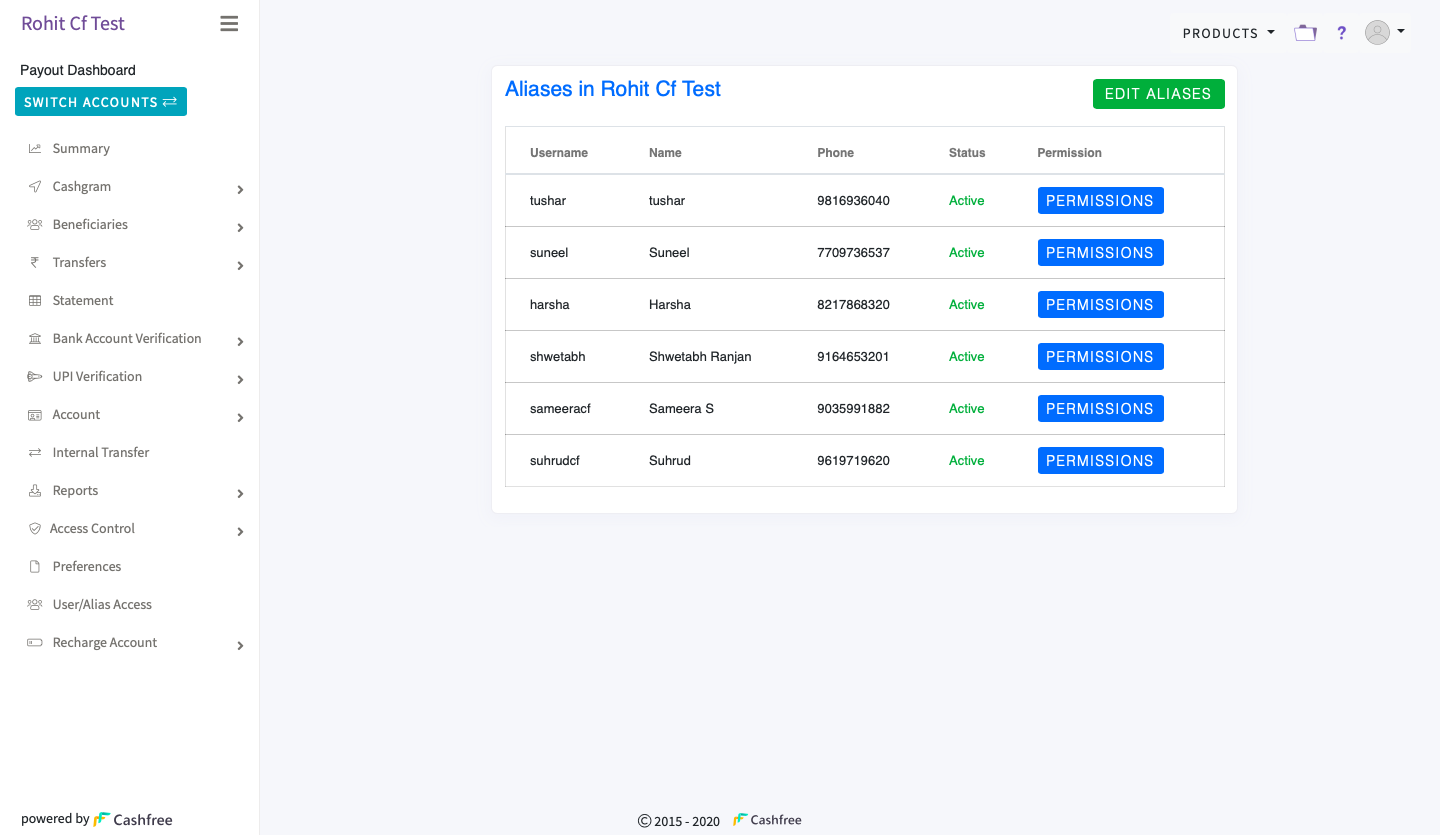
User/Alias Access
Recharge Account
Cashfree creates a Payouts Recharge Account when the merchants complete the registration process with Cashfree. Every merchant gets an account number and an IFSC that is unique to their payouts account. You can view these details in the Recharge Account section in the Payouts Dashboard.
Multiple Accounts
Cashfree supports multiple Payouts Accounts to support your business use cases. For example, if you want to additionally use NEFT payment mode, including the default IMPS mode which is already available, Cashfree will create an additional Payout Account. Write to Cashfree to create additional accounts.
You can manage the payouts from the required account and also make internal transfers from one Payout Account to another. Internal transfers will work when there are sub payout accounts enabled for a particular merchant account. Talk to your account manager or write to [email protected] to know more.
You can switch between the accounts by selecting SWITCH ACCOUNTS in the Payouts Dashboard.
Internal Funds Transfer
You can transfer funds from one Cashfree Payout Account to another using the Internal Transfer option. You will see the Internal Transfer option in the Payouts Dashboard once you have more than one Payouts Account enabled.
Write to Cashfree team at [email protected], if you want to use more than one Payouts Account.
Updated 12 months ago