3.1 Initiate payment - Drop Checkout Flow
Drop flow
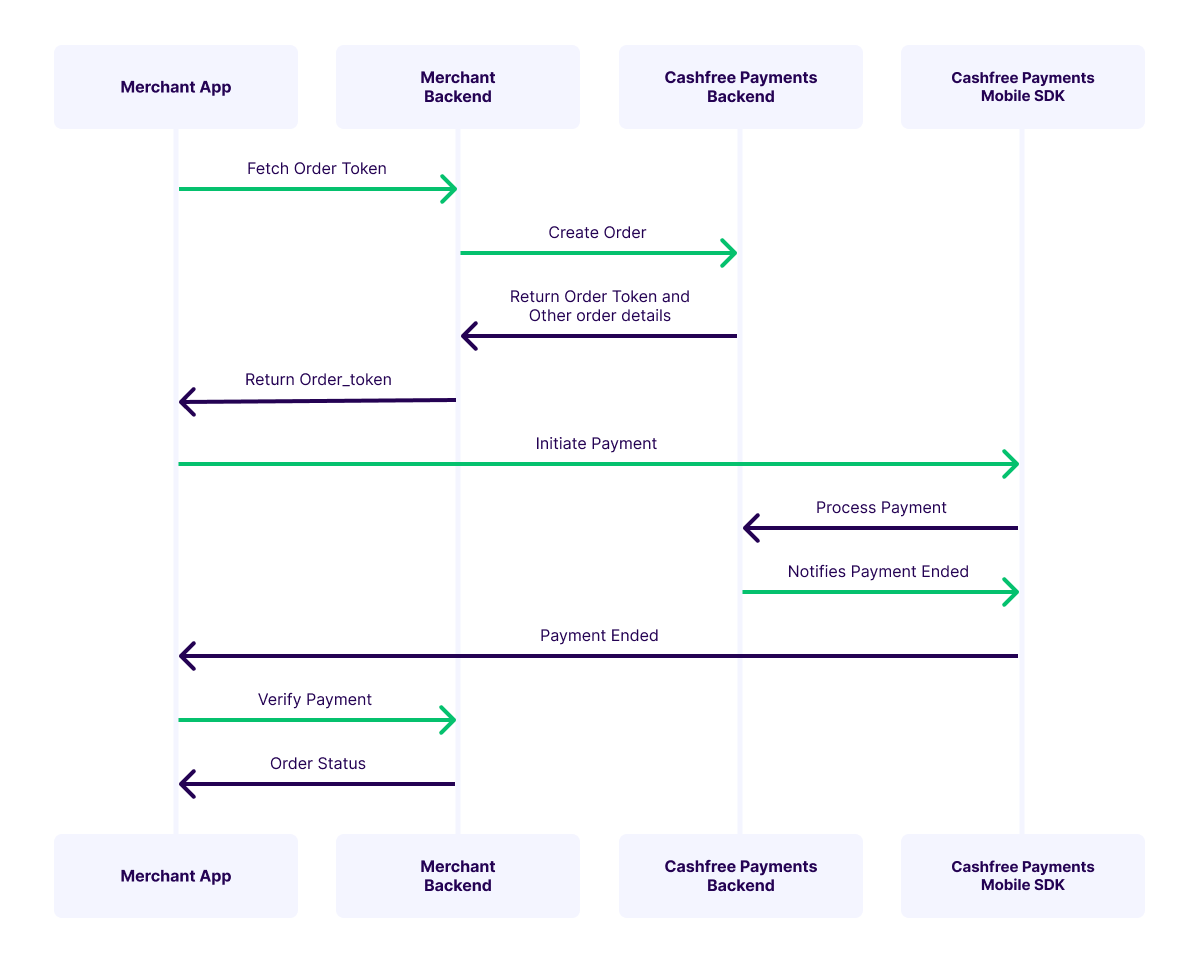
Drop flow is the standard flow for Cashfree payment gateway's iOS SDK. In this flow, SDK provides a pre-built native iOS screen to facilitate a quick integration with our payment gateway. Your customers can fill in the necessary details here and complete the payment.
This mode handles all the business logic and UI Components to make the payment smooth and easy to use. The SDK allows the merchant to customize the UI in terms of color coding, fonts and payment modes shown.

Drop Checkout
Initiating the payment
To initiate the Drop checkout payment in the SDK, follow these steps
- Create a CFSession object.
- Create a CFPaymentComponents object.
- Create a CFTheme object.
- Create a Drop Checkout Payment object.
- Set payment callback.
- Initiate the payment using the payment object created from [step 4]
Create a session
We have released our latest version 2022-09-01 to make our integration more secure for merchants and customers to use. In the this latest version, we have revamped the integration method for using our Drop and Element SDK.
Previous Implementation of creating session with "order_token" (setOrderToken) is deprecated and is replaced by "payment_session_id" (setPaymentSessionId).
The payment_session_id created from Step2 is used to authenticate the payment. The SDK exposes a class CFSession class which accepts the payment_session_id, Environment and order ID values.
Cashfree provides two environments, one being the sandbox environment for developers to test the payment flow and responses and the other being production environment which gets shipped to production. This environment can be set in this session object.
The values for environment can be either .SANDBOX or .PRODUCTION.
do {
     let cfSession = try CFSession.CFSessionBuilder()
                .setEnvironment(.SANDBOX)
                .setPaymentSessionId("payment_session_id")
                .setOrderId("order_Id")
                .build()
   } catch let e {
     let error = e as! CashfreeError
     print(error.localizedDescription)
   }
Payment Components
The Cashfree Payments Drop checkout allows the merchant to control the payment modes shown to their customer using the payment component parameter.
let paymentComponent = try CFPaymentComponent.CFPaymentComponentBuilder()
                        .enableComponents(["order-details", "card", "upi", "wallet", "netbanking", "emi", "paylater"])
                        .build()
The enableComponents() method takes in an array of string and the order in which the merchant sends the components is honoured. If this method is not called, by default all the payment modes are enabled.
For UPI Intent method, the UPI apps installed on the device will be fetched only if the permissions are added in the info.plist file. For more details, click here.
Set a Theme
let theme = try CFTheme.CFThemeBuilder()
                        .setNavigationBarBackgroundColor("#C3C3C3")
                        .setNavigationBarTextColor("#FFFFFF")
                        .setButtonBackgroundColor("#FF0000")
                        .setButtonTextColor("#FFFFFF")
                        .setPrimaryFont("Futura")
                        .setSecondaryFont("Menlo")
                        .build()
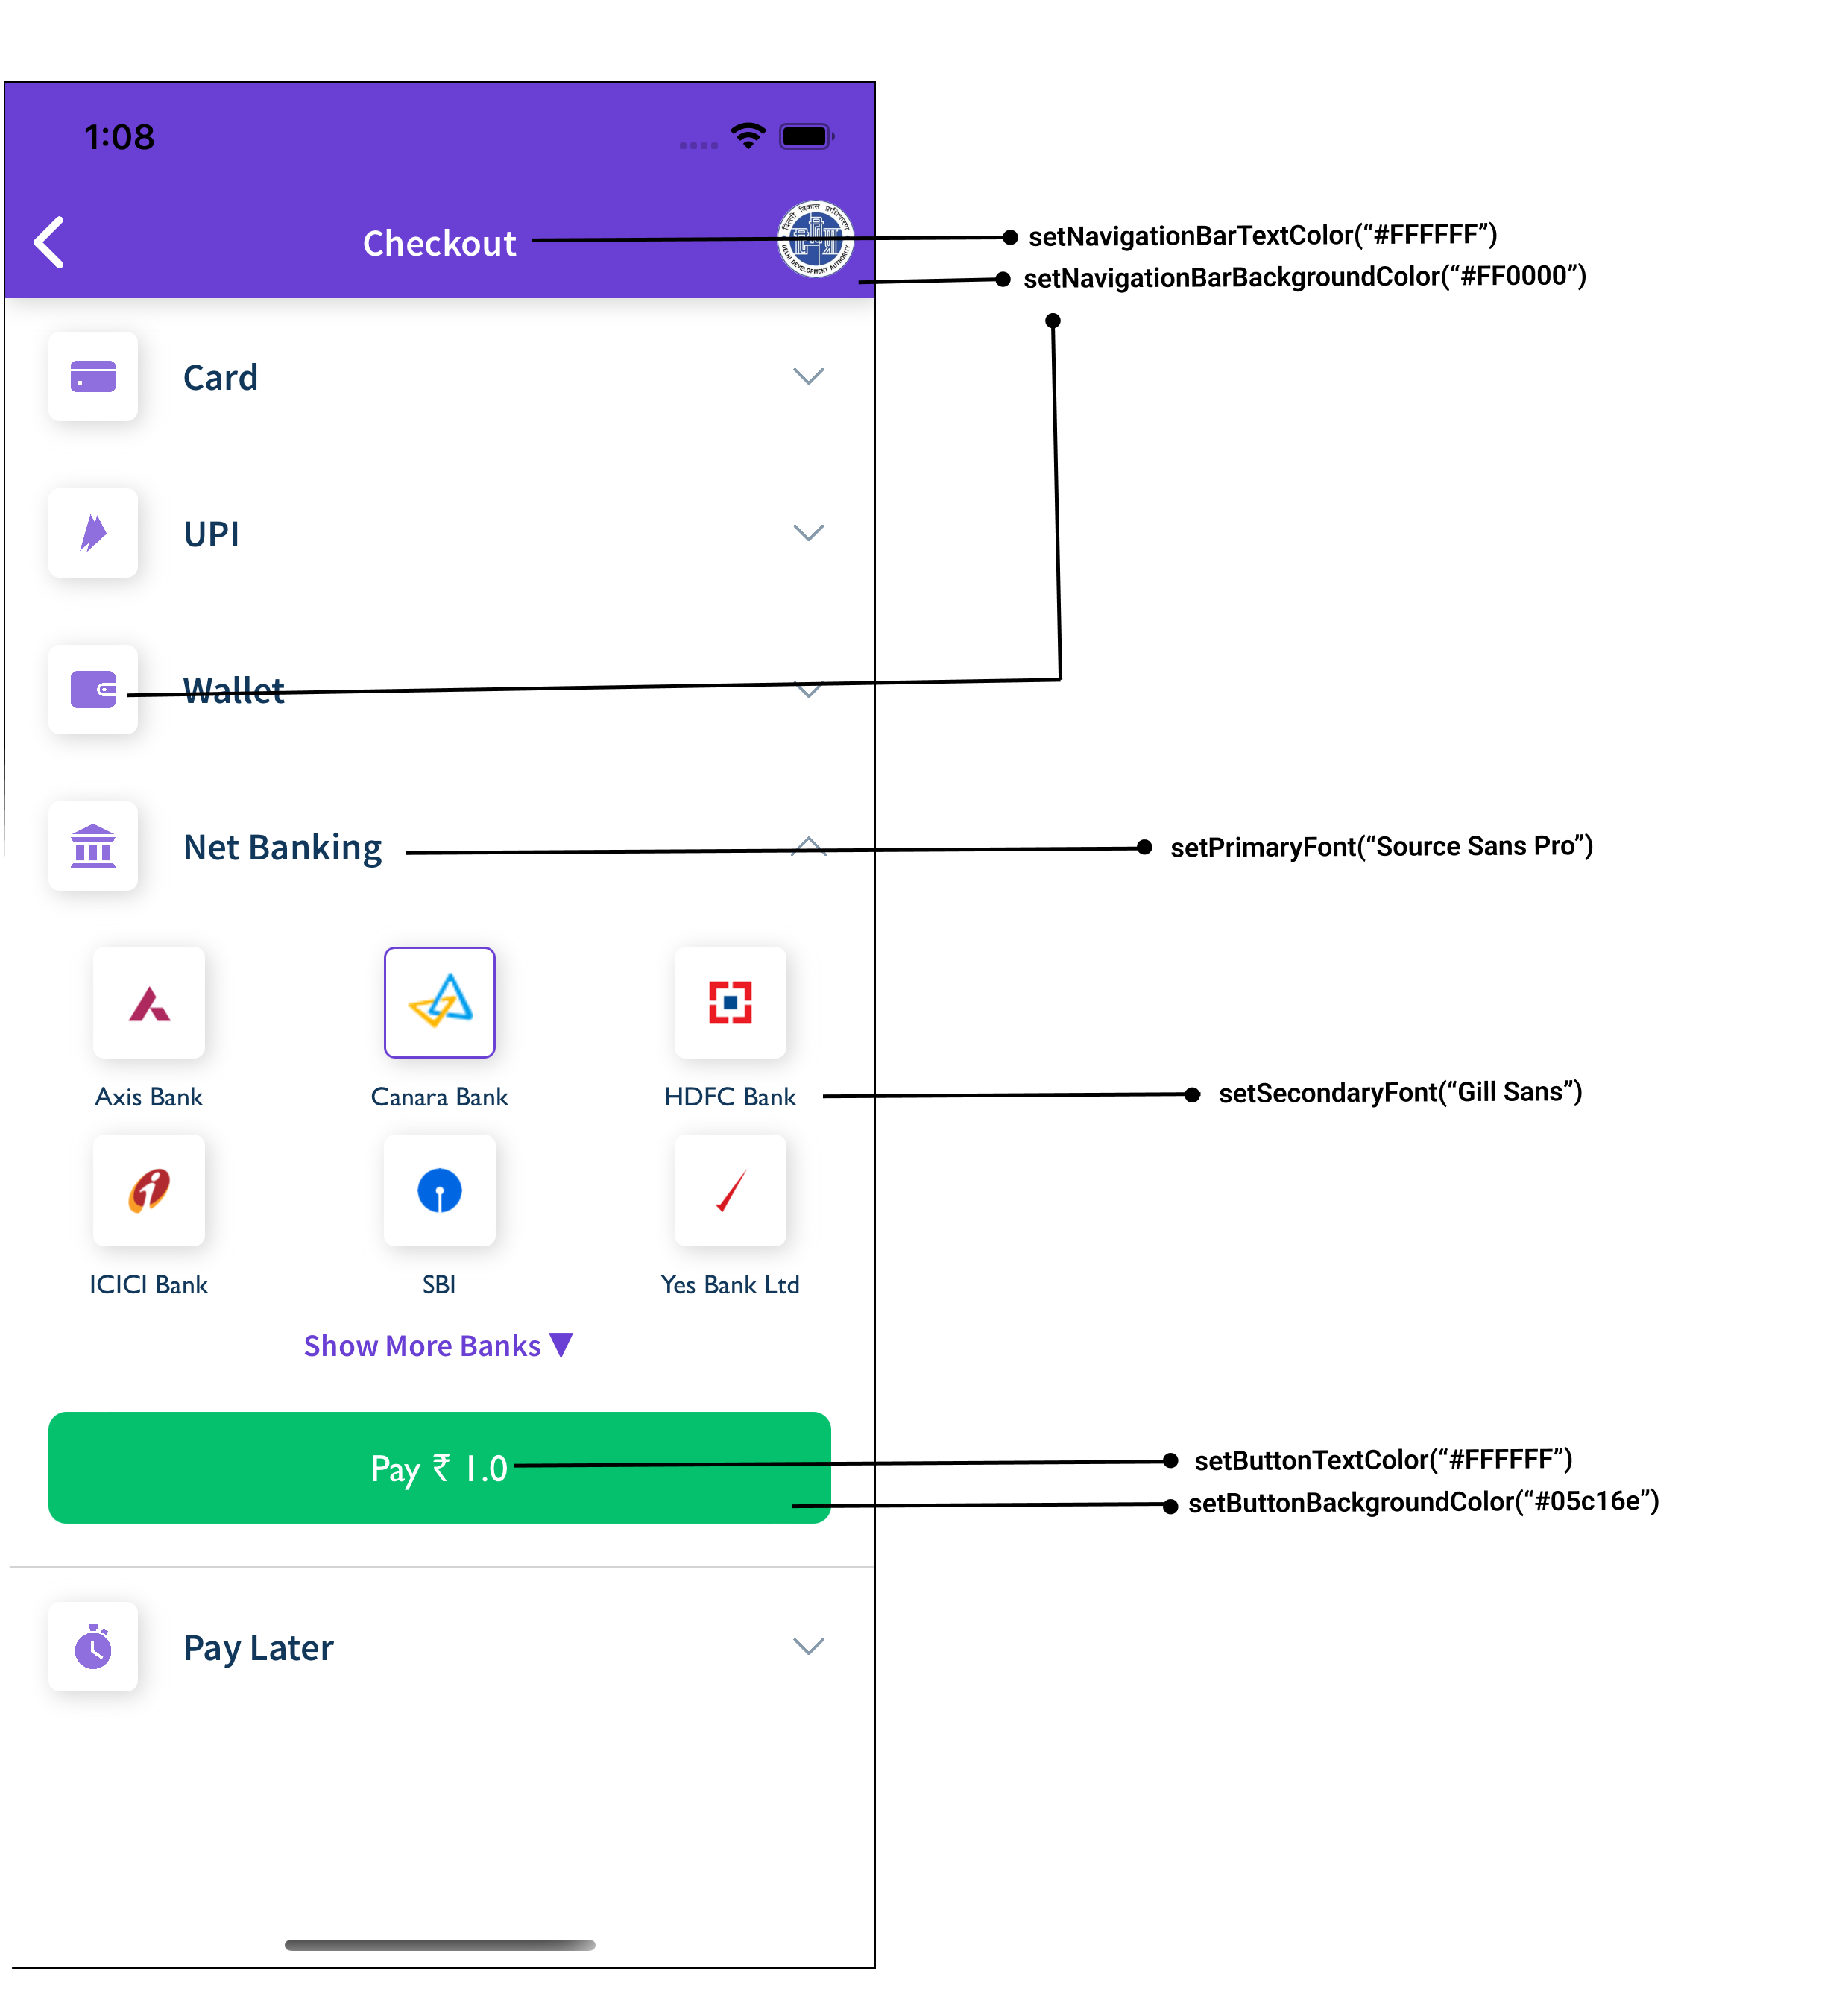
The CFThemeBuilder class used to create CFTheme used to set the theming for Drop checkout screen.

Theme options
Create a Drop Checkout Payment object
- Code Snippet to create a payment object for Drop Checkout (pre-built UI SDK)
do {
       let payment = try CFDropCheckoutPayment.CFDropCheckoutPaymentBuilder()
                        .setSession(session)
                        .setComponent(paymentComponent)
                        .setTheme(theme)
                        .build()
    } catch let e {
      let error = e as! CashfreeError
      print(error.localizedDescription)
    }
If payment component object is not provided then all the payment modes that are enabled for the merchant account is shown.
Setup payment callback
The SDK exposes a protocol CFResponseDelegate which the class has to conform to. It comes with 2 functions; one of them informs the user to verify the payment and the other informs the user that there was an error while trying to make payment.
@objc func onError(_ error: CFErrorResponse, order_id: String)@objc func verifyPayment(order_id: String)
- Code snippet demonstrating it's usage:
class YourViewController: CFResponseDelegate {

    func onError(_ error: CFErrorResponse, order_id: String) {
        print(error.message)
    }

    func verifyPayment(order_id: String) {
        print(order_id)
    }

}
You can now subscribe to Cashfree generated events for analytics
The
CFResponseDelegatehas an optional delegate method which can be implemented to start receiving events.public func receivedEvent(event_name: String, meta_data: Dictionary<String, Any>) { print(event_name) }
Initiate Payment
- Finally to initiate the payment, the above created Payment Object has to be sent to the SDK.
- The SDK exposes a class
CFPaymentGatewayService, which can be used to set the Payment Object and initiate the payment. - The below code snippet is an example demonstrating it's usage:
let gatewayService = CFPaymentGatewayService.getInstance()

override func viewDidLoad() {
  // We recommend that the callback be set separately in the viewDidLoad as well
  gatewayService.setCallback(self)
}


do {
   gatewayService.setCallback(self)
   try gatewayService.doPayment(payment: dropCheckoutPayment, viewController: self)
} catch let e {
  let error = e as! CashfreeError
  print(error.localizedDescription)
}
Sample Code
import Foundation
import UIKit
import CashfreePGCoreSDK
import CashfreePGUISDK
import CashfreePG

class MyViewController: UIViewController {

    private let cfPaymentGatewayService = CFPaymentGatewayService.getInstance()

    override func viewDidLoad() {
        self.cfPaymentGatewayService.setCallback(self)
    }

    private func getSession() -> CFSession? {
        do {
            let session = try CFSession.CFSessionBuilder()
                .setEnvironment(.SANDBOX)
                .setOrderID("order_id")
                .setPaymentSessionId("payment_session_id")
                .build()
            return session
        } catch let e {
            let error = e as! CashfreeError
            print(error.localizedDescription)
            // Handle errors here
        }
        return nil
    }

    @IBAction func invokeNativeiOSSDK(_ sender: Any) {
        if let session = self.getSession() {
            do {

                // Set Components
                let paymentComponents = try CFPaymentComponent.CFPaymentComponentBuilder()
                    .enableComponents([
                        "order-details",
                        "card",
                        "paylater",
                        "wallet",
                        "emi",
                        "netbanking",
                        "upi"
                    ])
                    .build()

                // Set Theme
                let theme = try CFTheme.CFThemeBuilder()
                    .setPrimaryFont("Source Sans Pro")
                    .setSecondaryFont("Gill Sans")
                    .setButtonTextColor("#FFFFFF")
                    .setButtonBackgroundColor("#FF0000")
                    .setNavigationBarTextColor("#FFFFFF")
                    .setNavigationBarBackgroundColor("#FF0000")
                    .setPrimaryTextColor("#FF0000")
                    .setSecondaryTextColor("#FF0000")
                    .build()

                // Native payment
                let nativePayment = try CFDropCheckoutPayment.CFDropCheckoutPaymentBuilder()
                    .setSession(session)
                    .setTheme(theme)
                    .setComponent(paymentComponents)
                    .build()

                // Invoke SDK
                try self.cfPaymentGatewayService.doPayment(nativePayment, viewController: self)


            } catch let e {
                let error = e as! CashfreeError
                print(error.localizedDescription)
                // Handle errors here
            }
        }
    }

}

extension MyViewController: CFResponseDelegate {

    func onError(_ error: CFErrorResponse, order_id: String) {
        print(error.message)
    }

    func verifyPayment(order_id: String) {
        // Verify The Payment here
    }

}
Initiate payment in test/prod environment
To initiate payment in SDK, CFSession object needs to be created as explained in detail above.
To create test transaction use test API keys in Create Order step and for live transaction in prod, use prod API keys while creating the order and then use that payment_session_id received in response to initiate the payment.
This environment also needs to be set in this session object as (Sandbox/Production).
Verify Payment
As a best practise you should always verify the payment status from your backend. Refer here for details steps on how to verify payment.
Updated about 1 year ago